10. Manage Asset Instances
The user can view/edit an individual Asset Instance version by clicking the Asset Instance name from the:
- Browse Asset Instance grid
- Search results grid
- Relationships tree of another Asset Instance
- Reverse Relationships tab of another Asset Instance
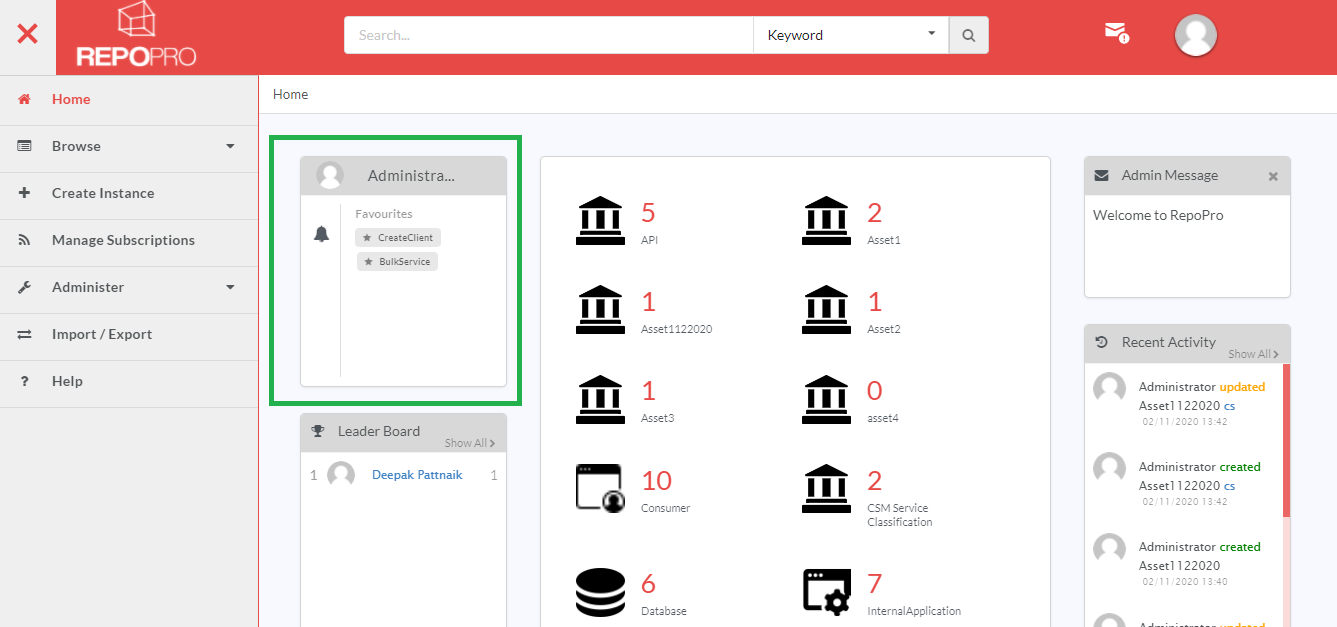
- Favourites widget (if it has been marked as a Favourite)
10.1. Add Asset Instances
The Add Instance Module in RepoPro allows the user to add Asset Instances to an Asset through the Browse <Asset> Instance screen. The View/Edit Asset Instance screen allows the user to update the Asset Name, add/edit Tags, Property Values, Forward and Reverse Relationships, Taxonomies, Versions, Comments, and view and compare Revision History.
There are two ways you can navigate to the Create New Instance page:
- from the main Navigation menu option called Create Instance, or
- from the Browse > By Asset Type menu option
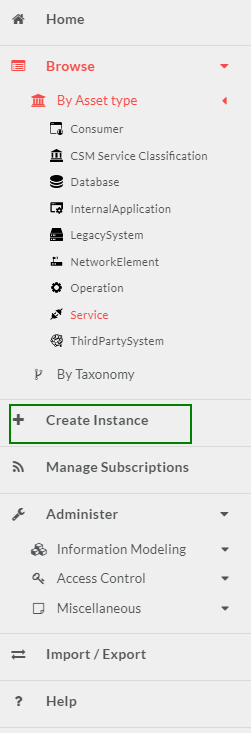
To navigate to the Create new Instance screen from the Create Instance menu option:
Note
The Create Instance menu option, like the Browse By Asset Type option, allows creation of Instances for Asset Types as per access permission settings.
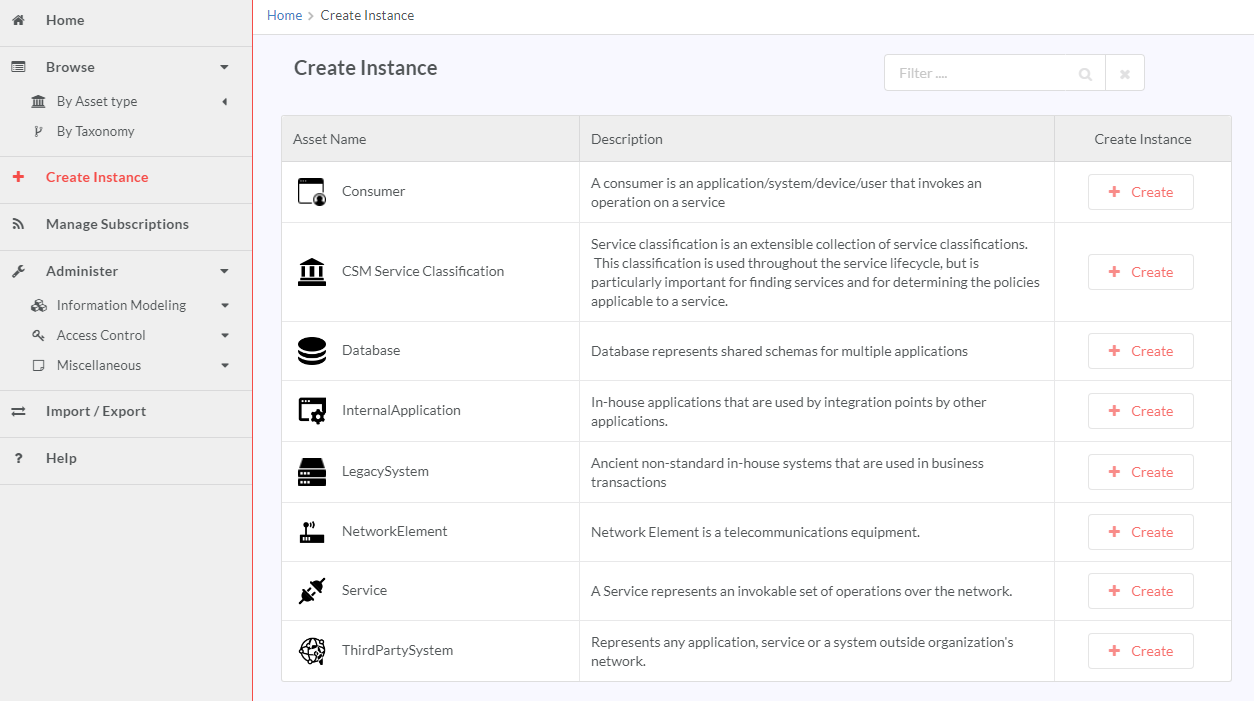
In the main Navigation menu, click Create Instance.
The Create Instance grid screen displays with a list of all Asset Types.
The Create Instance screen provides an infinite scroll view. While scrolling downward, a scroll icon appears. Click the scroll icon
 to be re-directed to the top of the screen.
In the row that has the Asset Type for which you wish to create an instance, in the column Create Instance, click Create.
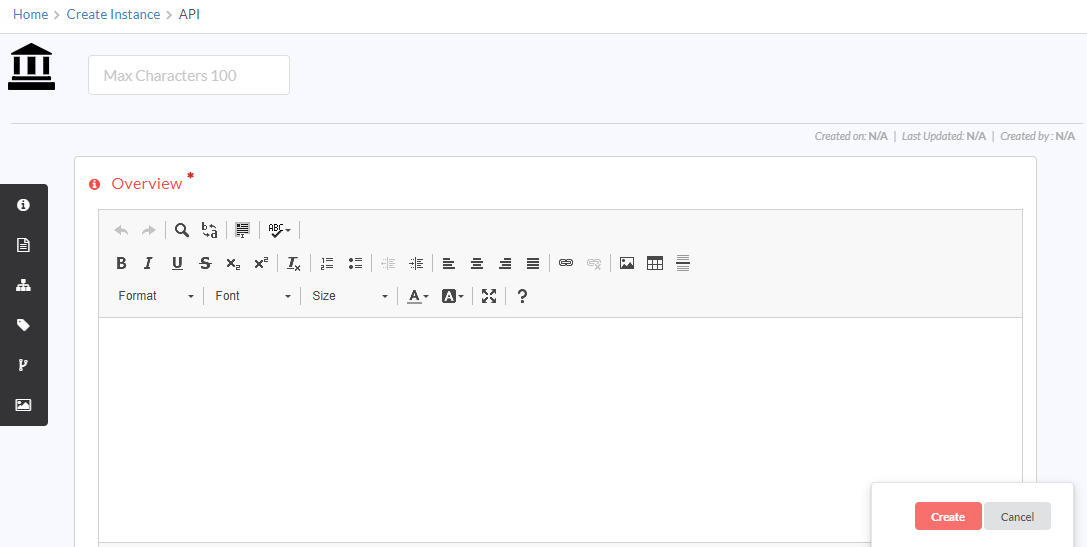
The create New Instance screen displays.
To navigate to the Create new Instance screen from the Browse by Asset Type menu option:
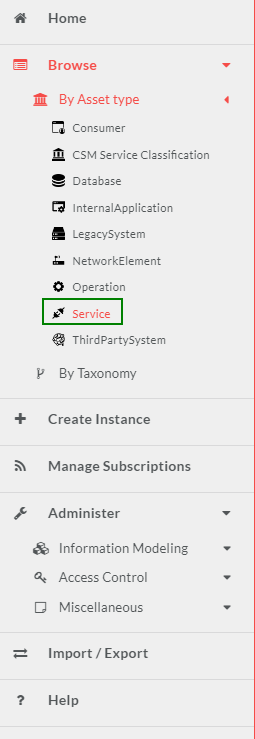
In the main Navigation menu, click Browse > By Asset Type.
A list of all Assets displays in a sub-menu below.
The list contains only those Assets for which the user can create Asset Instances as per the Asset-level Access settings.
If the user does not have Add Instance rights for an Asset, a notification displays to the effect. For more information on Asset-level settings, refer: Authentication.
Note
For those Asset Types that are at the destination of a Composition or Aggregation relation, new Instances can only be created from the source Asset’s View/Edit Asset Instance screen.
For more on Composition and Aggregation relations, refer the topic: Asset Relationships.
In the Assets sub-menu, click to select the Asset for which you wish to add an Asset Instance.
The Browse <Asset> Instances screen displays with all the Asset Instances created under the selected Asset.
Hover over the hamburger menu to display an Action menu.
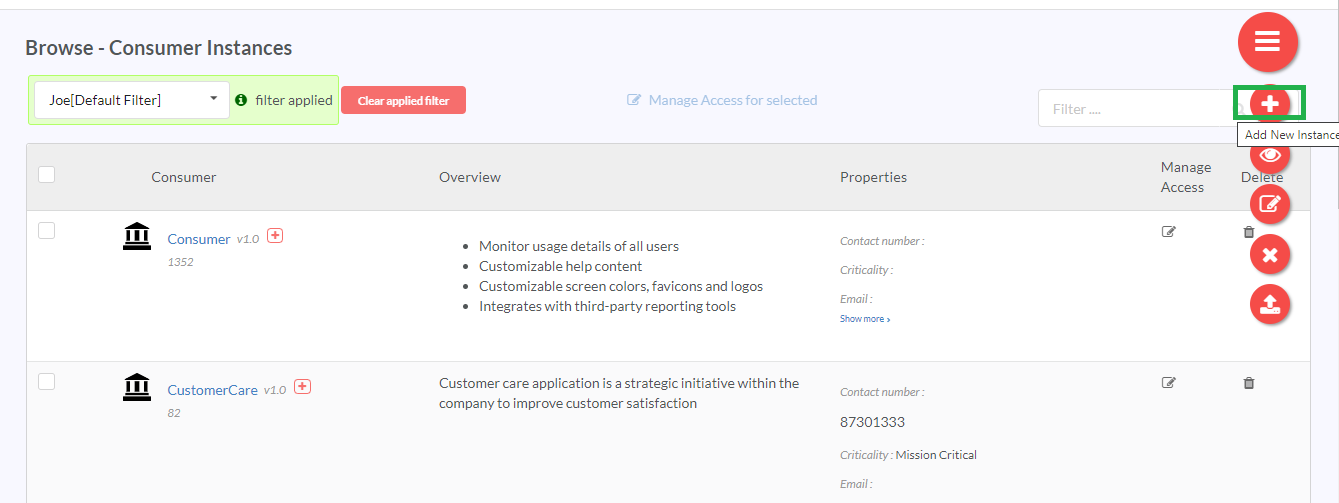
In the Action menu, click the Add icon (
 ) to display the Create New Instance screen.
To add an Asset instance to the selected Asset Type:
Note
The Version name for the newly created Asset Instance defaults to 1.0 for versionable Assets, and can be edited later, if required.
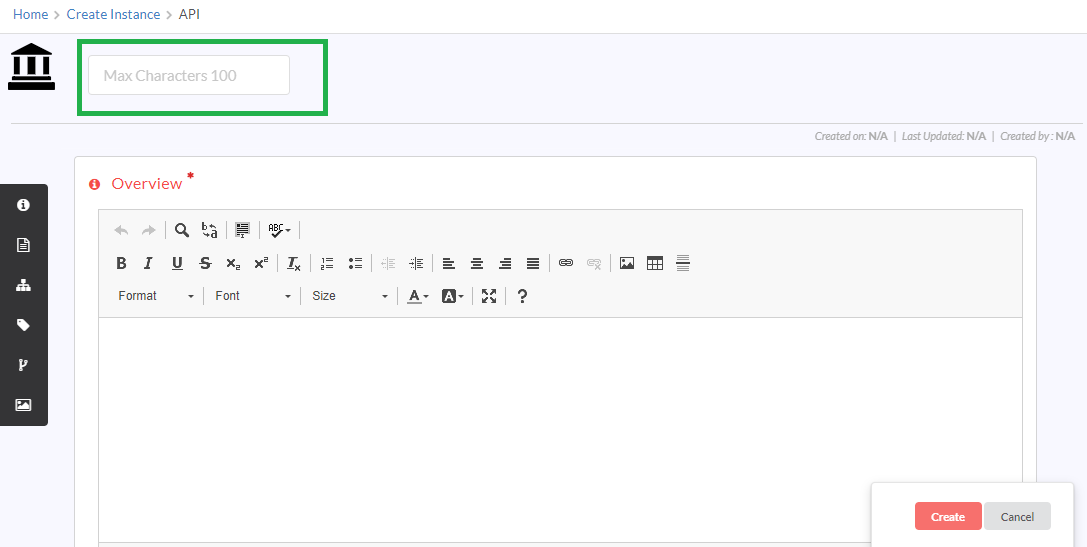
In the Asset Instance name box, type a name for the Instance.
An Asset Instance name can take the following characters: alphabetic, numeric, space, underscore, hyphen, comma, at the rate symbol, dot, parentheses characters only, forward slash, back slash, ampersand, hash, plus, dollar, colon, single quote, double quote, accented characters (Latin 1 character set) with a maximum 100 characters.
In the Overview rich-text editor box, type a description for the Asset Instance. The Overview text editor box allows a maximum of up to 50000 characters. Use the formatting options available in the rich-text editor interface to make changes to the text or upload an image. Refer Upload an image section under Admin Message.
In the Properties section, add values to all the Parameters that are mandatory. Follow instructions in Assign Property Values to the Asset Instance to add Parameter values.
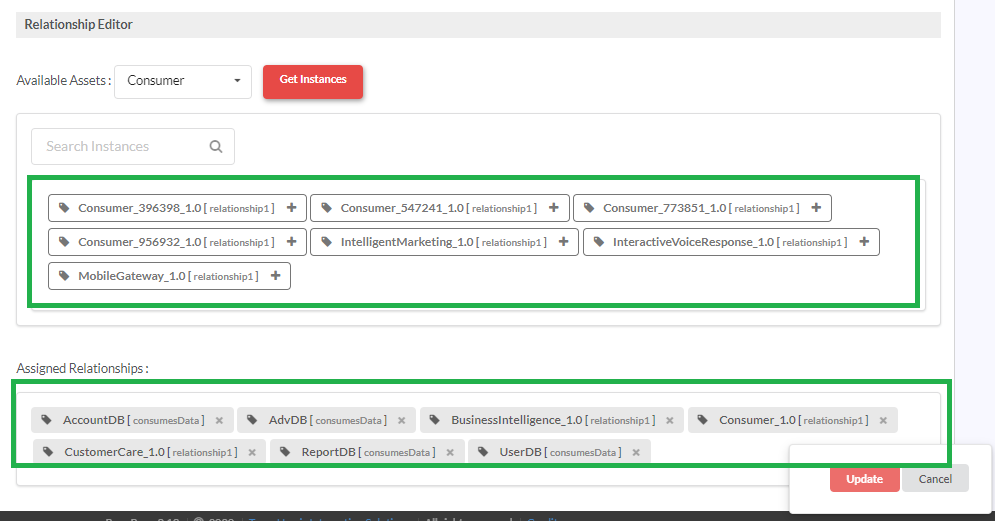
In the Relationships section, in the Available Assets drop-down, select the Asset Type that has the Instances to be assigned to the Relationship. The box below displays a list of available Instances for the selected Asset.
Note
Users can assign instances to only Association and Classification Relationship Types from here.
Type the name of the Instance in a predictive Search Instances search box to zero down to the Instance to add.
Click to select the Instance and assign it to the Relationship. The Asset Instance now displays in the Assigned Relationships box.
In the Tags section, assign tags to the Asset Instance. Follow the instructions in Assign Tags to Asset Instances to assign Tags.
In the Taxonomies section, assign taxonomies to the Asset Instance. Follow the instructions in Assign Tags to Asset Instances to assign Taxonomies.
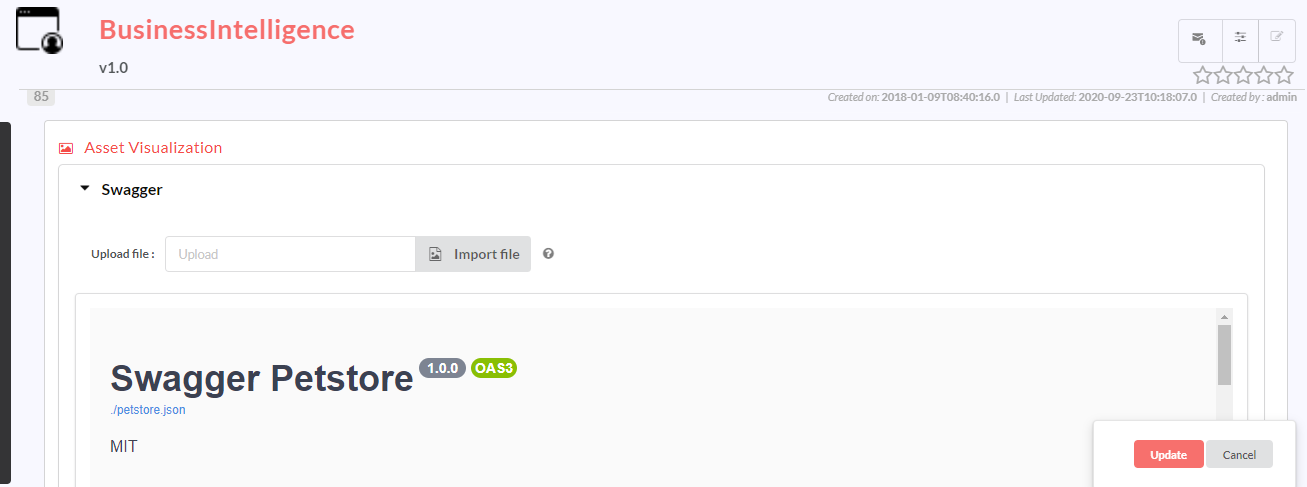
In the Asset Visualization section, click Import File to upload/reupload the file having json/yaml extension.
Once the Asset Instance is created, the user can then go ahead and edit other Instance details as instructed in View Edit Asset Instance, which includes:
- Add Reviews and Ratings, and Subscribe to the Instance
- Participate in discussions by posting comments
- Check and compare Revision changes of the Asset Instances
- Compare two versions of the Asset Instance
The user who creates an Asset Instance and adds a new Asset Instance Version gets 5 points for the Gamification calculations. To learn more about Gamification, refer: Gamification.
Note
It is mandatory to add the Instance name, Overview and all mandatory parameter values.
Note
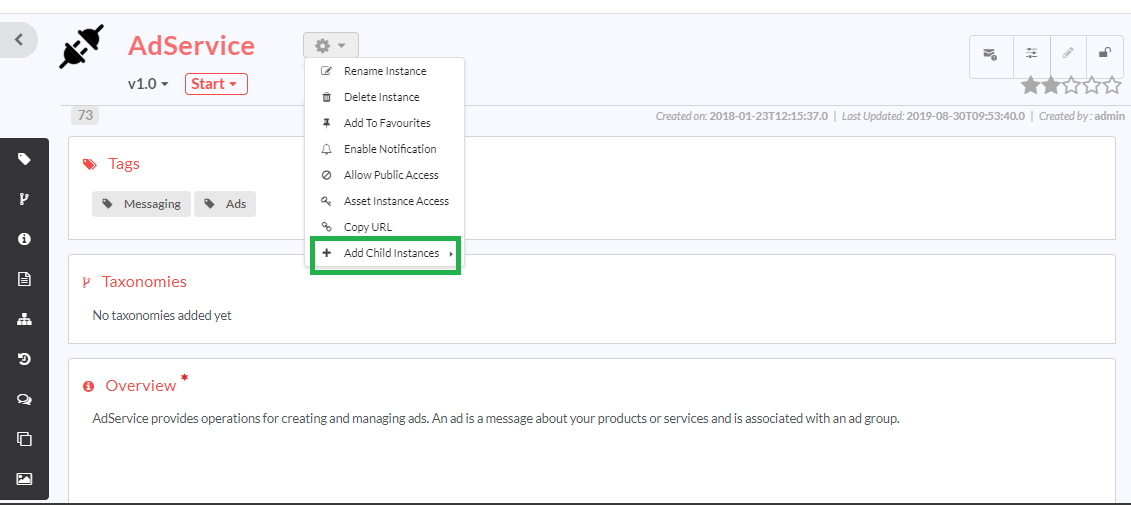
The option to create child instances is not available while creating a new Instance.
10.2. View Edit Asset Instance
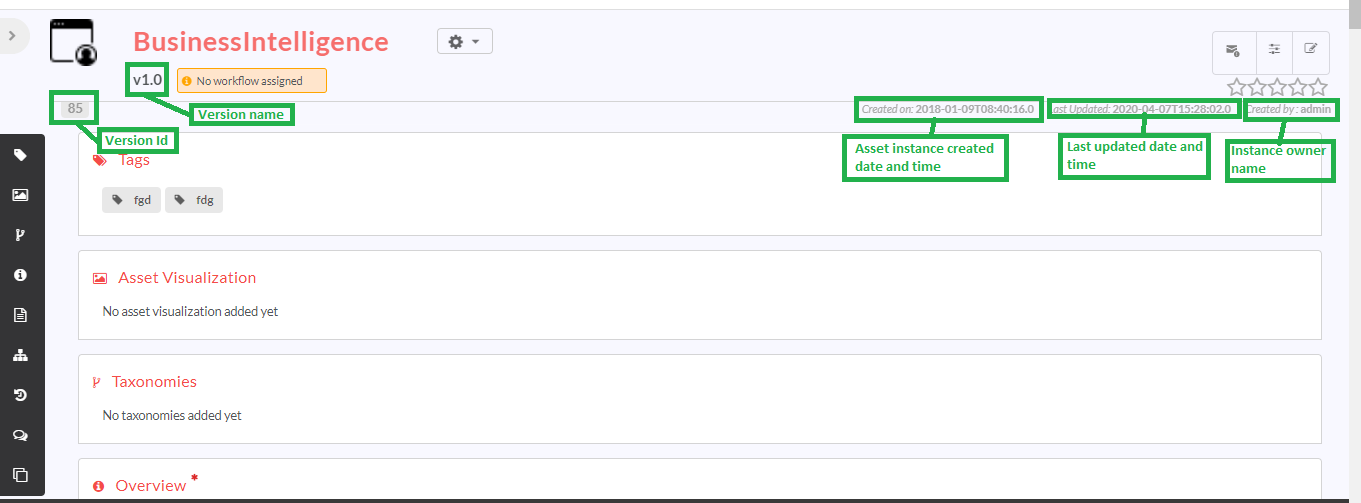
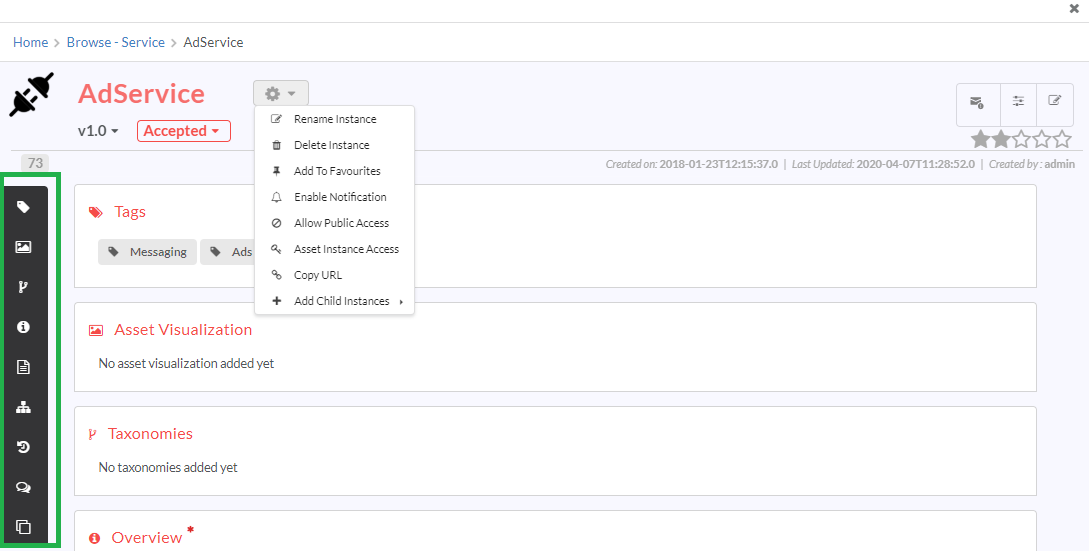
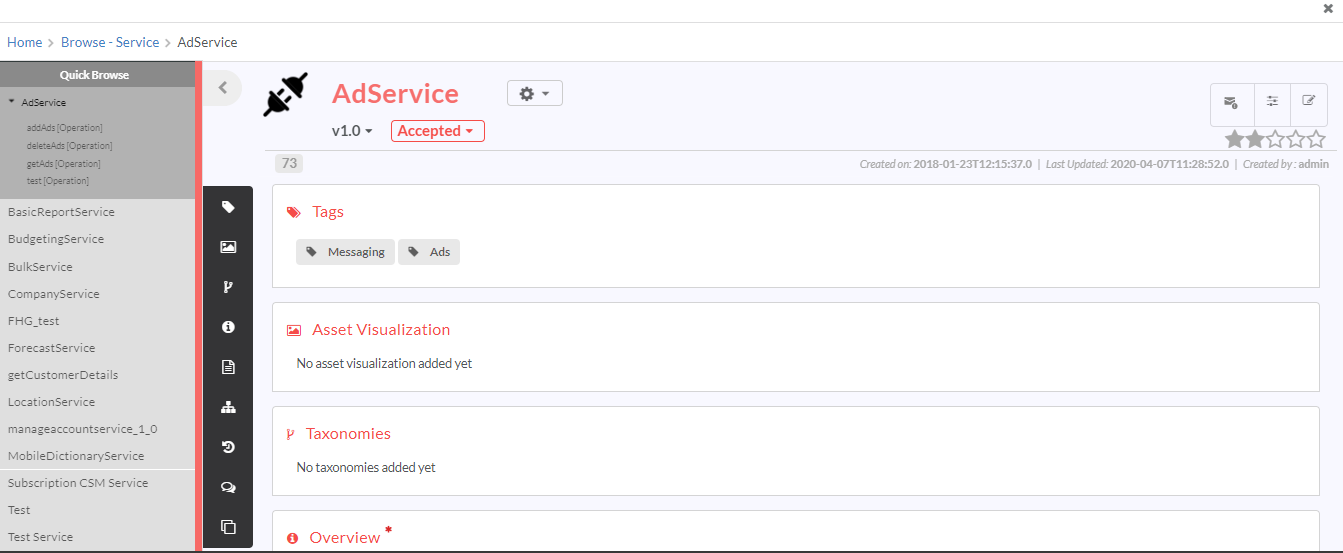
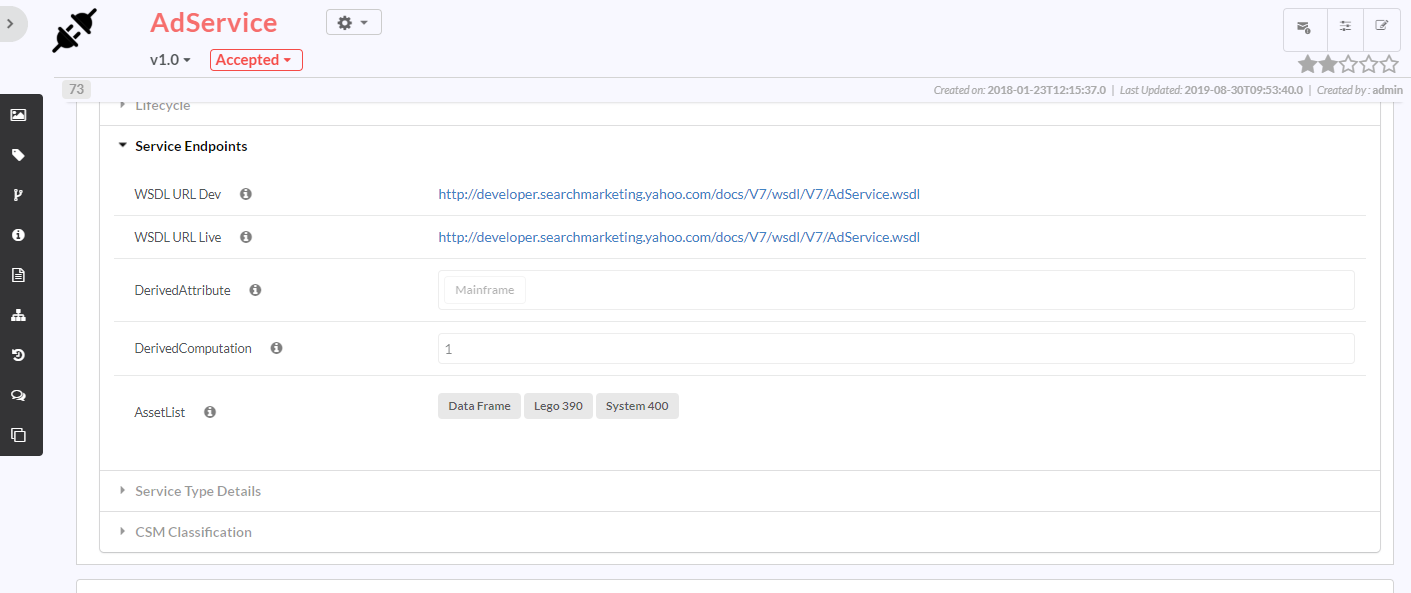
The View/Edit Asset Instance interface helps the user view and manage Overview, metadata Properties, Relationships, Asset Visualization, Reverse Relationships, Discussion, Revision History, and Versions for an Asset Instance. Each Asset Instance has as its owner, i.e., the user who creates the instance, which can be found under the Asset Instance name in the View/Edit Asset Instance screen. The last updated date of the Asset Instance also displays below the Asset Instance name.
The View/Edit Assset Instance screen has a View and an Edit mode. By default, the View/Edit Assset Instance screen loads in the View mode. The user can choose the Edit mode by clicking the Edit icon (![]() ) in the top-right corner of the screen. The Edit mode is available or not available based on the user’s access settings.
) in the top-right corner of the screen. The Edit mode is available or not available based on the user’s access settings.
10.2.2. Asset Instance version ID
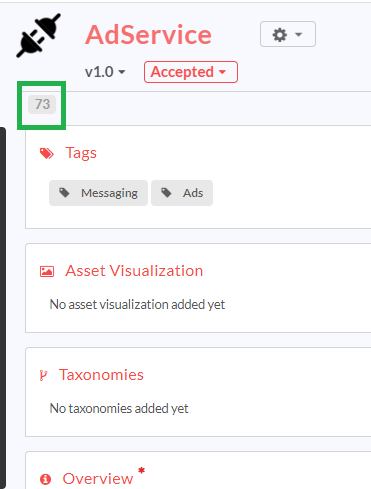
Asset Instance Version ID for each version displays below the Asset Instance name in the View/Edit Asset Instance screen.
10.2.2.1. Concurrent Editing Lock
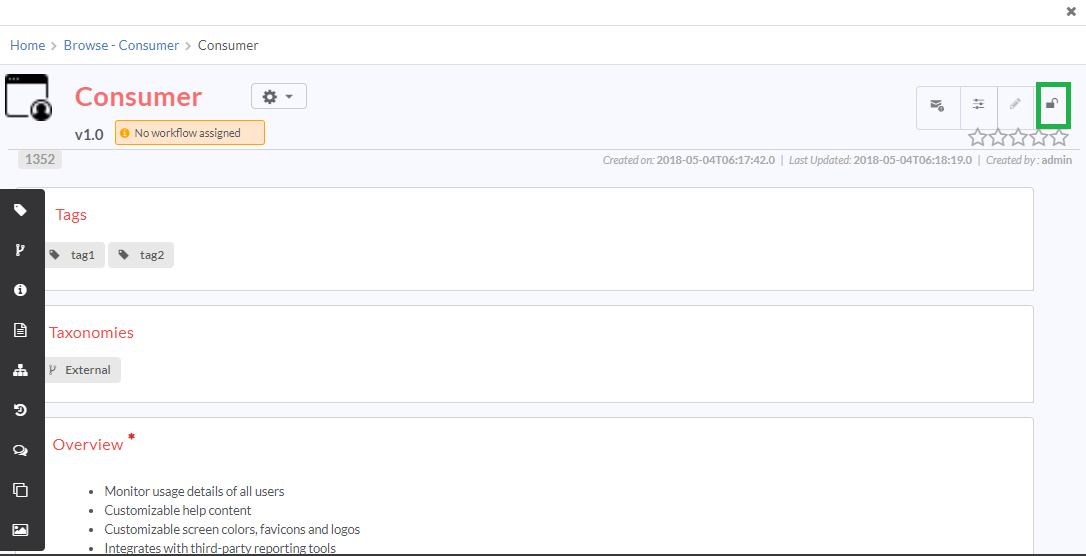
The Concurrent Editing Lock feature allows the user to lock an Asset Instance, restricting other Users from editing it for a specified period. The Locking period is specified through Lock Release Time in Global Settings. Refer: Global Settings for more information. The View/Edit Asset Instance screen has a Lock icon that denotes whether the Editing Lock is activated or not.
Note
The Lock icon becomes visible only when the Concurrent Edit Lock is enabled in Global Settings.
The table below explains the behaviour of the Concurrent Editing Lock feature:
| Scenario/Behaviour | Able to edit Overview, Properties, Classification/Association Relationships, taxonomy | Able to lock the instance version | Able to unlock the instance version |
|---|---|---|---|
| Any logged-in user with edit access for the Instance version when not yet locked by him/her | No | Yes | No |
| Any logged-in user with edit access for the Instance version when locked by him/her | Yes | No | Yes |
| Admin user when the Instance version is locked by another user | No | No | Yes |
| Any logged-in user without edit access for the Instance version | No | No | No |
Note
- When Concurrent Editing Lock feature is enabled from the Global Settings, the screen edit icon (
 ) stays in the disabled state until the user locks the Asset Instance version for edit.
 - The user can continue with editing the Instance i) until the lock release time duration, ii) until the user unlocks the instance version, or iii) until the user clicks the update button. The Asset Instance version gets unlocked when the user clicks the update button.
Overview Description can be edited until the expiry of the lock release time duration or until the user unlocks the instance version or until the user clicks the Update button. Once the user clicks the Update button, Asset Instance version is automatically unlocked.
Alternatively, the user can unlock the Instance version by clicking the Lock icon (![]() ).
).
10.2.3. Add Ratings and Reviews
RepoPro allows logged-in Users to provide Ratings and Reviews for Asset Instances. Ratings are represented as a set of stars ranging from one (lowest rating) to five (highest rating).
Here are some points you need to know about Ratings and Reviews:
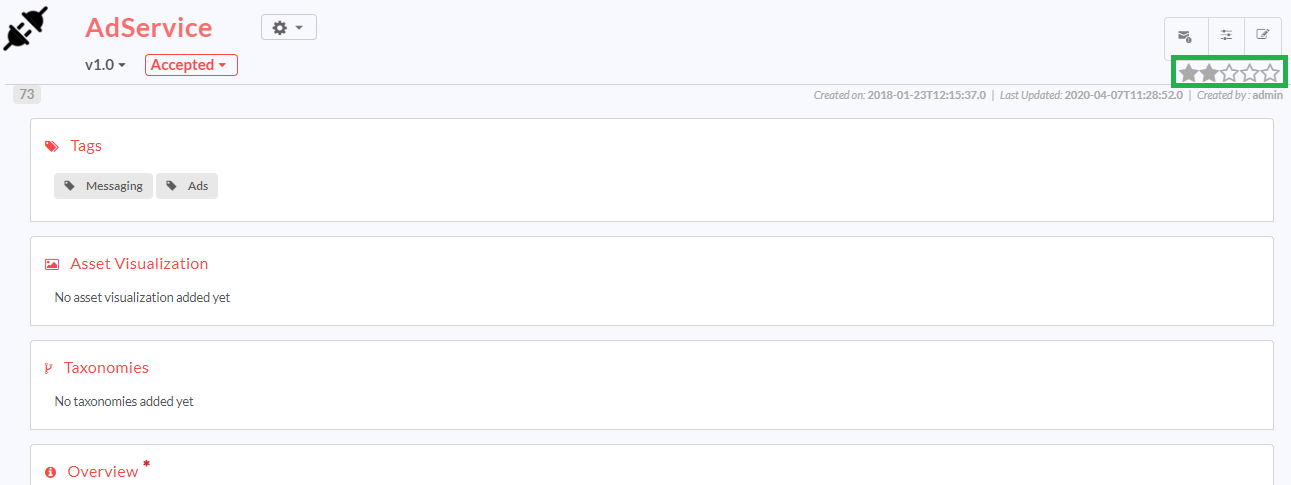
When the View/Edit Asset Instance screen loads, the average of all Ratings provided to the Instance is represented in yellow.
Any logged-in User can provide a Rating for the Asset Instance by clicking the five-star icon.
If a user provides Ratings more than once, RepoPro records only the latest Rating against the User’s name.
If the logged-in user is the Asset Instance owner, another additional icon displays on mouse-over. By clicking the icon, the details of all Ratings provided so far and the corresponding feedback text displays in a popup.
To add a Rating and Review for an Asset Instance:
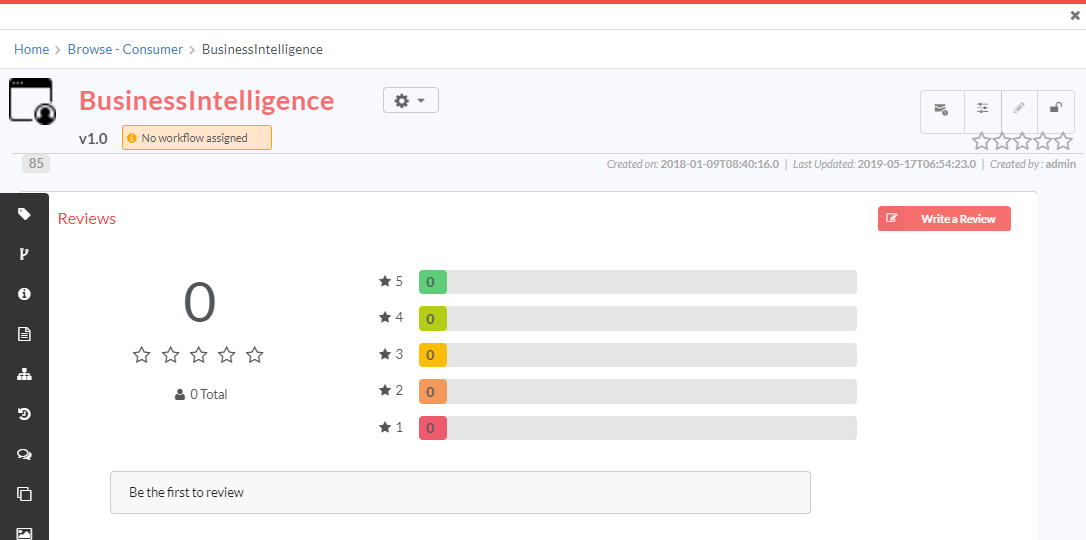
In the View/Edit Asset Instance screen, click the Star Rating (
 ) to display the Reviews dialog in an expanded view.
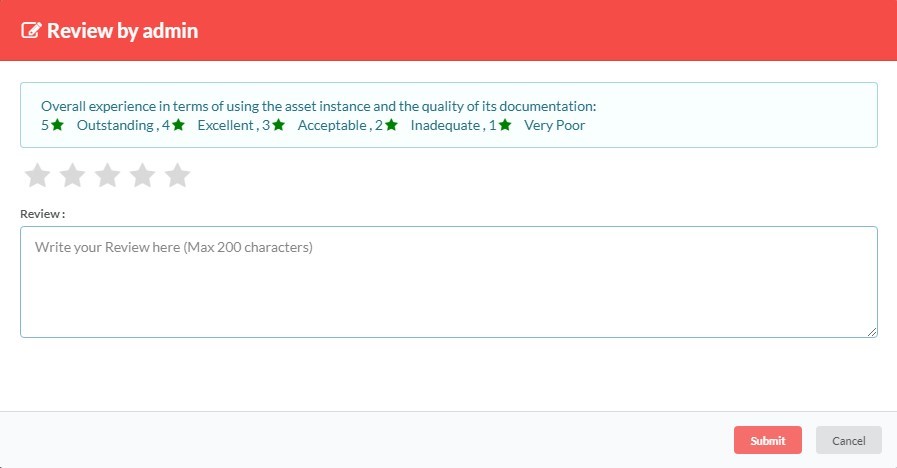
In the Reviews dialog, click Write a Review to display another dialog named Review by <user name>.
Note
Clicking the Star Rating toggles between the collapsed and expanded views of the Review dialog.
In the Review by <user name> dialog, in the Star Rating icon (
 ), click the star corresponding to the Rating that you wish to provide for the Asset Instance.
In the Review text box, type in the reviews for the Asset Instance.
Click Submit to save changes and update the Ratings and Reviews for the Asset Instance.
10.2.4. Assign Tags to Asset Instances
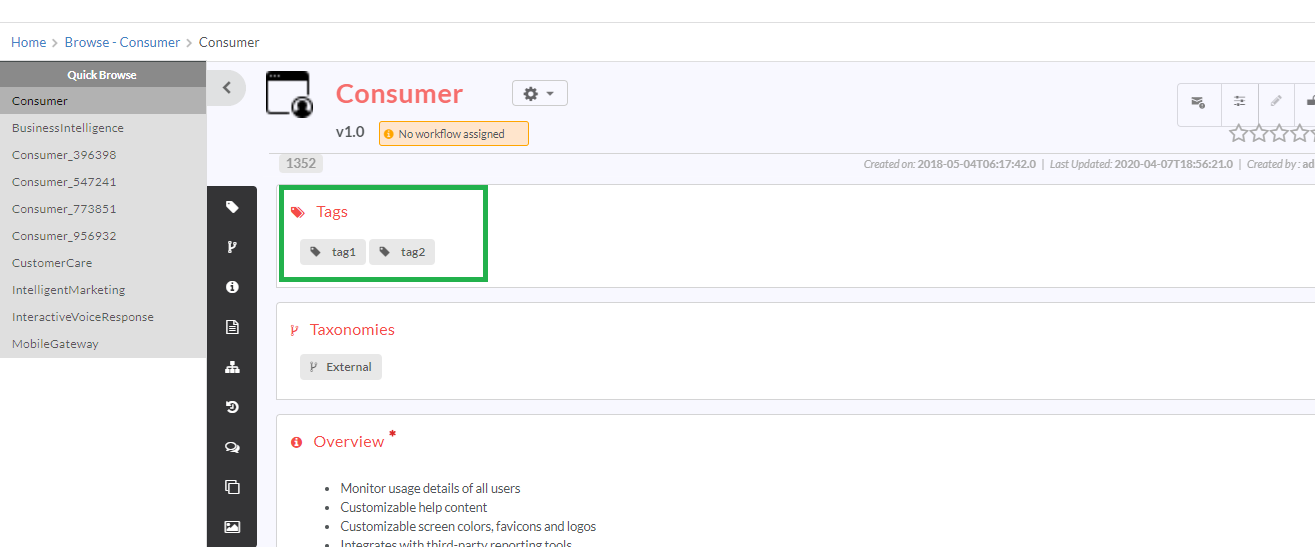
RepoPro allows users (with edit permissions) to tag individual asset instances using free text tags.
To add a Tag for an Asset Instance (for users with Edit permissions):
Upon entering the Edit mode, in the Tags section, in the Add New Tag box, type the tags to add. You can also add multiple tags.
Click Create if you are adding tags to a new instance or click Update if you are adding tags to an existing instance. The newly added Tag displays as shown.
Repeat the above steps to add more Tags to the Asset Instance.
Note
- Here are some points to note with regards to Tags:
- RepoPro allows users with Edit permissions to tag individual asset instances using free text Tags.
- Tags can be up to 50 characters long and can contain a combination of alphabets, numerals, and a few special characters, such as space, underscore and hyphen.
- Add multiple Tags by separating each of them using commas; subject to the limitation of max 50 characters.
To remove an added Tag, click the delete icon (![]() ) against it.
) against it.
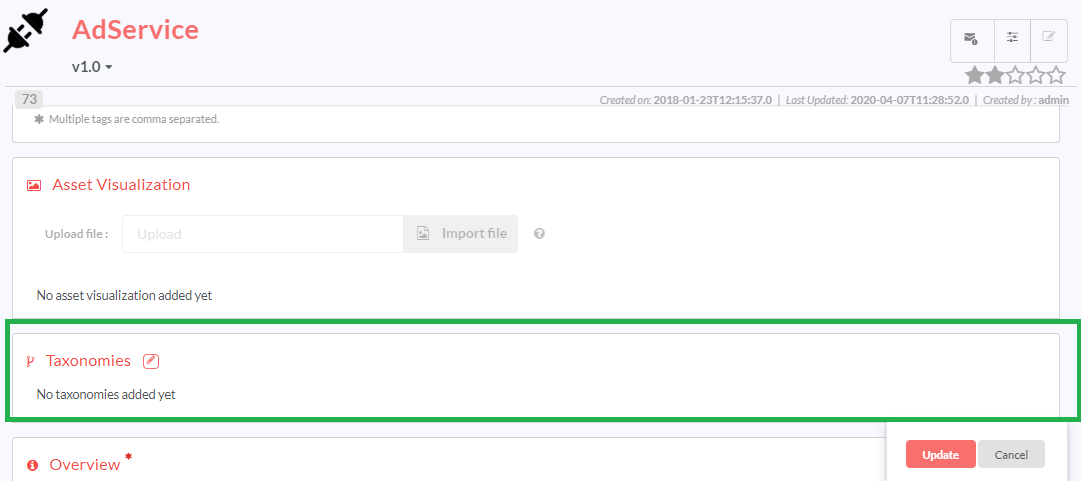
10.2.5. Taxonomies for Asset Instance
To assign a Taxonomy for an Asset Instance:
In the Taxonomies panel, click the edit icon (
 ).
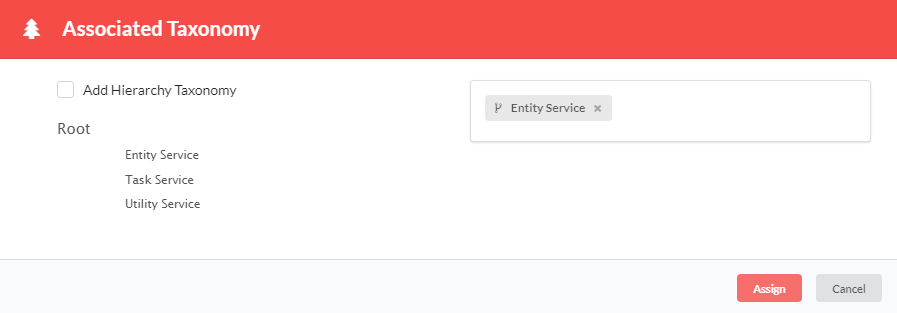
).The Associated Taxonomy dialog displays. The Associated Taxonomy dialog has the Taxonomy Tree based on the Taxonomies assigned to the Assets and displays with the list of Taxonomy nodes already assigned to the Asset Instance (if any).
The user can select any number of Taxonomy nodes to assign to the Asset Instance. The selected nodes appear in the Selected section. Any selected node can be removed by clicking the delete icon (
 ) against it.
Note
When Concurrent Editing Lock is in the enabled state, the edit icon (
 ) remains in disabled state, and it marks the Asset Instance version as locked by that user.
The user can continue editing the tag data and Taxonomies until the lock release time duration expires or until the user clicks the Submit/Close button or the Close icon.
Clicking the Submit/Close button or the Close icon, unlocks the asset instance version. The user can unlock the instance version by clicking the Lock icon.
) remains in disabled state, and it marks the Asset Instance version as locked by that user.
The user can continue editing the tag data and Taxonomies until the lock release time duration expires or until the user clicks the Submit/Close button or the Close icon.
Clicking the Submit/Close button or the Close icon, unlocks the asset instance version. The user can unlock the instance version by clicking the Lock icon.Click to check the Add Hierarchy Taxonomy check box to add the chain of parent Taxonomies of the selected node automatically to the Asset Instance.
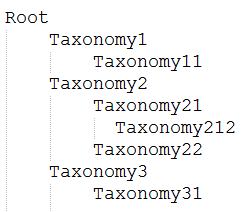
For example, if the taxonomy tree is as below:
If the user selects Taxonomy212 for an Asset Instance by selecting the corresponding checkbox, RepoPro automatically assigns the parent hierarchy, viz., Taxonomy21 and Taxonomy2 to the Asset Instance.
Click Assign to assign the selected Taxonomies to the Asset Instance. In the taxonomies section, you can click any assigned Taxonomy to load the Browse by Taxonomies screen for the particular Taxonomy.
Note
For more information on how to manage Taxonomies refer: Manage Taxonomies.
10.2.6. Asset Visualization at Instance Level
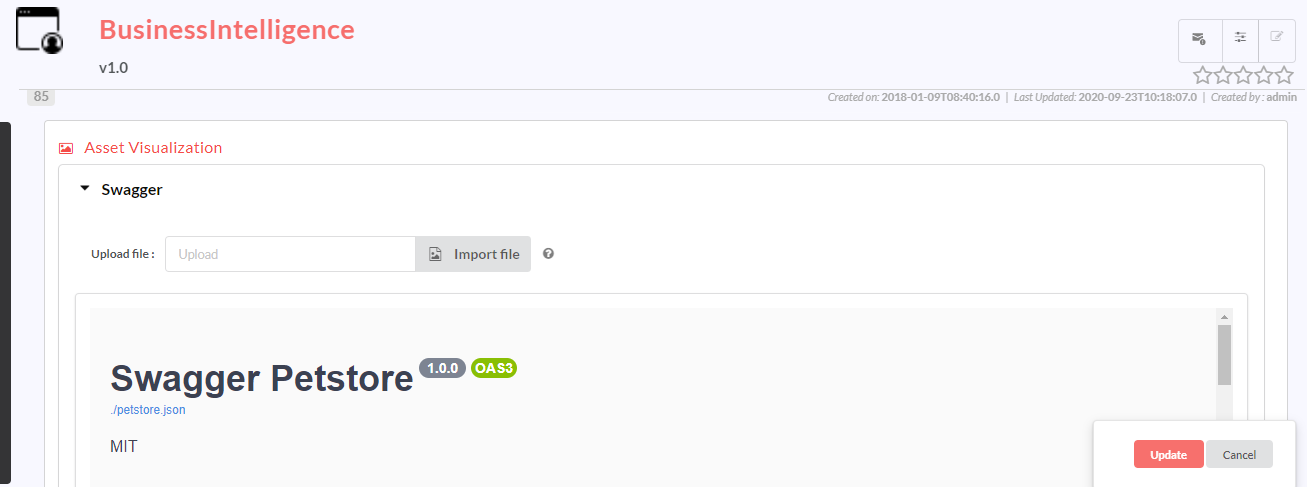
RepoPro allows users to display asset visualization at instance level. If you have already selected a visualization in the drop-down in the Manage Asset page, then based on the options selected in the Manage Asset Visualization page and the visualization file uploaded, visualization will be displayed in HTML format in the Asset Instance details page. Refer the sections Manage Asset Visualization and Asset Visualization at Asset Level for more details.
To add an asset visualization:
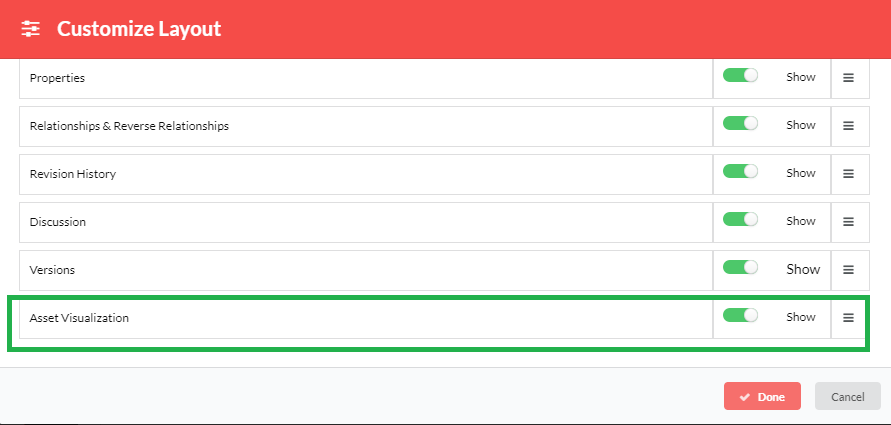
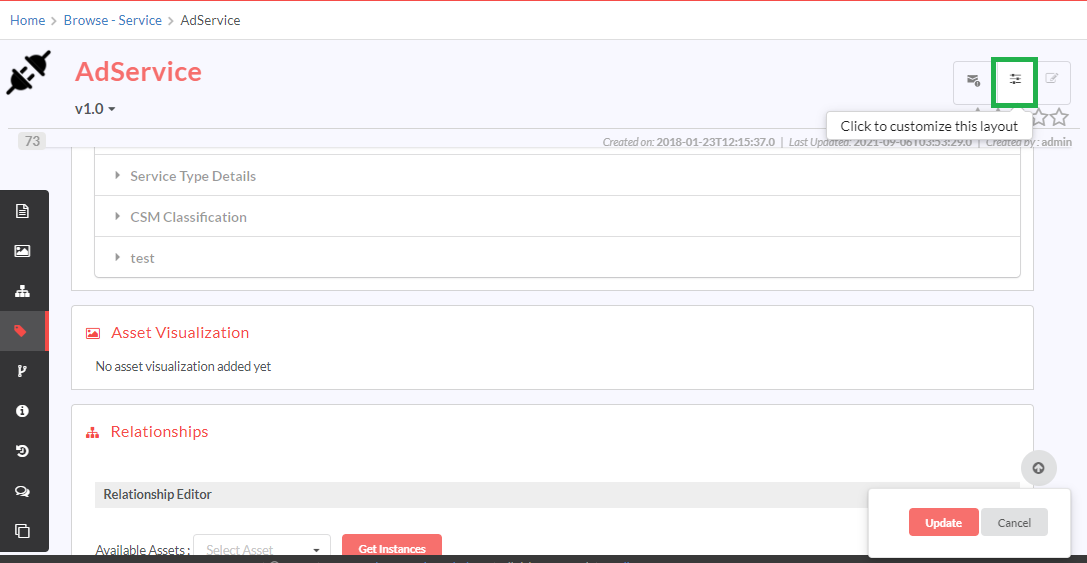
In the Asset Instance details page, click customize layout
 icon to display the Customize Layout dialog.
In the Customize Layout dialog, in the row that has Asset Visualization section that you wish to enable, click and drag the Show/Hide toggler to your right to turn it green, and display that section. Inversely, click and drag the Show/Hide toggler to your left to turn it red, and hide the Asset Visualization section.
Click Done to save the changes and exit the dialog.
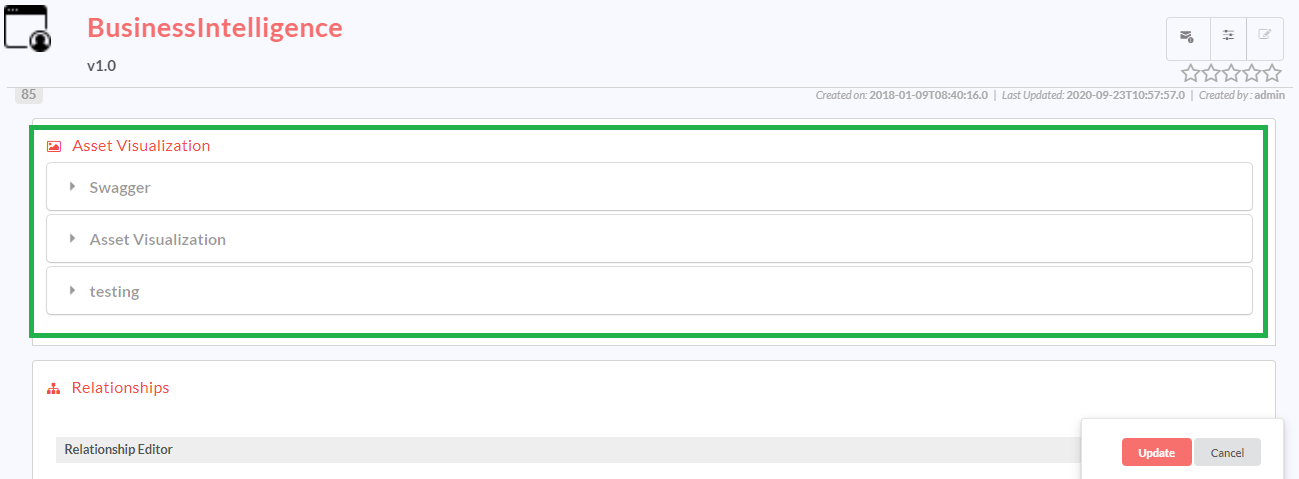
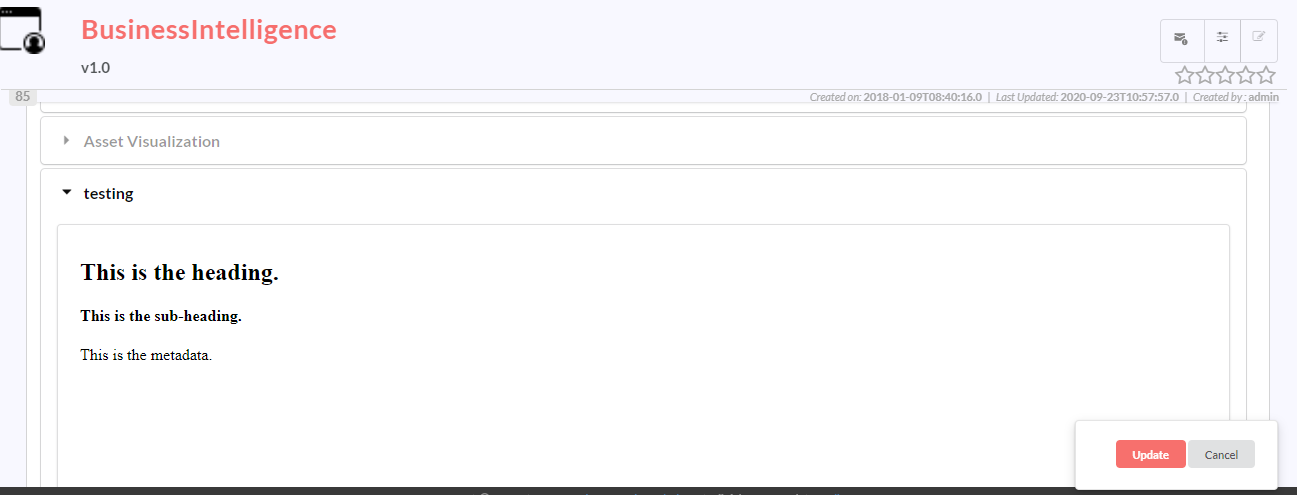
After opening the Asset Instance details page for edit, under the Asset Visualization section, you will see multiple visualizations displayed in multiple collapsible tabs one below the other. Click to open each tab.
If you have selected Interface file required option as Yes in the Add/Edit Asset Visualization page, you will see an option to upload a visualization file in the Upload File field. Click Import File to upload/reupload the file. When you upload/reupload this file, the jar file that was added in the Manage Asset Visualization page automatically generates an HTML file on the Asset Instance details page.
Note
This is option will only be displayed if you have selected Interface file required option as Yes in the Add/Edit Asset Visualization page.
If you have selected Interface file required option as No in the Add/Edit Asset Visualization page, the visualization will be displayed by default.
Note
Upload file option will not be displayed to users in this case.
- Click Update to save the changes.
10.2.7. Workflow at the Instance Level
The asset will follow the states defined in the workflow. The state will start from the first state and proceed to the next states in a sequence until the last state.
The user who has edit instance access is allowed for state transition.
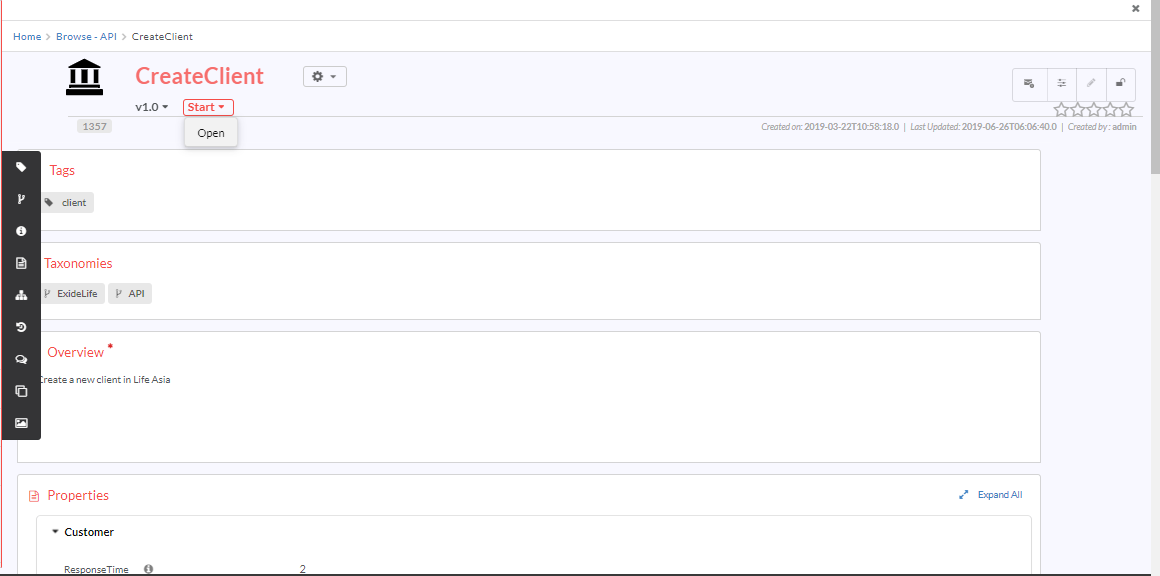
The figure shown below is the instance of the API asset which is assigned to Default workflow. Hence the instance will follow the Default Workflow.
Since the Default workflow begins with Start, it is highlighted.
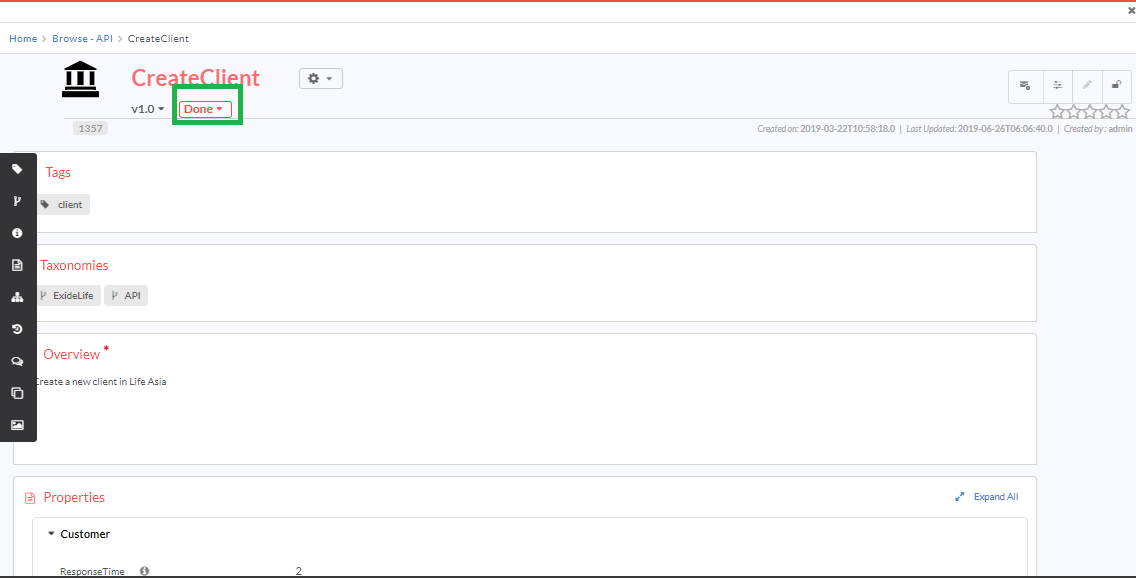
The state will move from Start to Done in a sequential manner according to the workflow. Please refer fig for the states in the workflow.
This process will continue until it encounters last state.
10.2.8. Enable Alerting at Instance Level
If “Enable Alerting” toggle button is enabled for parameters at the asset level, those parameters are displayed at the instance level in the alerting modal in the Select Parameter drop down, using which the user can set the rule for asset instance version.
Using Cronjob Scheduler the user can run the alerting jar. If the rule set defined by the user is satisfied the scheduler will be triggered according to the scheduler set during rule set creation by jar, then the user will be notified via scheduler till “Alerting jar” is in execution state.
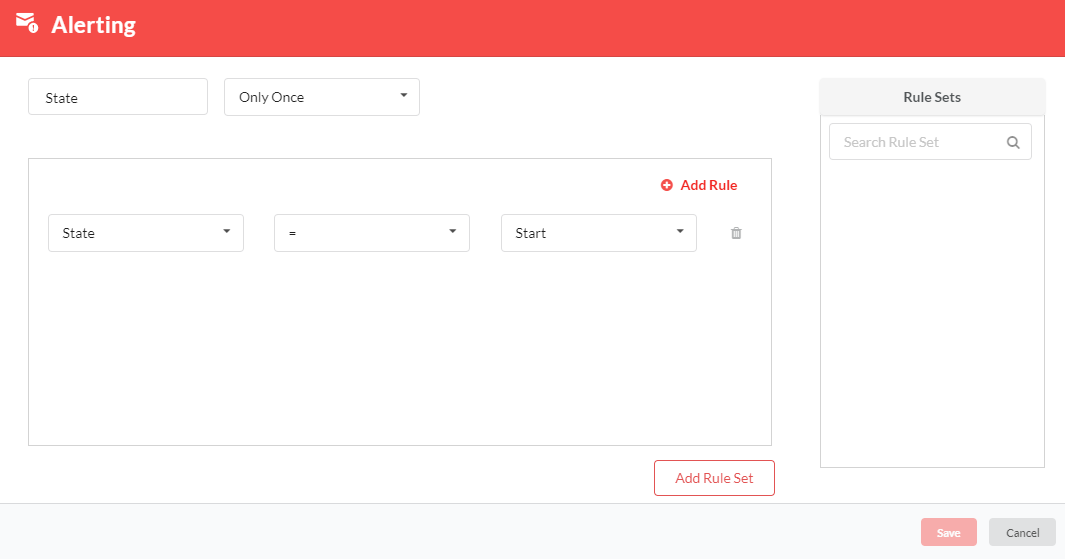
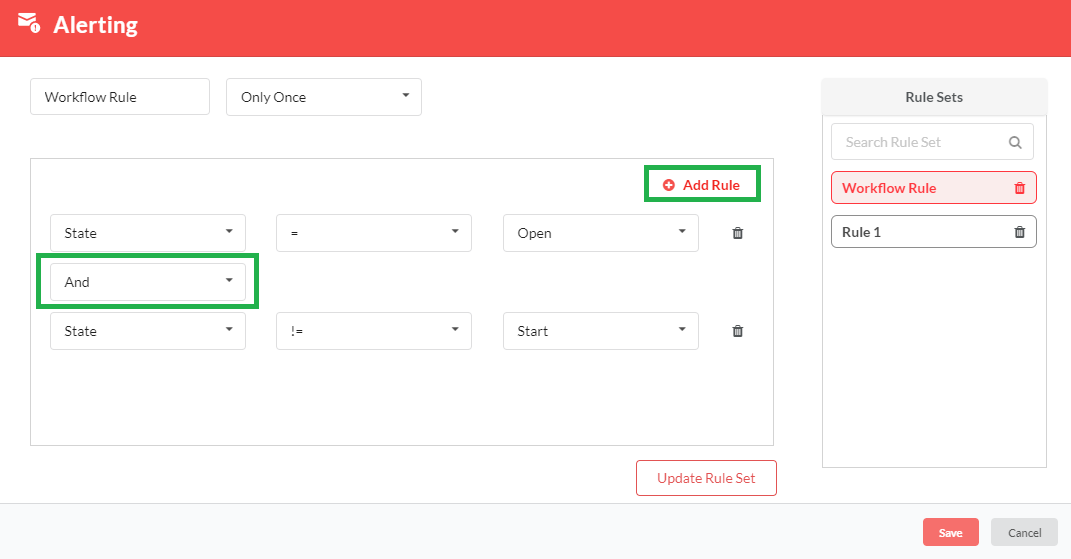
Any user can create the rule for themselves at the instance level. Users can create more than one rule and club them together under a Rule Set. Only the user who has created the rule set will receive the notification. Additonally, users can create an alerting modal when they need to be notified of a change in workflow state. For example, when there is a state change from Start → InProgress, a rule can be set for the particular instance for which the workflow is defined.
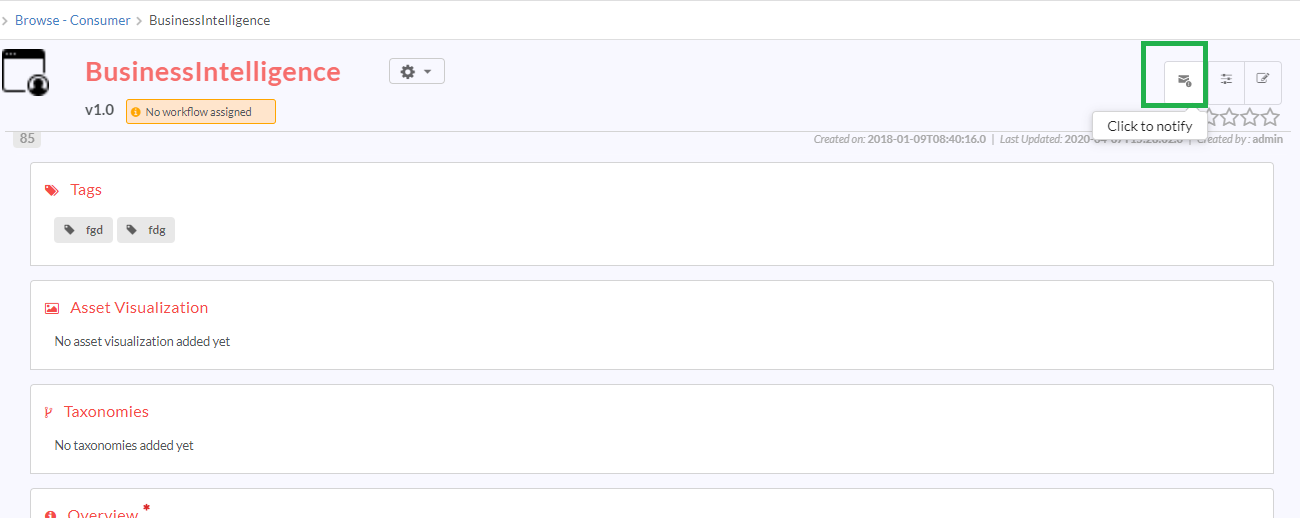
To configure the rule set, user needs to navigate to Browse > By Asset Type > Browse <Asset> Instances > Click on any Instance.
For Example, Browse > By Asset Type > Consumer > BusinessIntelligence
To configure the rule set of the parameter in BusinessIntelligence tap on the ![]() icon (Tap me to notify you) as highlighted in Figure.
icon (Tap me to notify you) as highlighted in Figure.
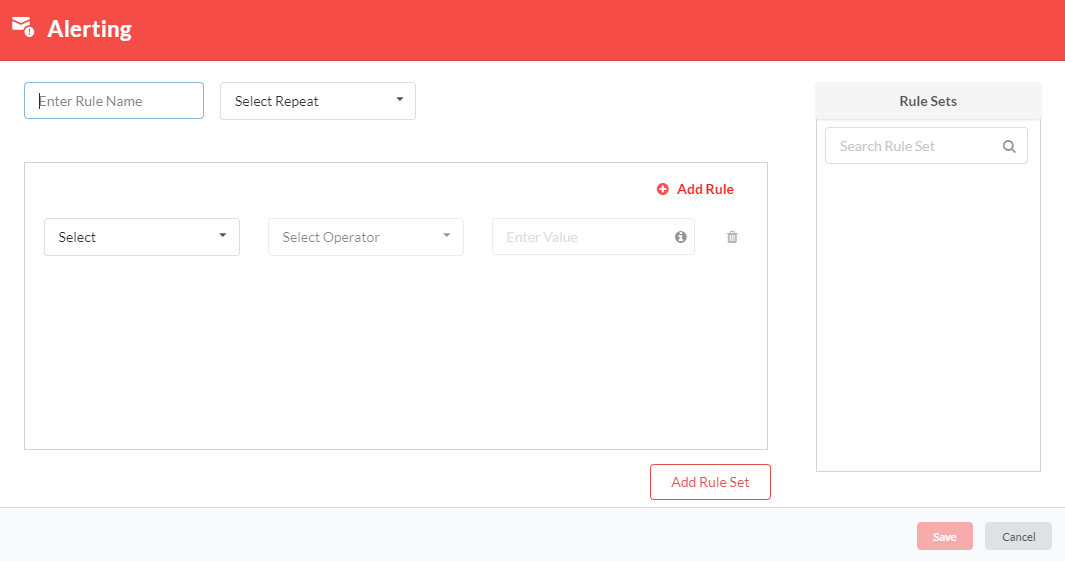
On clicking the ![]() icon Alerting modal page will be displayed.
icon Alerting modal page will be displayed.
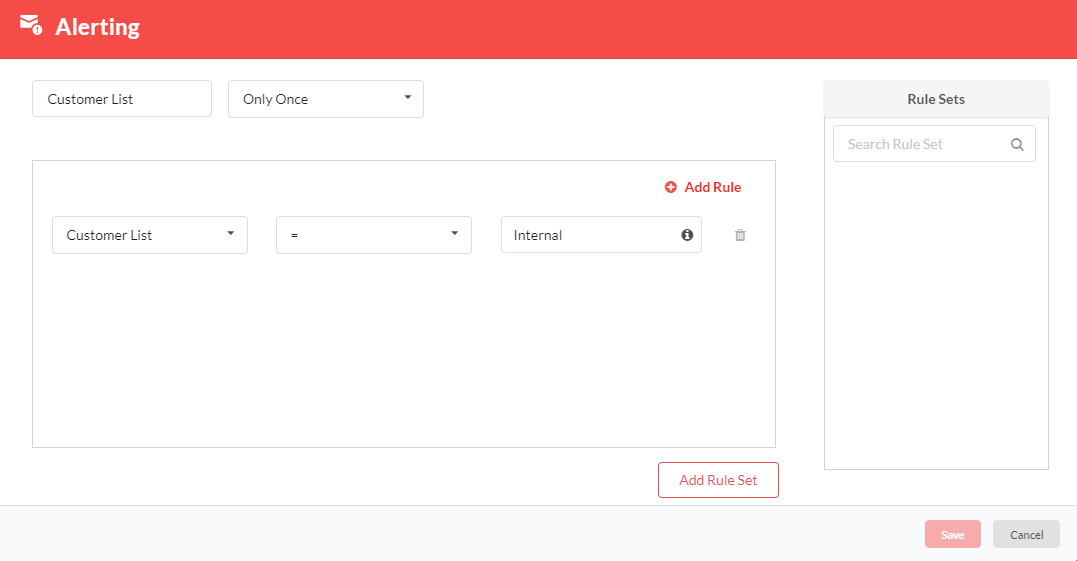
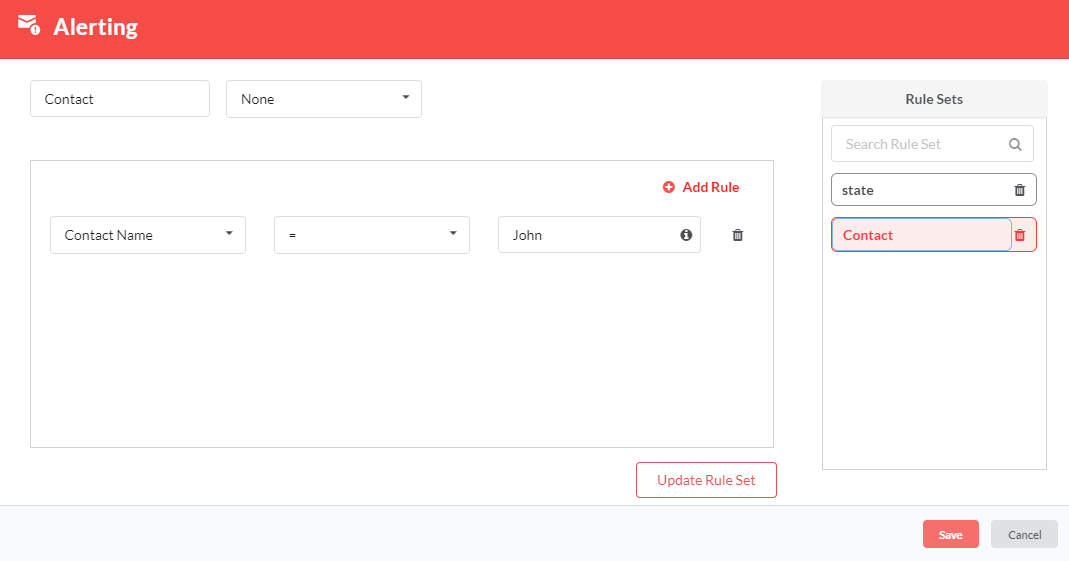
Alerting Modal for Creating a New Rule Set:
- Populate the below mandatory fields with the required values:
- Enter Rule Name: Enter the name to be assigned to the rule set in this text box.
- Select Repeat: This drop-down displays the frequency at which the user will be notified. Depending on the Select Repeat option set by the user, that user will be notified accordingly. The available options are: None, Only Once, Hourly, Daily, Weekly, Monthly and Yearly.
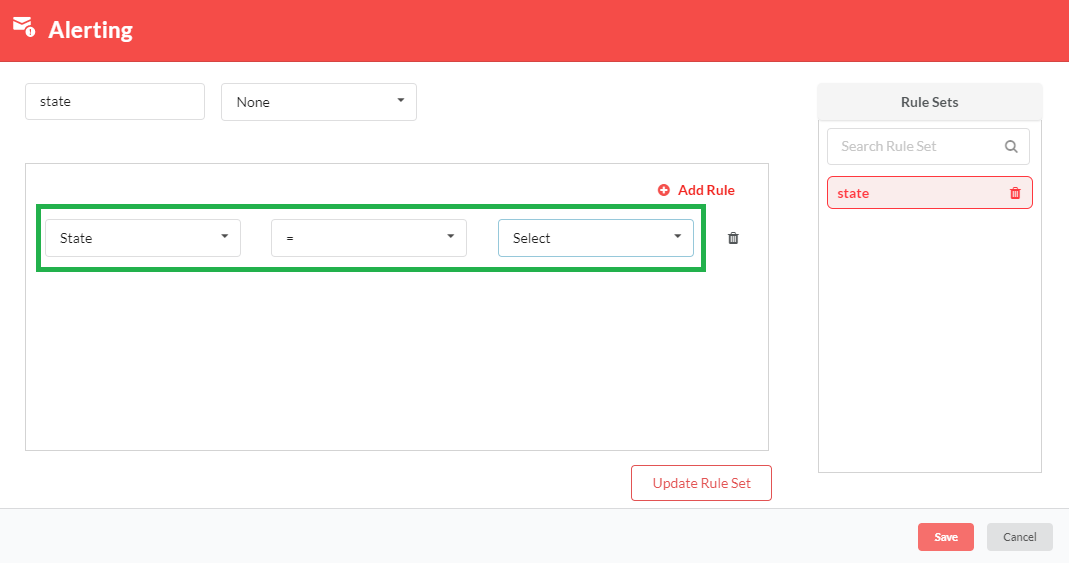
- Select: This drop-down displays the list of all parameters whose Enable Alerting option is enabled and have view access at the asset level. It displays list of parameters and the state as two options where the user can set the rule when they need to be notified. When only one rule is present, the delete icon is disabled.
- Select Operator: This drop-down displays list of all operators allowed for the type of parameter selected.
The allowed list of operators for respective field is listed below
Table 10.2 List of Operators¶ Field Operator Date =, !=, <, >, <=, >= Text =, !=, <, >, <=, >= Rich Text like, not like, =, != List - Array List, Custom List, User List, Ldap User List =, != LDAP Mapping like, not like, =, != Derived Attributes (DA) like, not like, =, != Derived Computation (DC) =, != Derived attribute for asset list (AC) like, not like, =, != State =, !=
Enter Value: Enter the value to be assigned to the parameter. Except for Date and State parameters, if parameter type value consists of /, in the enter value textbox, then that will be considered as multiple values. Use /, as a separator while entering multiple values.
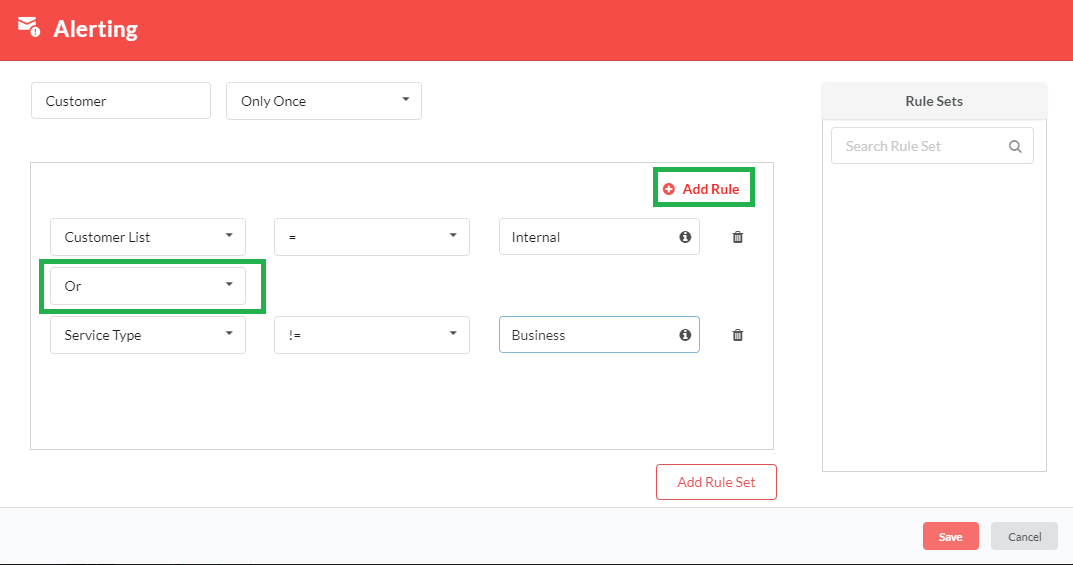
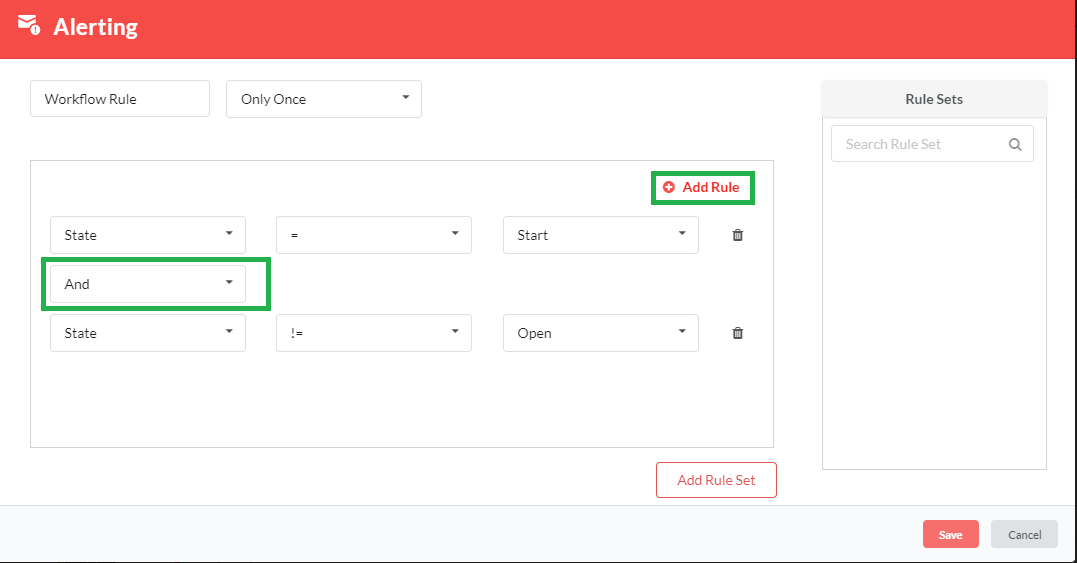
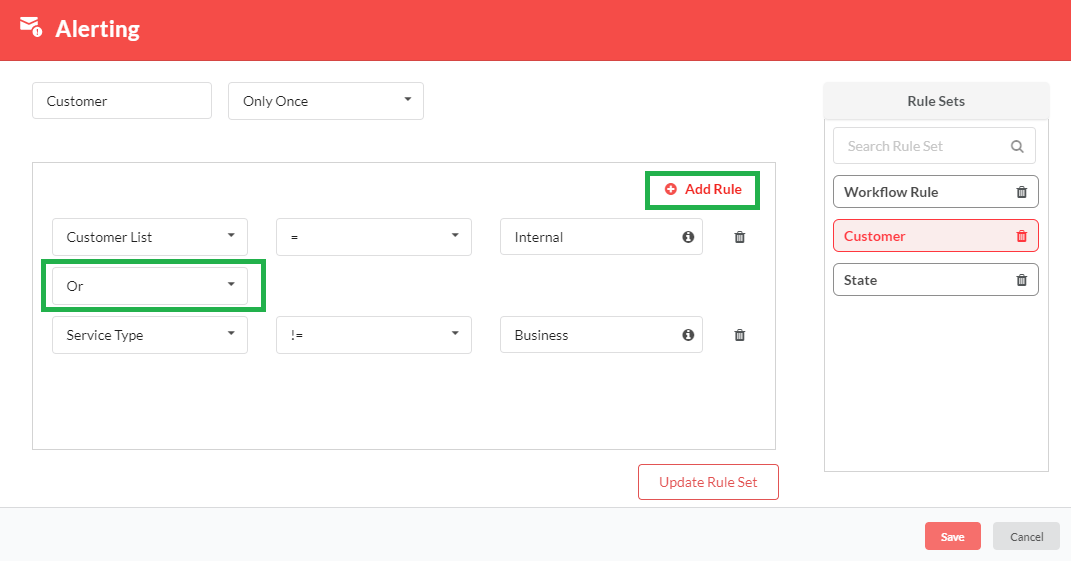
A rule set can be either be a single rule or a combination of multiple rules. Multiple rules are combined using the logical operators And/Or.
Click Add Rule. A drop-down appears where you can select either And or Or to add multiple parameter-value rule combinations for a single rule set.
Click Add Rule Set. The rule set displays under the Rule Sets column. To search for a particular rule set, type the required rule set name in the Search Rule Set search bar. You can delete the parameter rules or parameter rule set by clicking the delete (
 ) icon corresponding to each rule set. While deleting, the system will ask for confirmation. If the user clicks Yes, the rule set will be deleted.
Click Save to save the changes or click Cancel to exit without saving.
Alerting JAR will be provided to the user. The user runs the jar using CronJob Scheduler. If the rule is matched with the parameter value defined at the instance level, the notification will be sent to the user who has created the rule/rule set.
Notification message pattern that is sent via email is: <RuleSet Name> has met the rule for <asset Instance Name> of the <Asset Name>.
Alerting Modal for Editing an Existing Rule Set
- Under the Rule Sets column, click the rule set whose details you want to modify. The rule set with its details will be displayed.
- You can edit the values for the below fields:
Enter Rule Name: Edit the name to be assigned to the rule set in this text box.
Select Repeat: Edit the frequency at which the user will be notified. Depending on the Select Repeat option set by the user, that user will be notified accordingly. The available options are: None, Only Once, Hourly, Daily, Weekly, Monthly and Yearly.
Select: This drop-down displays the list of all parameters whose Enable Alerting option is enabled and have view access at the asset level. It displays list of parameters and the state as two options where the user can set the rule when they need to be notified. When only one rule is present, the delete icon is disabled.
Select Operators: Edit the list of all operators allowed for the type of parameter selected. The allowed list of operators for respective field is same as those mentioned in Alerting Modal for Creating a New Rule Set section.
Enter Value: Edit the value to be assigned to the parameter. Except for Date and State parameters, if parameter type value consists of /, in the enter value textbox, then that will be considered as multiple values. Use /, as a separator while entering multiple values.
A rule set can be either be a single rule or a combination of multiple rules. Multiple rules are combined using the logical operators And/Or.
Click Add Rule. A drop-down appears where you can select either And or Or to add multiple parameter-value rule combinations for a single rule set.
Click Update Rule Set to save the updated data. The rule set displays under the Rule Sets column. To search for a particular rule set, type the required rule set name in the Search Rule Set search bar. You can delete the parameter rules or parameter rule set by clicking the delete (
 ) icon corresponding to each rule/rule set. While deleting, the system will ask for confirmation. If the user clicks Yes, the rule/rule set will be deleted.
Click Save to save the changes or click Cancel to exit without saving.
When a rule set is defined and saved using ‘States’ parameter, and if that state name is renamed or deleted from Manage Workflow, then in alerting dialog box, in the Select drop-down, default value i.e. Select will be shown when rule details are displayed.
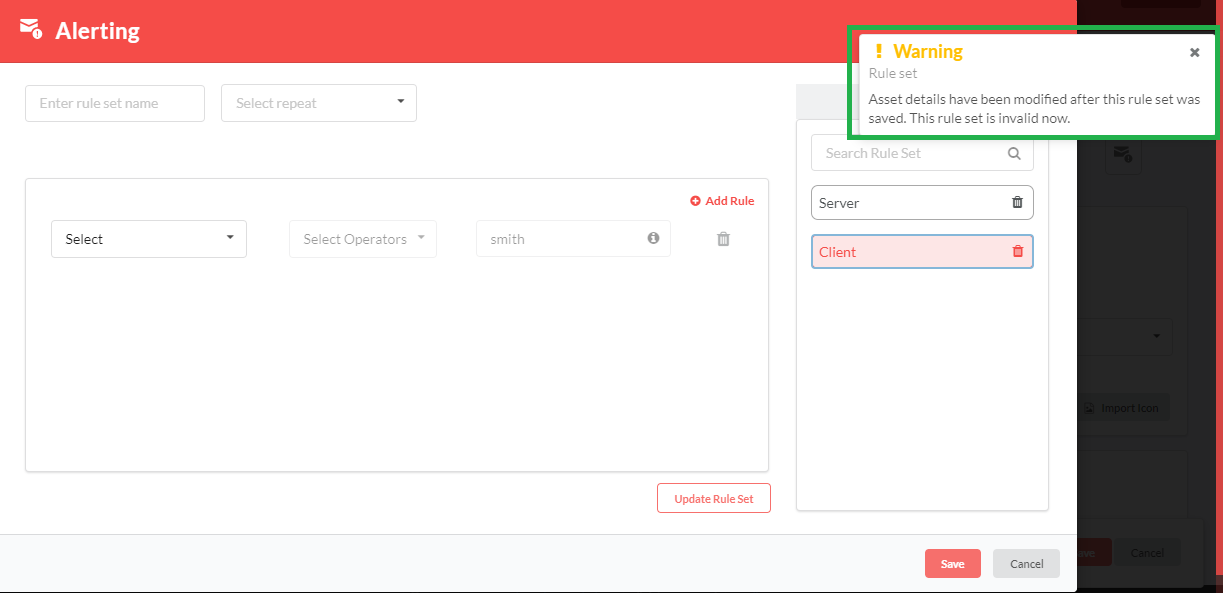
When a rule set is defined and saved for a parameter, and if that parameter is deleted from the parameter list, then in the alerting dialog box, when you click that rule set, a warning message is displayed. You can either delete this rule set or update the values within this rule set.
Alerting JAR will be provided to the user. The user runs the jar using CronJob Scheduler. If the rule is matched with the parameter value defined at the instance level, the notification will be sent to the user who has created the rule/rule set.
Notification message pattern that is sent via email is: <RuleSet Name> has met the rule for <asset Instance Name> of the <Asset Name>.
Note
When a user wants to re-create the rule, then the existing rule need to be deleted if it is in disabled mode & create a new rule.
10.2.9. Edit Overview
To edit the overview of the Asset Instance:
- In the Overview section, click the Edit icon (
 ) (if in View mode) to display a rich text editor.
 - In the rich text editor, type in the Overview for the Asset Instance. Use the formatting options available in the rich-text editor interface to make changes to the text or upload an image. Refer Upload an image section under Admin Message.
- Click Update to save changes.
- (Optional) Click Cancel to discard the task and start afresh.
10.2.10. Assign Property Values to the Asset Instance
Note
Mandatory Parameters are highlighted in red colored asterisks.
In the Properties section, to expand or collapse each category, click the Category box. To expand or collapse all categories in one go, click the Expand All or Collapse All toggle.
To edit Property values:
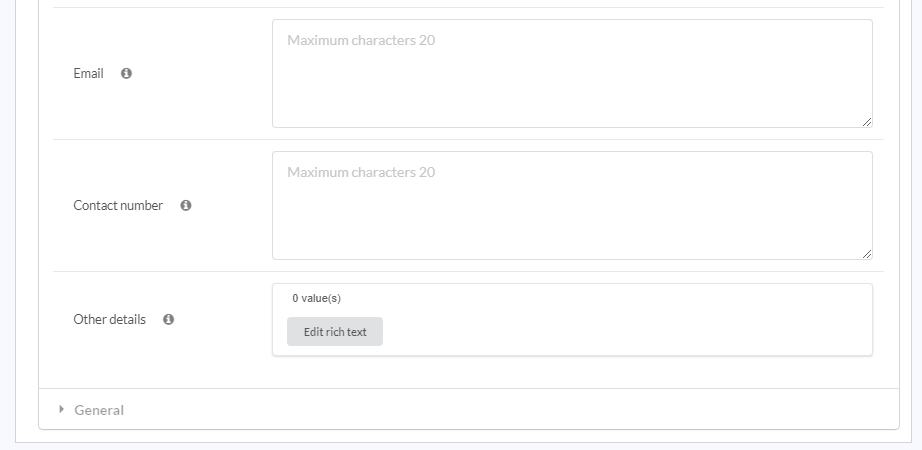
for Text parameters: enter the text values in the box(es) provided alongside the Property name(s). follow the instructions in ‘Editing array values for Text Parameter Types’ below.
for Rich Text parameters: enter the text values in the Rich Text box provided alongside the Property name(s). Use the formatting options available in the rich-text editor interface to make changes to the text or upload an image. Refer Upload an image section under Admin Message. If the Rich Text Parameter has been marked as an array, follow the instructions in ‘Editing Array Values for Rich text Parameter Types’ below.
for Date parameters: click the date value box to choose a date from the pop down calendar.
for List parameters: for Custom List, Asset List and Native User List Types, click the drop down box to select the parameter from the drop down list. For Ldap User List, follow the instructions in ‘Editing LDAP Users List Parameter Type’ below.
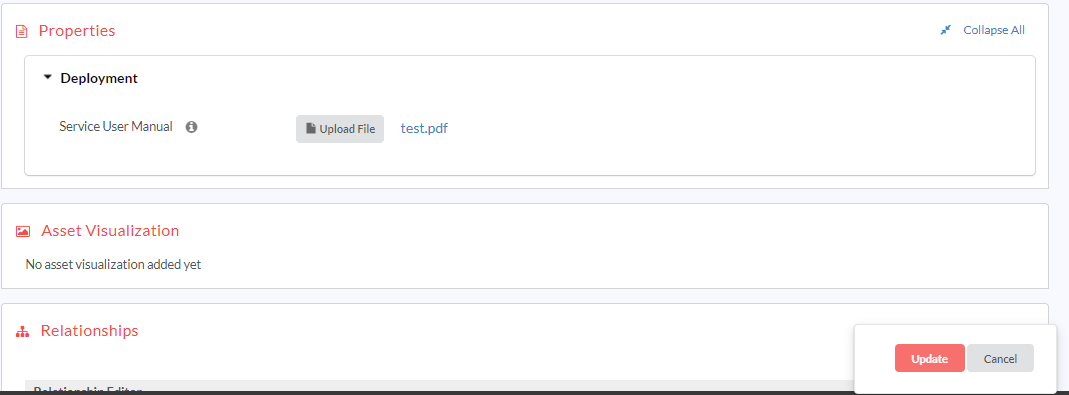
for File parameters: click the Upload File to attach a file from your computer. The uploaded file will be visible next to the Upload File button. This file can be downloaded only by users who have the permission to edit the Asset Instance page. For users with view only access to the Asset Instance page, the download option will be disabled.
Note
Maximum characters allowed for Rich Text Parameters is 50000.
Click Update Properties to save changes.
Note
As the parameter types Derived Attribute and Derived Computation have dynamically derived values, the user cannot make changes to these fields and the edit options do not appear in both cases.
To learn more about the implications of Access Control on Derived Attribute and Derived Computation, refer the topic: Access Control.
When a user updates important parameters with values, the system awards 1 point per important parameter to that user.
Note
If a parameter is visible and editable to the logged-in user and is also mandatory, the user must provide a value to the Parameter. RepoPro does not allow the user to save the asset instance if the Parameter is left empty in such cases.
Note
In case the Properties section is locked, the user can unlock the Instance version by clicking the Lock icon.
10.2.11. Editing array values for Text Parameter Types
To edit array values for Text-based Parameters:
In the text Parameter value box, click Edit Text to display the Edit Text Array - <Parameter Name> dialog.
In the Edit Text Array - <Parameter Name> dialog, click Add Values to add an array value.
Under List of Values, in the input box, type the array value.
Use the formatting options available in the rich-text editor interface to make changes to the text or upload an image. Refer Upload an image section under Admin Message.
Repeat the previous two steps (i.e., step 2 and 3) to add more values.
Click Save to save changes.
10.2.12. Editing array values for Rich Text Parameter Types
To edit array values for Rich Text-based Parameters:
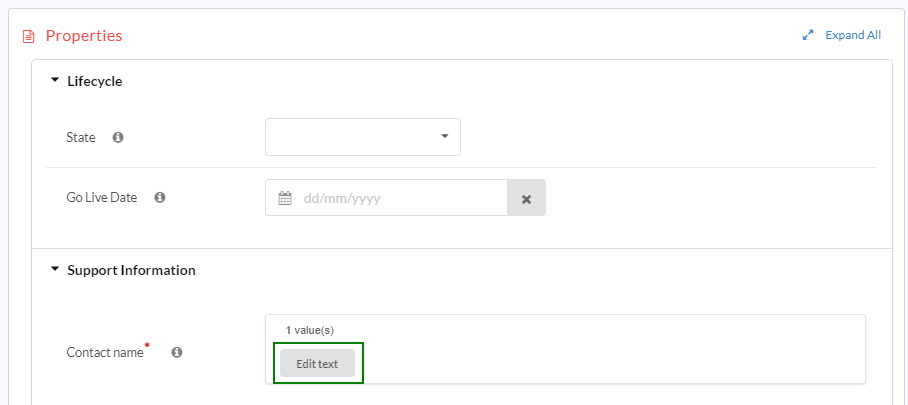
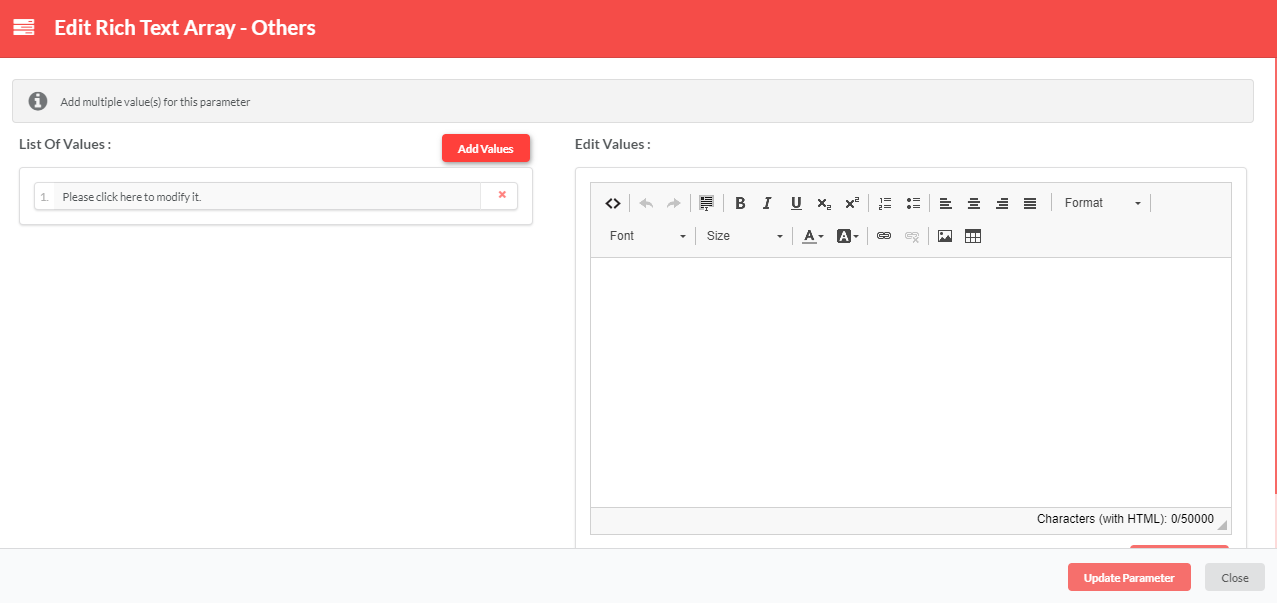
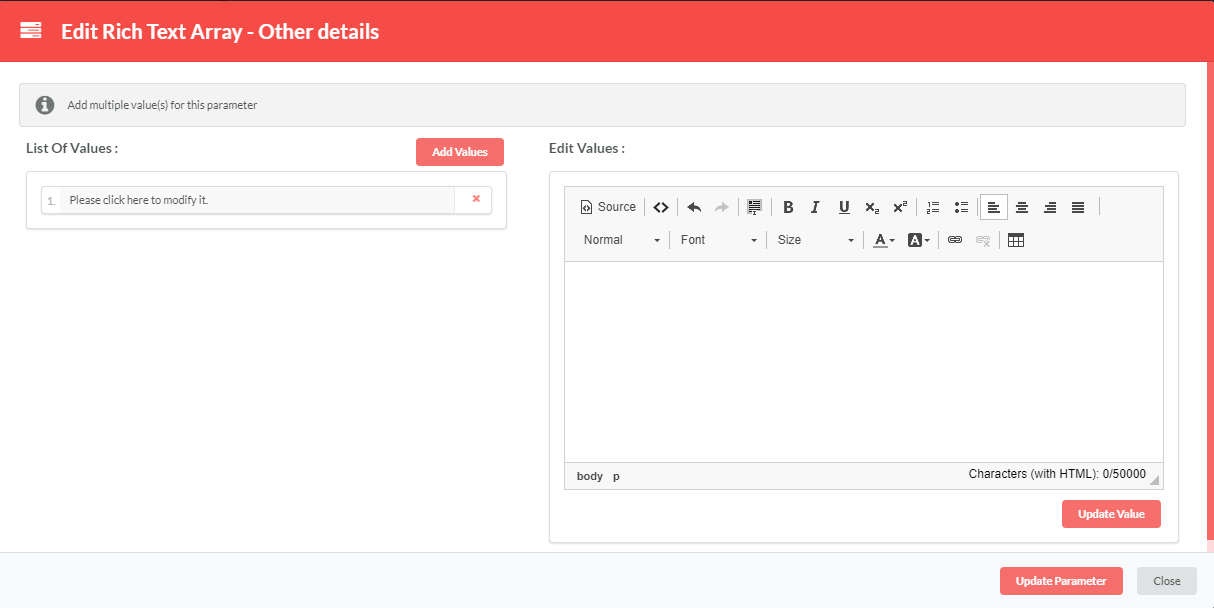
In the Rich Text Parameter value box, click Edit Rich text to display the Edit Rich Text Array - <Parameter Name> dialog.
In the Edit Rich Text Array - <Parameter Name> dialog, click Add Values to add an array value.
Under Edit Values, in the Rich Text box, type the array value. Use the formatting options available in the rich-text editor interface to make changes to the text or upload an image. Refer Upload an image section under Admin Message.
Repeat the previous two steps (i.e., step 2 and 3) to add more values.
Click Update Parameter to save changes.
10.2.13. Editing LDAP Users List Parameter Type
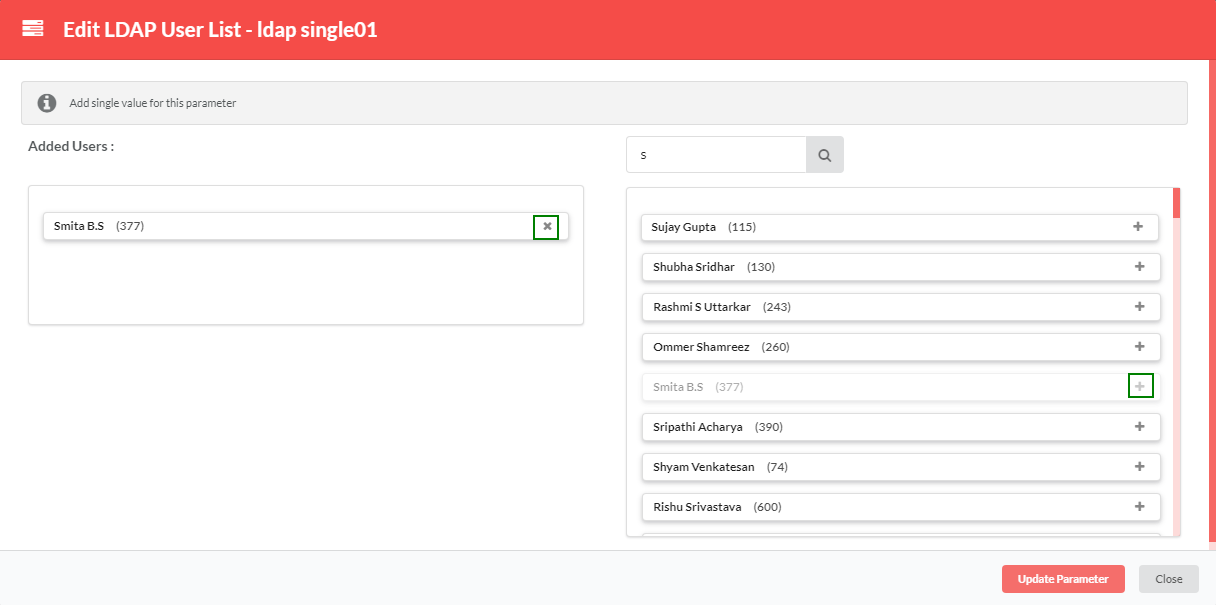
To edit values for LDAP User List Type Parameters with single-select:
In the LDAP User List value box, click Edit list to display the Edit LDAP User List - <Parameter Name> dialog. The LDAP User List value box contains a value (user) assigned, if any.
In the Edit LDAP User List - <Parameter Name> dialog, in the Search LDAP user search box, type in the name of the user you wish to add. A list of LDAP users matching the name displays below.
Click the Add icon (
 ) corresponding to the user name that you wish to add. The selected user gets populated under Added Users replacing any existing user name. Any already mapped user is removed and replaced with the selected user name. You can click the delete icon (
 ) if you wish to delete a user from under Added Users.
Click Update Parameter to finish adding an LDAP user.
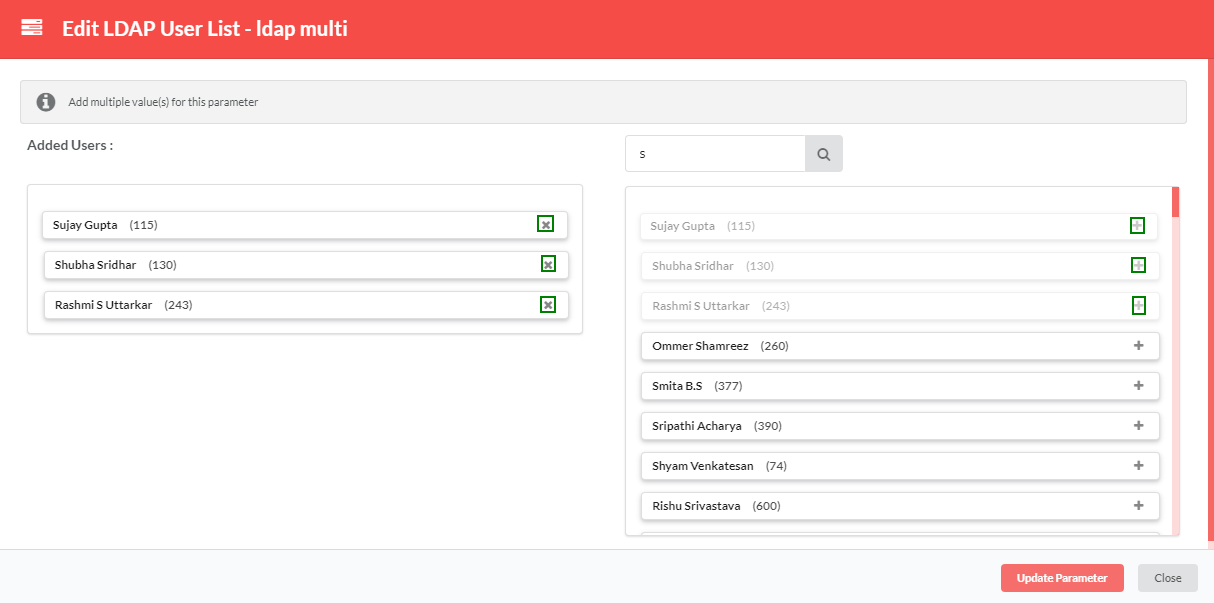
To edit values for LDAP User List Type Parameters with multi-select:
In the LDAP User List value box, click Edit list to display the Edit LDAP User List - <Parameter Name> dialog. The LDAP User List value box contains a summary of number of values (users) assigned, if any.
In the Edit LDAP User List - <Parameter Name> dialog, in the Search LDAP user search box, type in first few letters of the name of the user you wish to add. A list of all LDAP users matching the name displays below.
Click the Add icon (
 ) corresponding to the user name that you wish to add. The selected user gets populated under Added Users.
Repeat the previous step if you wish to add more users. Click the delete icon (
 ) if you wish to delete a user from under Added Users list.
Click Update Parameter to finish adding LDAP users.
10.2.14. LDAP Attribute Mapping Parameters
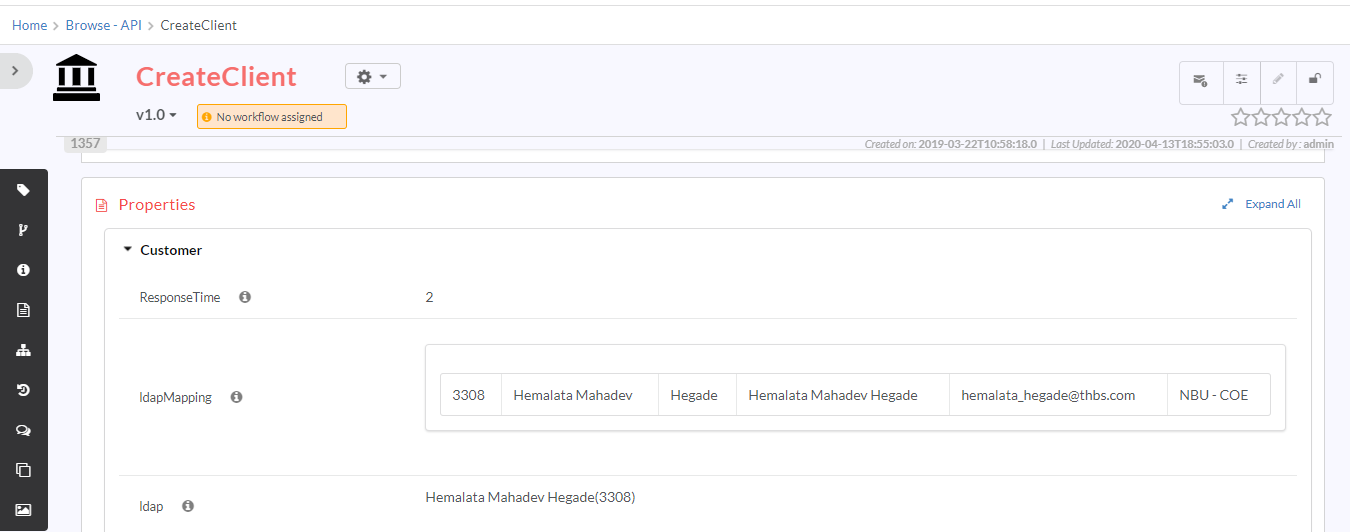
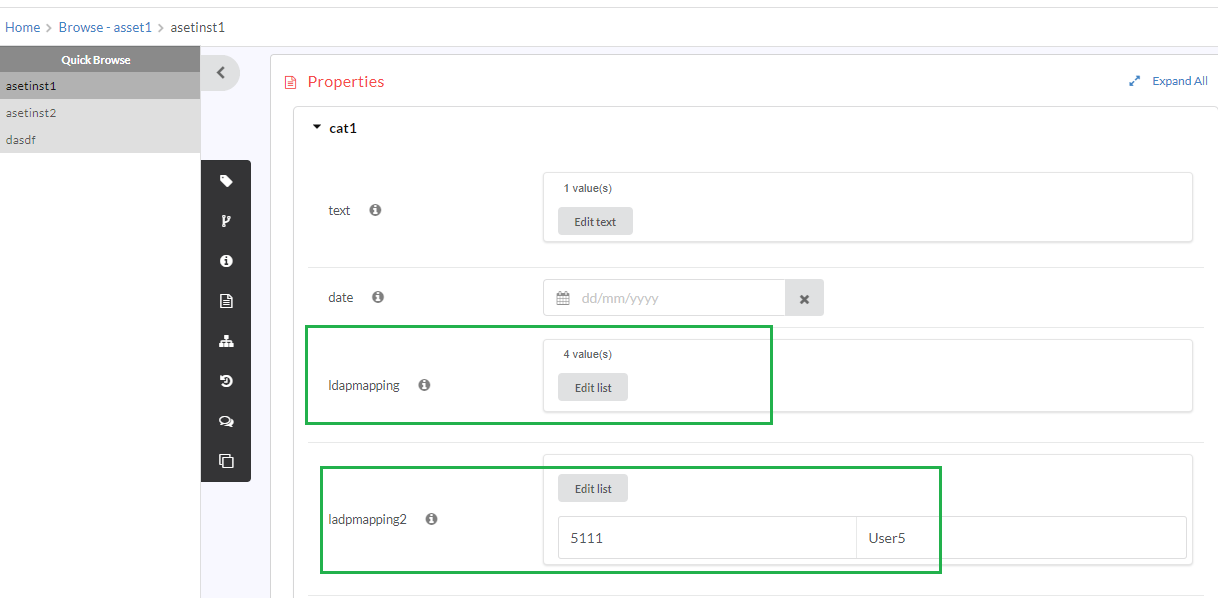
LDAP parameters can be configured for Single and Multiple users. ldap attribute mapping parameter values will be displayed in table format in the Asset Instance Version page.
The LDAP attribute mapping allows the users to retrieve and display the data in table format. The parameter can be mapped to different attributes. The combinations of the attribute are First Name, Last Name, Email ID, and User Id etc.
The sections below describes to Add, Modify and View the LDAP attribute mapping parameters.
View LDAP attribute Mapping parameters for available Assets and its Instances
Login to RepoPro with valid credentials. Homepage displays with available Assets Lists.
From the list of Asset Types, click an Asset Type to display the Browse <Asset> Instances grid view screen that contains all the Asset Instances of that Asset Type.
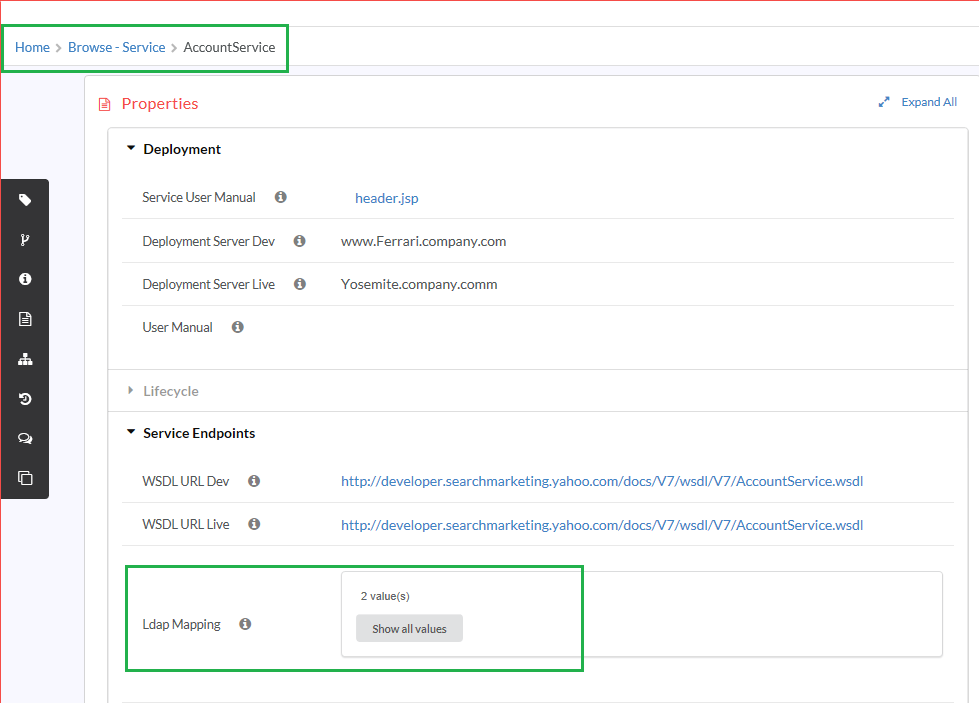
The Asset Instance page shows the new parameter ldap mapping. The total number of associated values will be displayed.
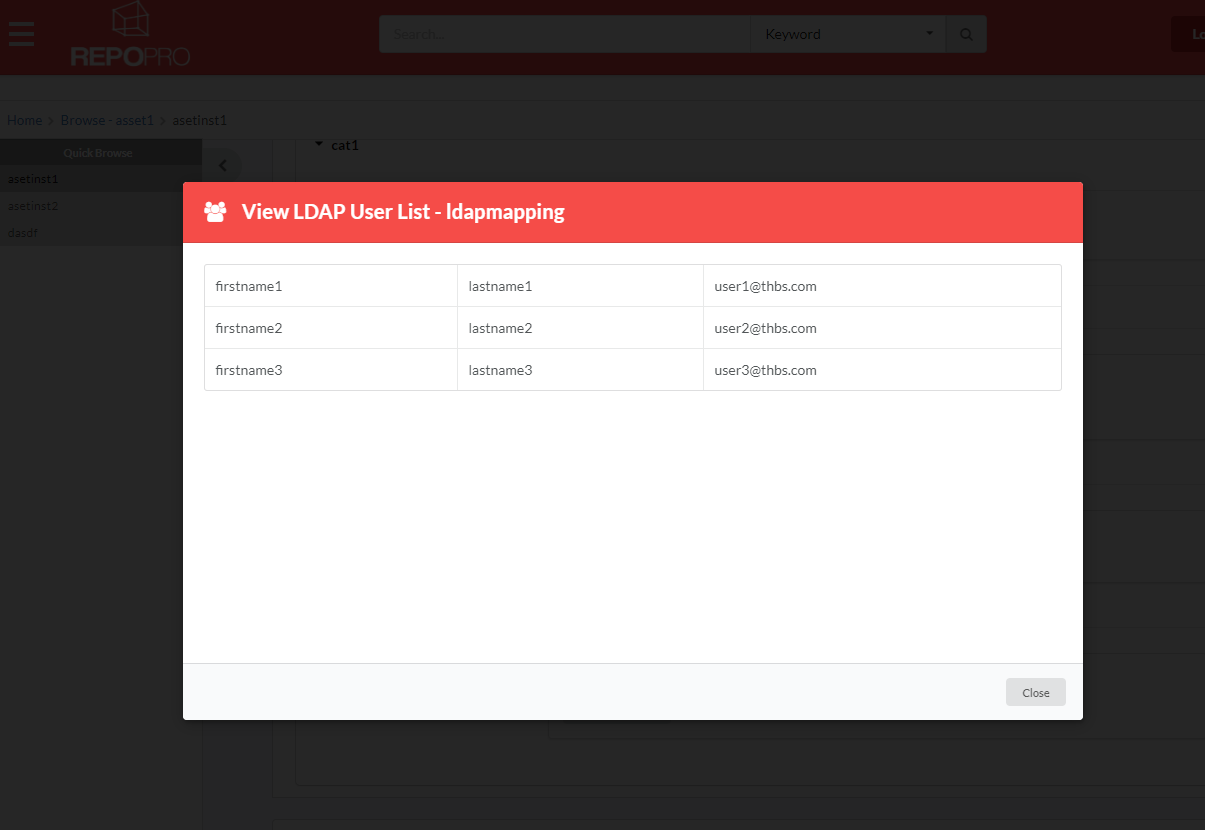
Upon selecting the Show all values option, the user list with the attributes values will be displayed in the View LDAP User List –ldapmapping dialog box.
Add LDAP attribute Mapping parameter for newly created Assets
Login to RepoPro with valid credentials. Select the Asset, browse page will be displayed. Click the Three-lined menu icon and select the + icon to Add a New Instance for the selected Asset.
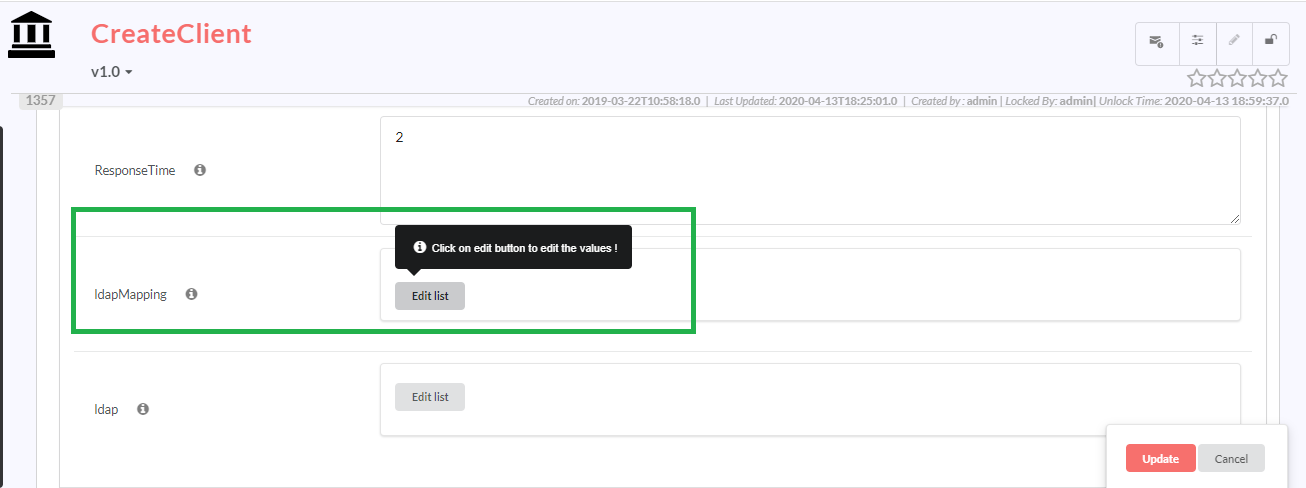
Create New Instance Page displays. Populate the mandatory data. Scroll down to Properties section to add the values for LDAP mapping parameter.
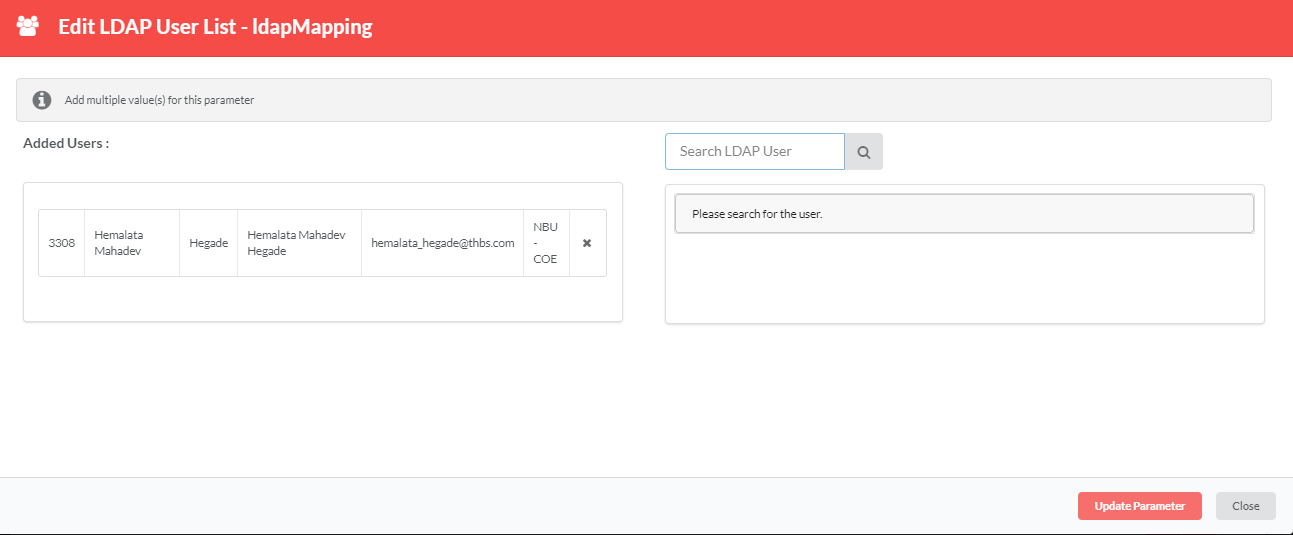
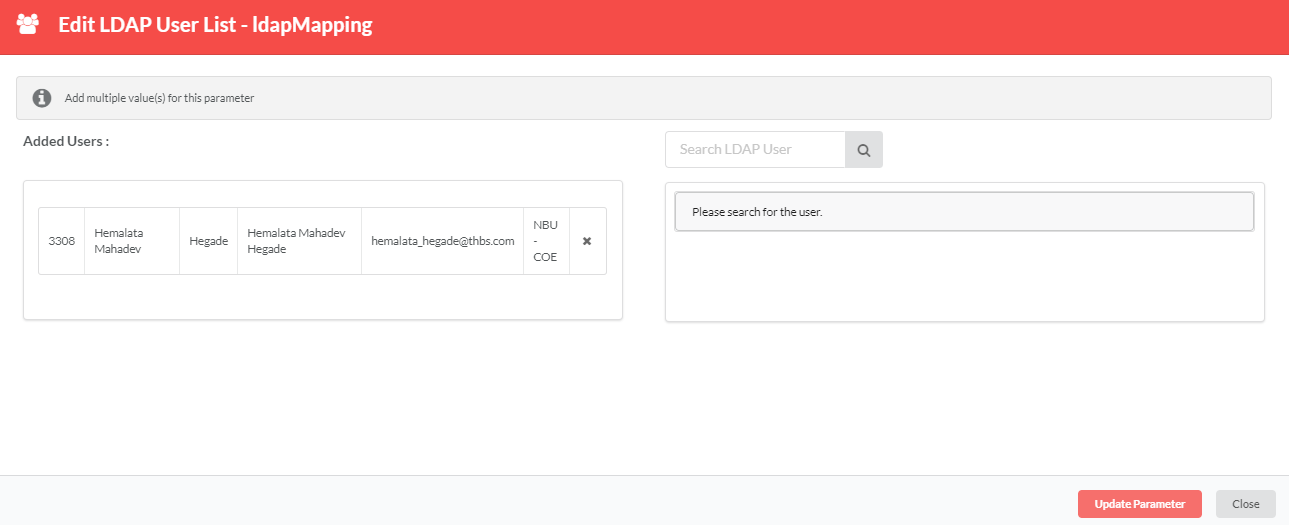
Click Edit List button, Edit LDAP UserList – ldapmapping dialog window will be displayed. Search for the user details, mapped attributes list will be displayed, Add the values and Update parameter value.
The newly added ldap Users details are visible in Properties section in Asset Instance Version page.
Click the Edit List button, a dialog window displays and allows the user to view and modify the data.
Navigate back to Browse page, the Instances are shown which has the ldap attribute mapping parameter values. The data shown will be for single and multiple select. For multiple select, count of values will be displayed.
Click the count link for ldap mapping parameter from Browse page. Users will be redirected to Asset Instance Version page and the ldap parameter is highlighted. The values displayed are in table format.
Note
The highlight of ldap attribute parameter will last only for 10 seconds.
Modify LDAP Attribute Mapping Parameters
From the list of Asset Types, click an Asset Type to display the Browse <Asset> Instances grid view screen that contains all the Asset Instances of that Asset Type. In Asset Instance page, select the click to edit Instance icon (![]() ). The instance edit page displays the following sections:
). The instance edit page displays the following sections:
- Tags
- Taxonomies
- Overview
- Properties
- Relationship
- Reverse Relations
- Scroll to Properties section, the ldapmapping attributes are displayed with available data.
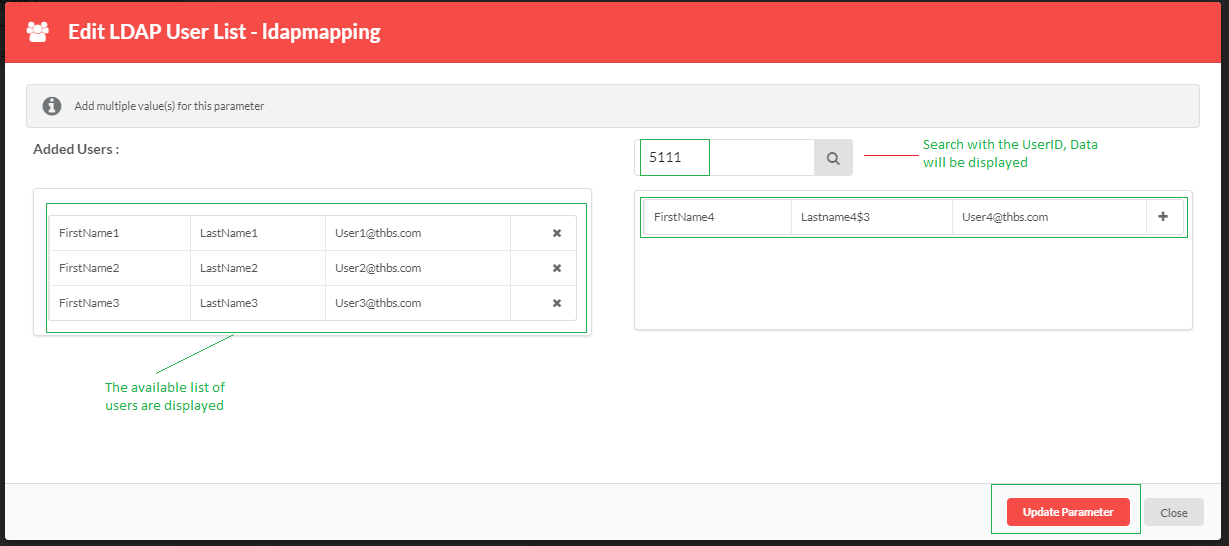
- Click Edit List button. Edit LDAP User List – ldapmapping dialog window pops up and prompts the user to Add/delete the parameter values. Search for either User ID, First Name, Last Name or Email ID. If the search is successful, data will be displayed. Click the + icon to add the users under ‘Added Users’ section. Click Update Parameters.
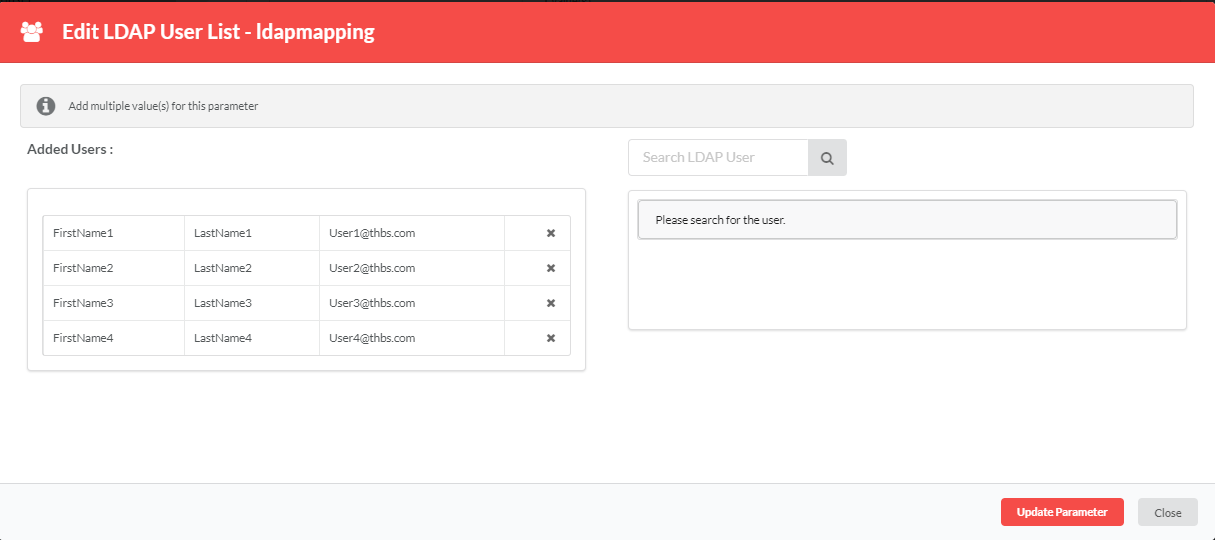
The data will be updated and displayed under Added Users section.
Note
The dialog window presents the available list of users. The user list can only be deleted and the data cannot be modified.
The updated list for ldapmapping parameters is visible in Instance page under Properties section.
Note
The other ldap attribute parameters can also be updated as mentioned above.
- Navigate back to Asset Instance page, the Browse <Asset> Instances will display the instance data along with ldap parameter values under Properties column.
- Click link for ldap mapping, users will be redirected to a page and ldap parameter is highlighted. The values are displayed in the section.
Note
The highlight of ldap parameter will last only for 10 seconds.
10.2.15. Relationships
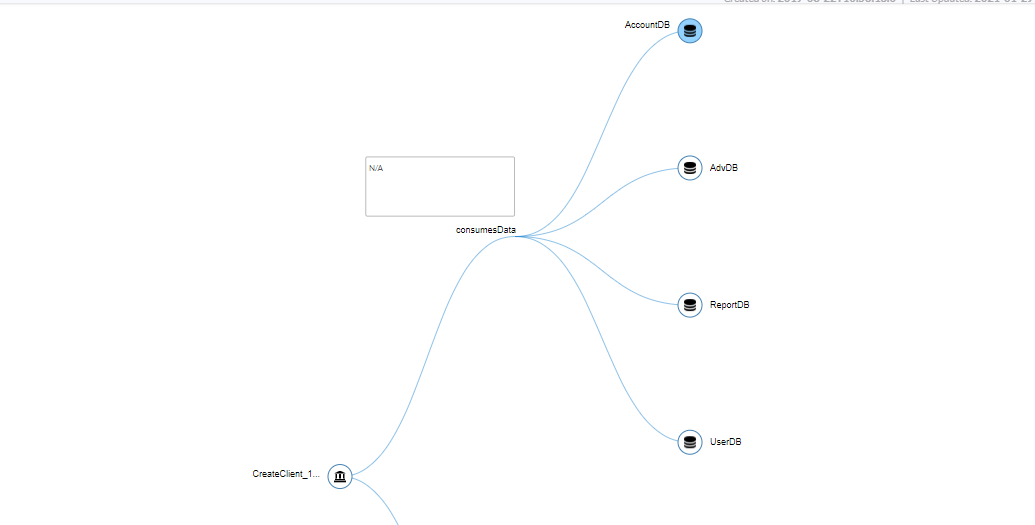
The Relationships section of the View/Edit Asset Instance screen allows the user to visualize existing Relationships and also edit Relationships. The user can switch between a graphical and tabular views of Relationships. In the tabular view, only the first level of relationships display whereas in the graphical view, the user has the added capability of expanding relationships for any of the items. In both cases the items have hyperlinks that allow the user to navigate to the corresponding asset instances.
Users can add Relationships or remove existing Relationships to draw up an updated Relationship view. The Relationship views update automatically to reflect each change in the Relationships.
To assign child Instances to Relationships of type: Association and Classification:
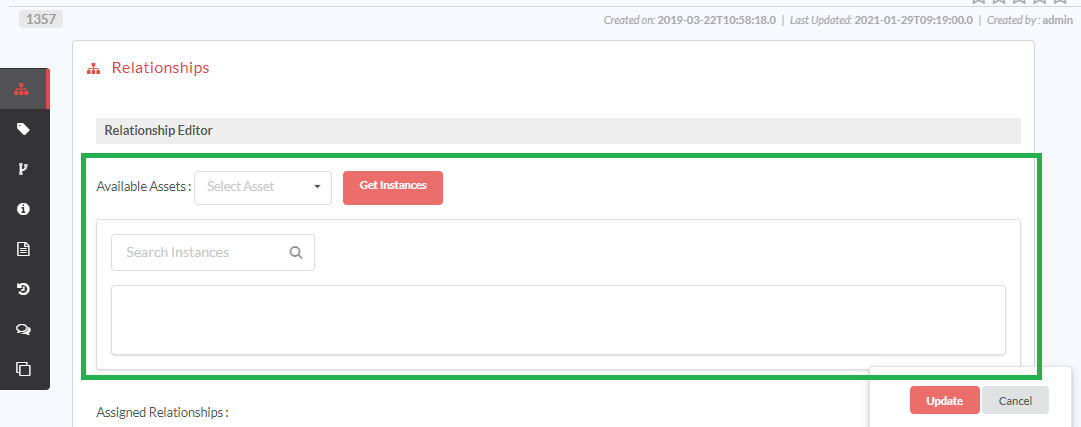
In the Relationships section, click the edit icon (
 ) (if in View mode) to display the Relationship Editor in an expanded view.
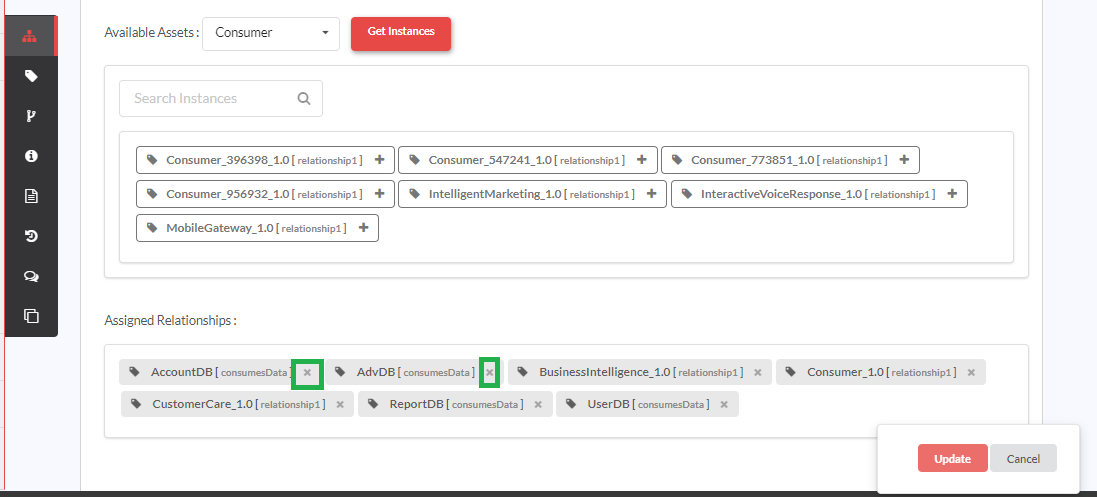
In the Available Assets drop-down, select the Asset Type, Instances of which have to be assigned to the Relationship. The box below displays a list of available Instances for the selected Asset.
Type the name of the Instance in a predictive Search Instances search box to zero down to the Instance to add.
Click to select the Instance and assign it to the Relationship. The Asset Instance now displays in the Assigned Relationships box.
Click Update to finish assigning the Instances and load the Relationship Tree with the changed Relationships.
To filter the Relationship tree based on a Relationship name:
In the Relationships section, click the edit icon (
 ) (if in View mode) to display a Relationship Editor in an expanded view.
In the Filter drop-down box, click to select the Relationship name to use for the Relationship tree and filter out other Relationships.
Click Apply to display an updated Relationship Tree with the Relationship based on the selected Relationship name.
To remove an assigned child Instance from the Relationship having destination with Relationship Types: Association and Classification:
In the Assigned Relationships box, click the delete icon (
 ) attached to the Assset Instance you wish to delete.
For deleting child instances with destination of Relationship Type: Aggregation and Composition, use the delete option from the browse grid of the corresponding Asset Type or from the View/Edit Asset Instance screen of the concerned Asset Instance.
Note
When Concurrent Editing Lock is enabled, once edit icon ( ![]() ) is clicked, the Asset Instance version is marked as locked for editing.
The user can continue editing Relationships until the expiry of Lock Release Time duration or until the user unlocks the instance version or until the user clicks the save icon.
Thereupon, the Asset Instance Version is automatically unlocked.
Alternatively, the user can unlock the Instance Version by clicking the Lock icon ().
) is clicked, the Asset Instance version is marked as locked for editing.
The user can continue editing Relationships until the expiry of Lock Release Time duration or until the user unlocks the instance version or until the user clicks the save icon.
Thereupon, the Asset Instance Version is automatically unlocked.
Alternatively, the user can unlock the Instance Version by clicking the Lock icon ().
To add description to the Relationship tree:
Users who have edit access to a particular instance and to the Manage Relationship tab of that instance can add/edit relationship description of the relationship tree. In the View mode, user can view the relationship description.
Users with Manage Relationship tab access but no edit access of the instance cannot edit the relationship description. And, users with only edit access of the instance but no Manage Relationship tab access cannot edit the relationship description.
- In the Relationships section, click the edit icon (
 ) (if in View mode) to display a Relationship Editor in an expanded view.
- In the Relationship Description box, enter the relationship description and then click the tick icon (
 ). Click
  to clear the description. You can enter a maximum of up to 100 characters. If no description is saved, then N/A will be displayed.
Note
Any change made to the Relationship Description here will be reflected in the Relationship Description in Manage Relationship section and Add/Edit Relationship dialog. Refer Manage Relationships for details.
- To add/edit relationship description at multiple levels of the relationship tree, click on an asset to enable the relationship description box at the required level.
Switching between Graphical and Tabular views
RepoPro allows its users to switch between the graphical and tabular views of Relationships.
To view the Relationship in a table, click the Tabular View tab.
To switch back to the graphical view, click the Graph View tab.
Downloading the Relationship Tree
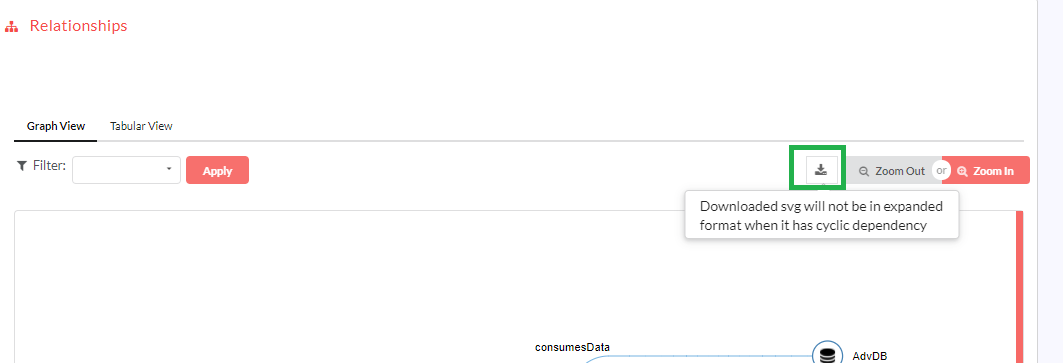
RepoPro allows its users to download the relationship tree. The downloaded relationship tree will be in SVG file format.
- Under the Relationships section, hover over the download icon (
 ). A message displays as shown below.
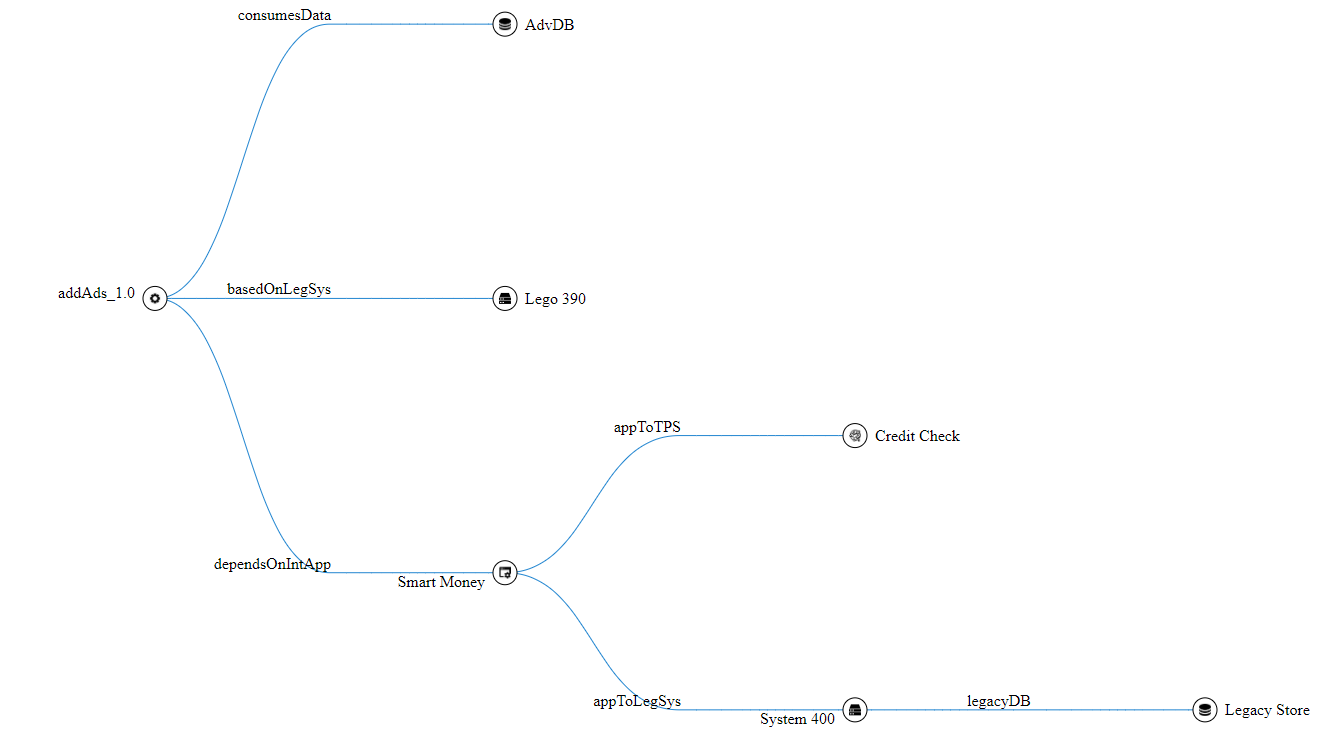
- Click the download icon (
 ) to download the relationship tree. The downloaded relationship tree is displayed in a svg file format as shown below.
The downloaded relationship tree will contain all the levels.
10.2.16. Reverse Relationships
Reverse Relationships allow the user to view all the other Asset Instances where this Asset Instance appears in the Forward Relationships.
Note
If a logged-in user tries to access any of the blocked Asset Instance versions, they will be redirected to an Access Denied page.
10.2.17. Versions
Note
The Versions section is available only if an Asset Type is versionable.
The Versions section shows all the versions for the Asset Instance.
When an Asset Instance has multiple Versions, RepoPro considers each version separately (with each version having its own Property Values, Relationships, etc.).
Note
The Versions section displays only those Asset Instance version(s) for which the logged-in user has view access. Logged-in users with no Edit access to an Asset Instance version are not allowed to edit the versions. Logged-in users with no delete access to an Asset Instance version are not allowed to delete the version.
To create a new Asset Instance version:
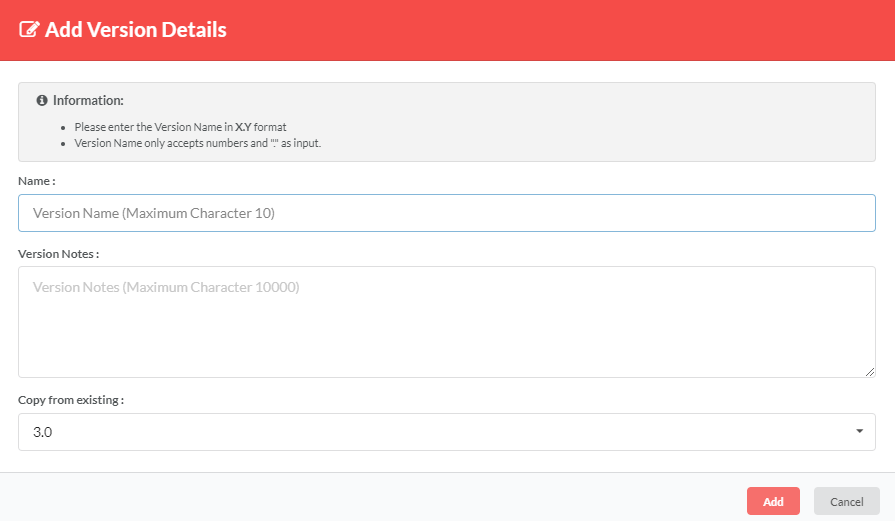
In the Versions section, click the Add icon (
 ) to display the Add Version Details dialog.
Note
You can also add version details from the Browse <Asset> Instances page. Click (
 ) to open the Add Version Details dialog box.
A new version can be created in either of the following two ways:
- As a copy of an existing version (all Parameter values and Relationships are copied)
- On a clean slate using the None option (only mandatory values assigned to Parameters are copied, no Relationships copied)
If None is selected for Copy from Existing, the new version and its chain of children created have their respective mandatory parameter values copied from the respective latest versions. Also, the child instances in the chain of the copied version have new versions created, with only mandatory parameter values copied from the corresponding parents.
If an older version is selected for the Copy from Existing, all existing values of that version is copied for the newly created version. Also, when a new version is created as a copy of an existing version, the child instances in the chain of the copied version have new versions created as copies of the corresponding parents.
Note
Asset Instance versions for which the user does not have view access are not included in the Copy from existing drop-down list.
In the Name box, type in the Version name.
In the Version Notes box, type in the notes for the Version.
If you wish to copy from an existing version, click Copy from existing drop-down list to select from a list of available versions of the Instance. Alternatively, select None to copy only mandatory values.
Click Add to create the new Version.
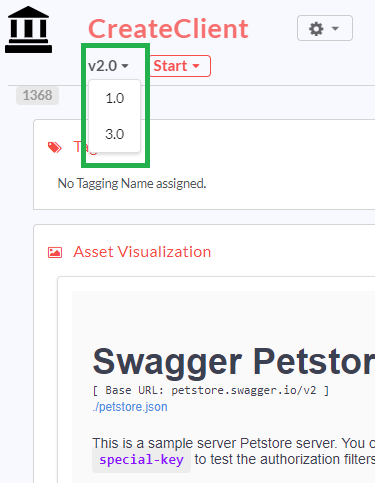
The version number for the new Asset Instance defaults to 1.0 for versionable assets, and can be edited later, if required.
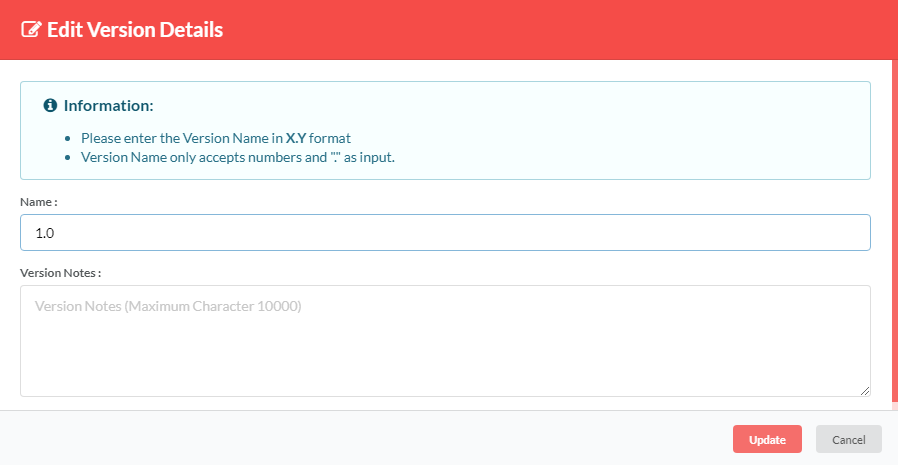
To edit an Asset Instance version:
In the Edit column, click the Edit icon (
 ) to display the Edit Version Details dialog.
Type to edit changes and then click Update to include the changes in the View/Edit Asset Instance screen.
To delete an Asset Instance version:
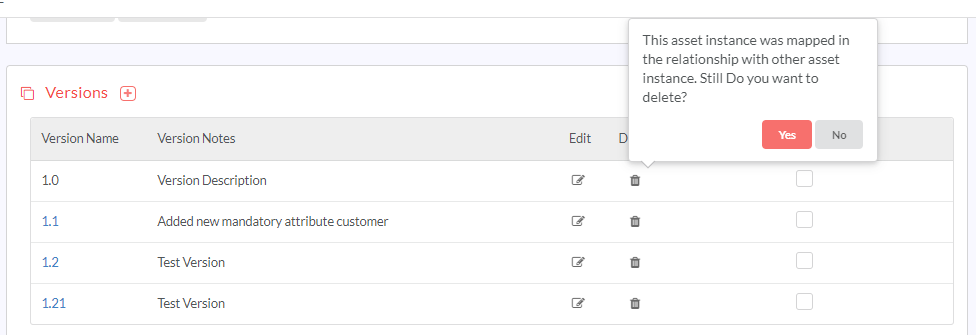
In the Delete column, click the Delete icon (
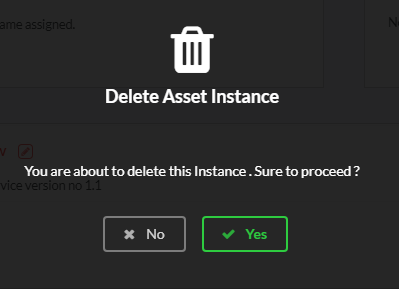
 ). A confirmation message displays.
In the Confirmation message, click Yes to delete the Asset Instance version.
Note
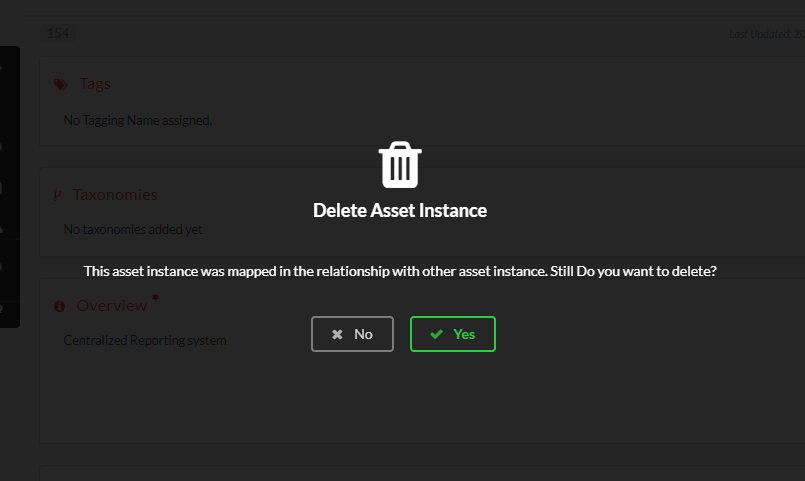
When an instance is mapped to another instance in relationship tree, and if user tries to delete destination instance, confirmation message about the instance being mapped will be shown in the UI.
To compare two versions of the Asset Instance:
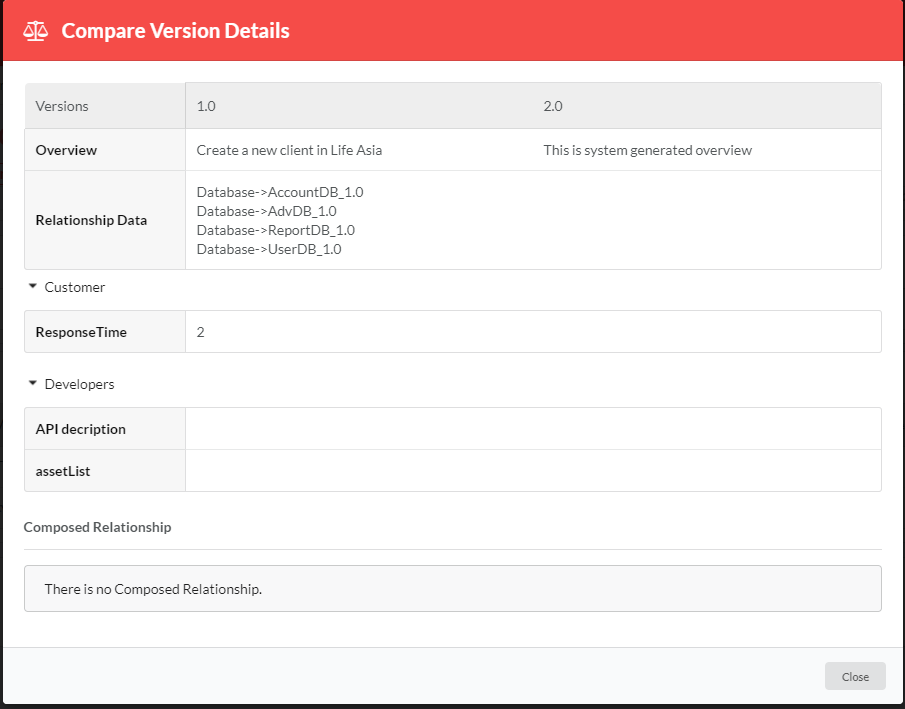
In the Compare column, select the two checkboxes corresponding to the Versions that you wish to compare. The Compare Version Details dialog displays with Overview, Properties and Relationships shown in the comparison.
If there are Relationships of type Composition, the comparison includes the details of the Child Instances also.
10.2.18. Revision History
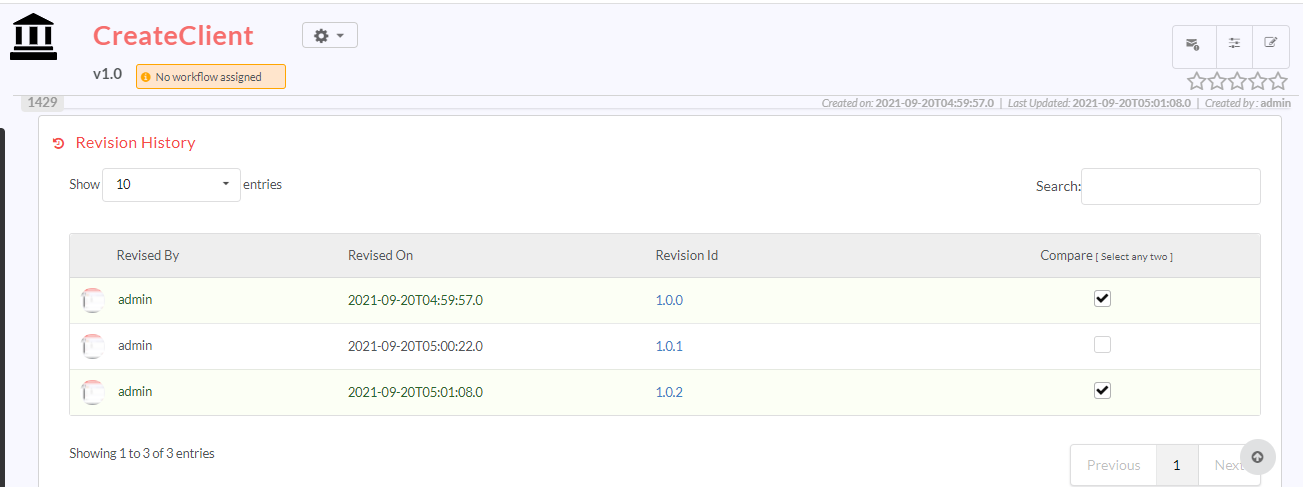
Revision History lists out all the revisions made to the Asset Instance. RepoPro creates a revision with a unique ID (generated based on the version number) for each change made to Overview or Property Values (except Derived Attribute, Derived Computation values and Derived attribute for Asset List) or Relationships of the Asset Instance. The user name along with the date and time of change is also captured and displayed. When an Instance is renamed all the versions of the Instance have their revision histories updated to reflect the same.
To view a comparison between two revisions:
- In the Revision History section, in the Compare column, click to select the checkbox(es) corresponding to the revisions that you wish to compare.
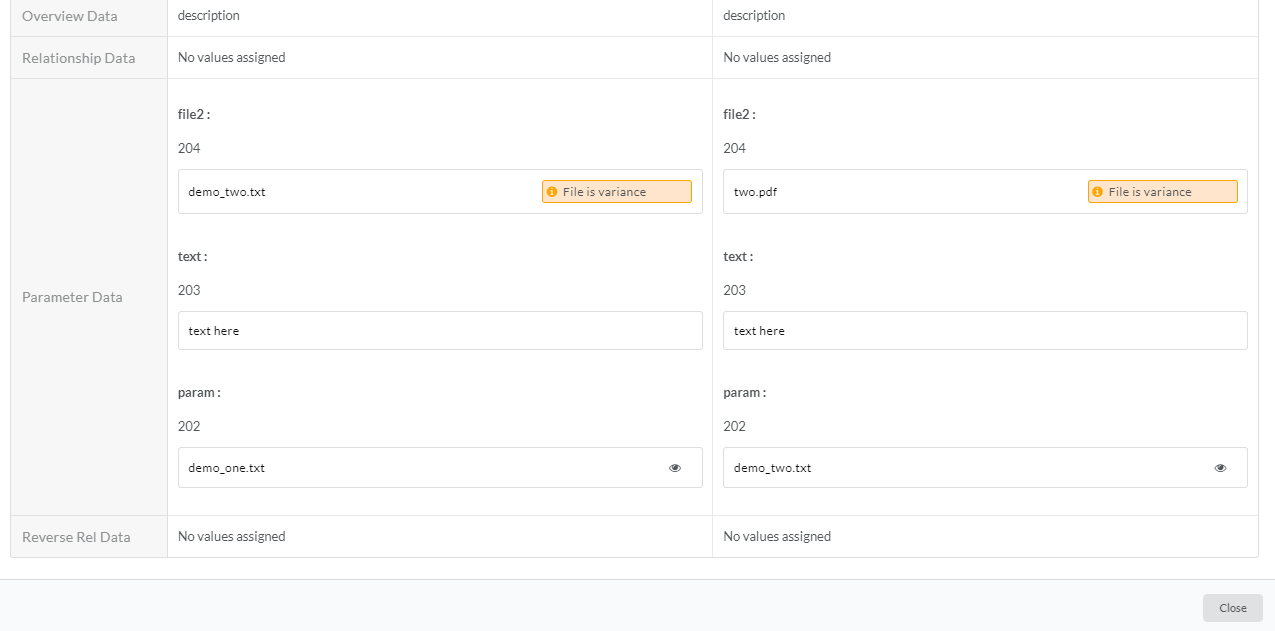
The Compare Revision Details dialog displays.
Note
- Only two files can be compared at a time and both the compared files must have the same extension. If file types are of different extension, the files cannot be compared and “File is variance” message is displayed.
- All file types except image file types are acceptable for comparison.
- To view the detailed comparison query, corresponding to Parameter Data column, click the eye icon
 next to the file type. The Comparison Query dialog displays.
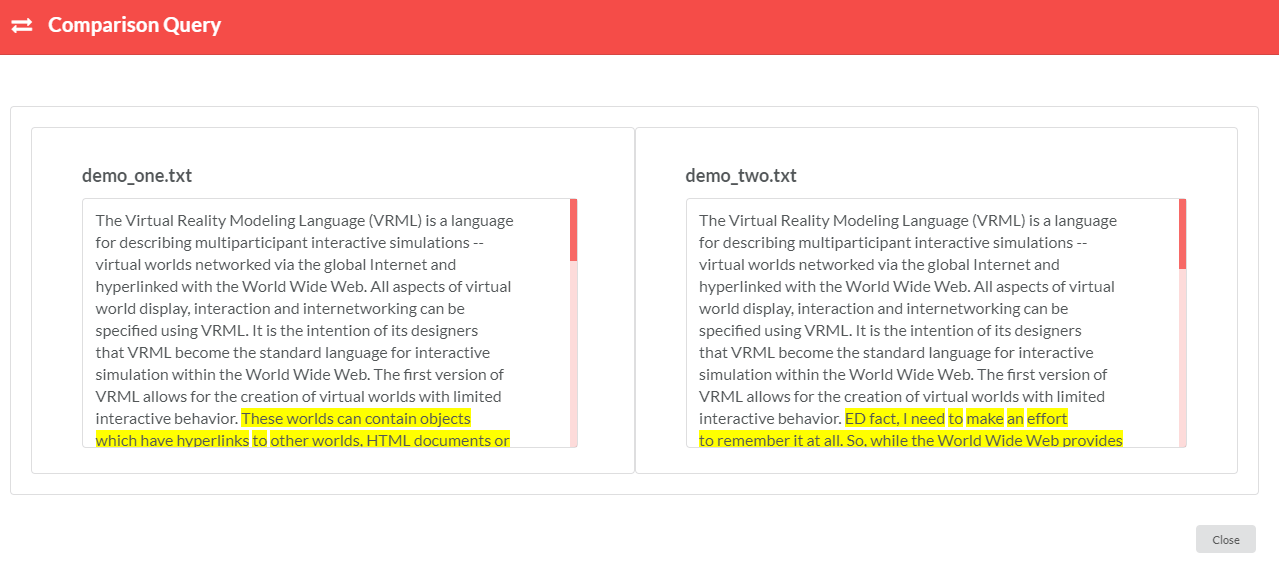
The two files are displayed for comparison side-by-side. First file is displayed on the left-hand-side while the second file is displayed on the right-hand-side. The content of both the files is displayed, with the difference between the two being highlighted in yellow. Use the scroll to see the entire content.
- Click Close to exit the Comparison Query dialog.
- Click Close to exit Compare Revision Details dialog.
10.2.19. Discussion
RepoPro allows logged-in users to post Comments against each Asset Instance version.
To post a Comment:
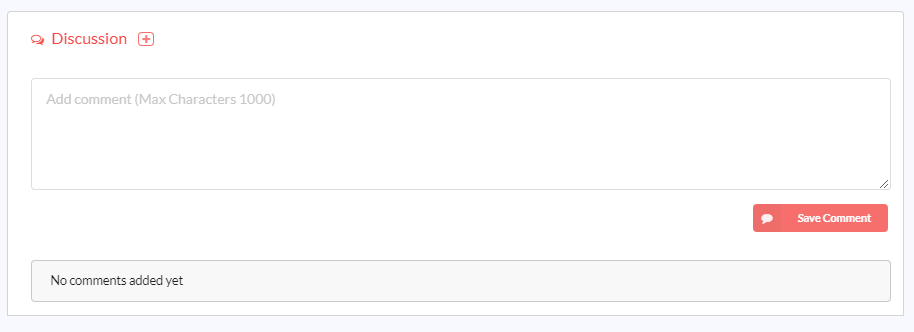
- In the Discussion section, click
 . The Add Comment box displays.
 - Type a comment in the text box and click Save Comment.
To reply to a specific comment:
In the Discussion section, Click Reply below the comment for which you want to add a reply.
10.3. Delete Asset Instance
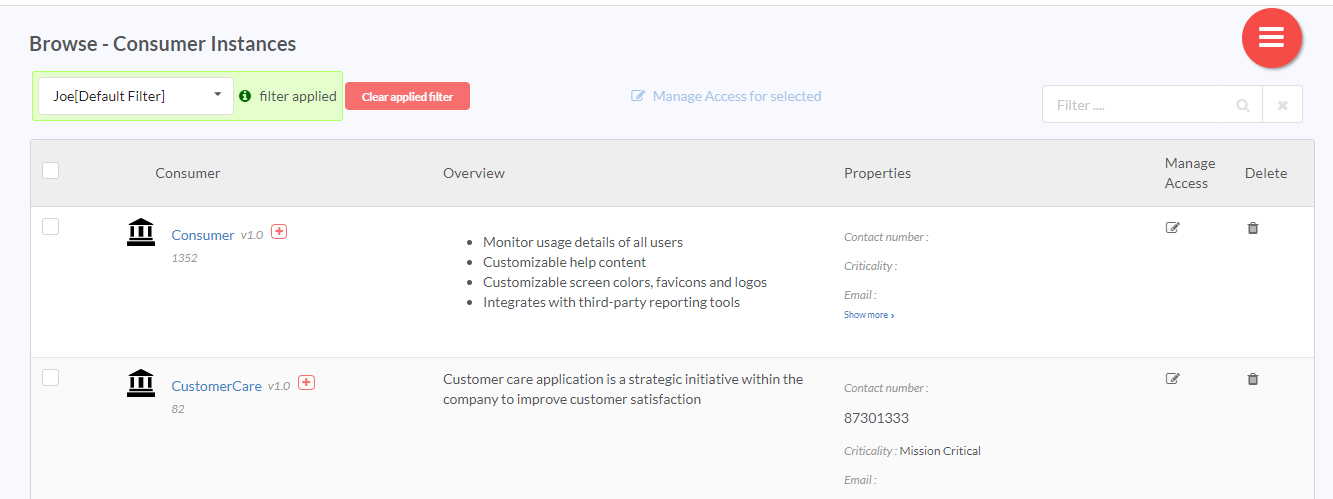
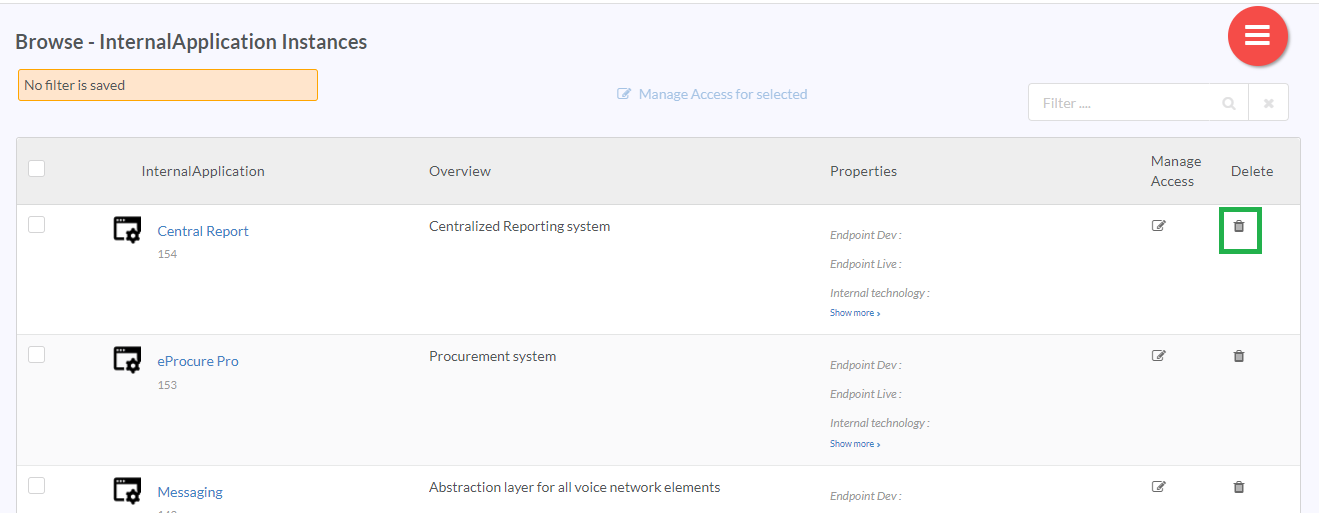
To delete a specific Asset Instance, in the Browse <Asset> Instances screen, in the Delete column, click the delete icon (
 ) for the Asset Instance that you wish to delete.
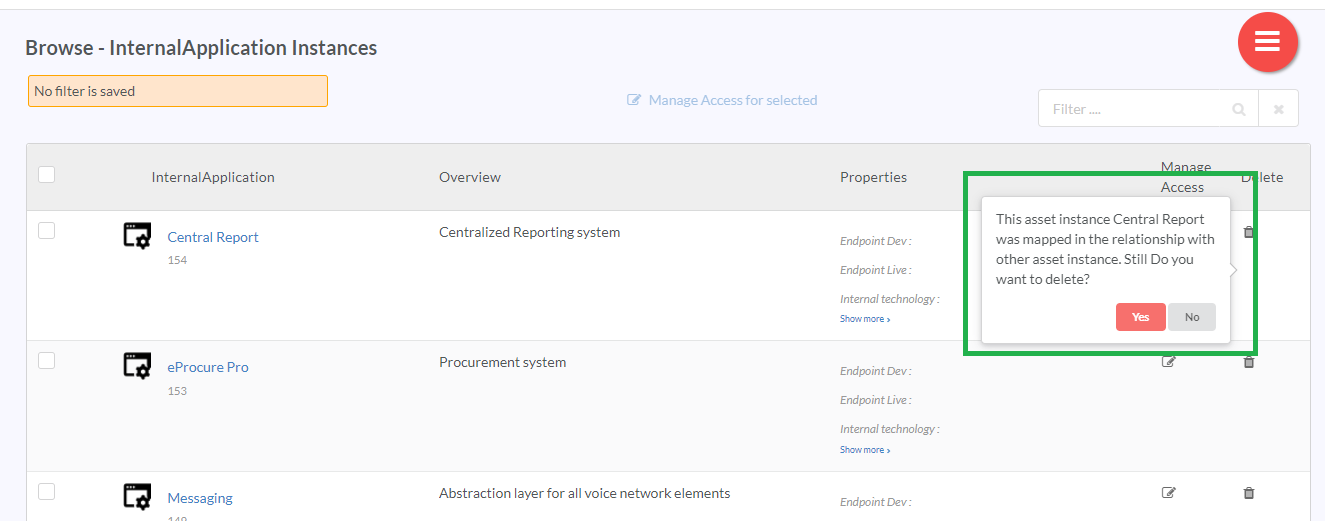
If the instance is mapped in a relationship with another asset instance, a pop-up displays.
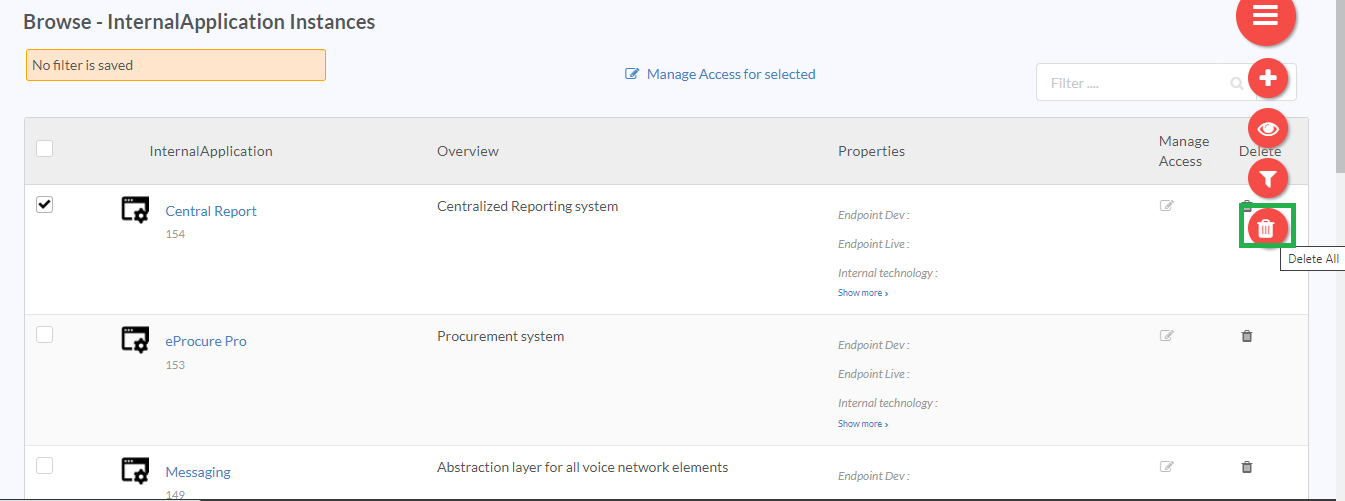
You can also select the checkbox corresponding to the Instances Name you wish to delete, then click the Hamburger menu (
 ) and finally click the (
 ) delete icon.
To delete all the instances of the asset, select the checkbox corresponding to the Instance Name in the header row. A notification displays.
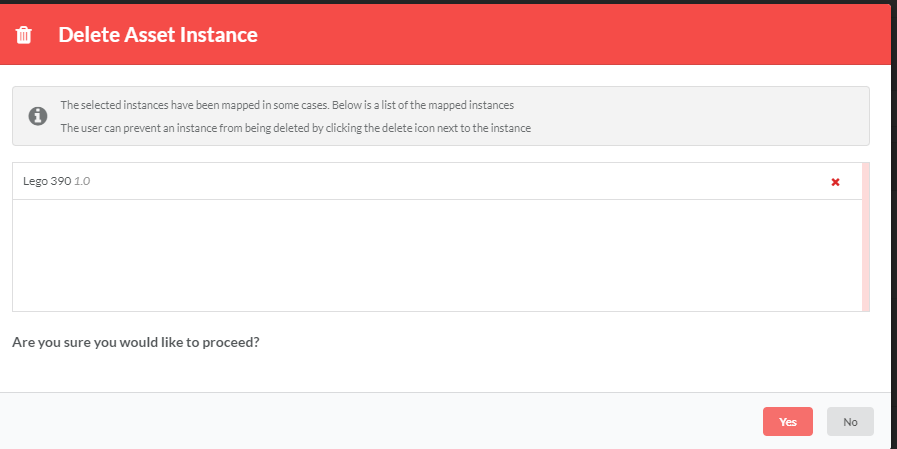
Click Yes to display the Delete Asset Instance dialog box.
If the list has mapped instances, then the Delete Asset Instance dialog box displays the list of mapped instances.
Note
You can prevent a mapped instance from being deleted by clicking the delete icon ![]() next to the instance.
next to the instance.
- Click Yes to proceed. The asset instance is deleted.
10.4. Manage Asset Instance Access
To manage which Group(s) of users has access to an Asset Instance version:
In the Browse <Asset> Instances screen, in the Manage Access column, in the row that has the Asset Instance that you wish to manage Asset Instance Access for, click the Edit icon(
 ).
The Manage Asset Instance Access dialog displays.
).
The Manage Asset Instance Access dialog displays.Note
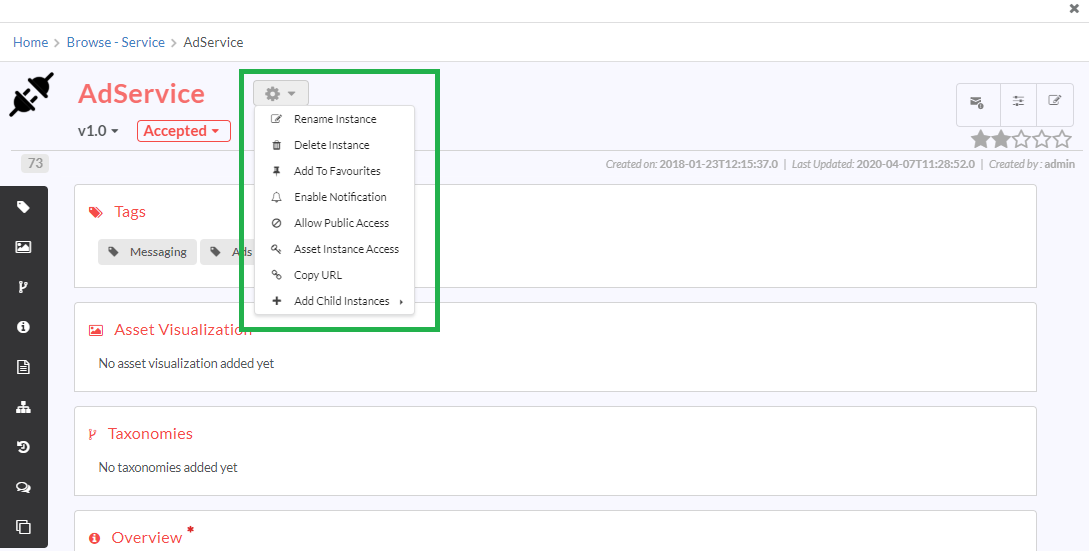
You can also manage Asset Instance access from within the View/Edit Asset Instance screen using the Asset Instance Access option in the Action Selector menu.
In the Manage Asset Instance Access dialog, click to select the checkboxes corresponding to the Groups for which you wish to allow Edit, View, Delete access to the Asset Instance.
Below are notes on the implications in each case, i.e., Edit, Delete, View and when none of these are selected:
- Edit: If Edit permission is given to a Group, then the users belonging to that Group have default view option by default. The user can update Overview Description, Metadata Properties, Relationship, Tags and assign or unassign Taxonomies. In the versions tab, the user can add/edit the versions of the Instance. In the Action Selector icon rename, block public access displays. The delete action cannot be performed. In the browse grid check all boxes and click here to view link will be enabled.
- Delete: If Delete permissions are given to the Group then the user belonging to the Group has view option by default, but cannot perform any edit actions. In the versions tab the user can perform delete the versions of an Instance. In the Action Selector icon delete will be displayed. In browse grid delete icon will be displayed.
- View: If only view permissions are given to the group then the user belonging to the group will be not able to perform any edit/delete actions.
- No Edit/Delete/View permission: If there is no permission given to the group the user belonging to the group will not be able to perform search, create filter, browse by taxonomies.
Note
Manage Asset Instance Access option will be visible only if Associated Groups check box is selected in Show/Hide Parameters dialog.
10.5. Using the Filter option
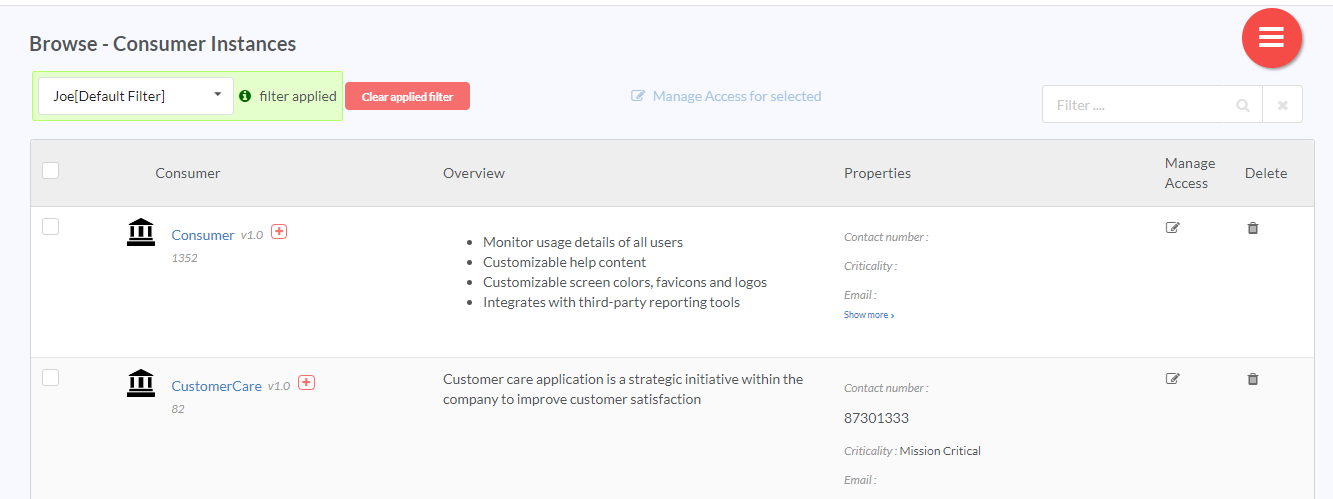
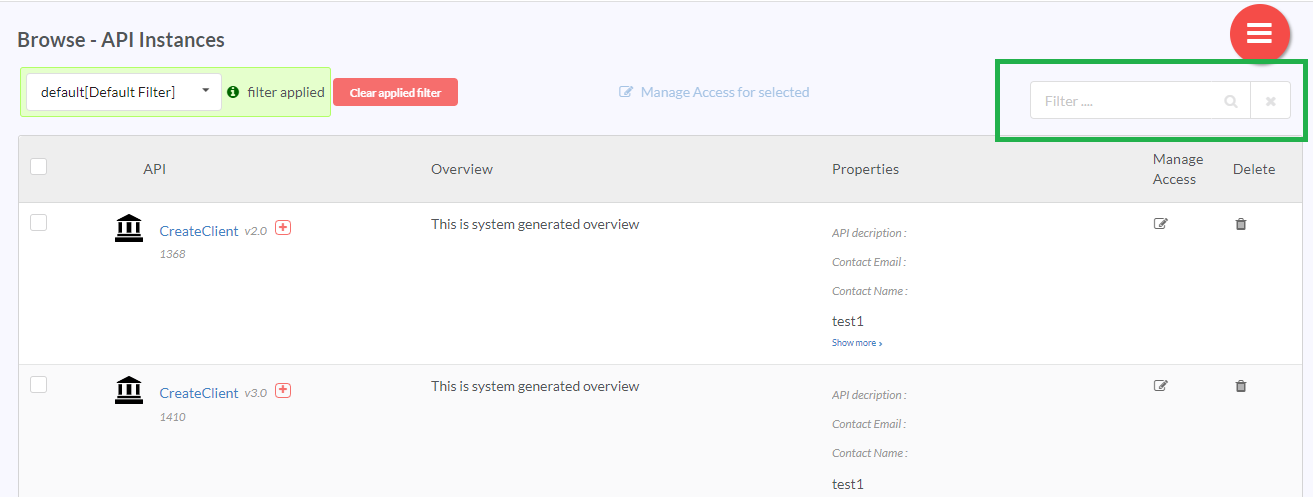
RepoPro allows the user to filter out instances from a huge list of instances using its general filter option present on the Browse - API Instances screen.
To use the filter, in the Filter box type the keywords you wish to use for narrowing down the results. The Browse - API Instances screen updates with fresh results based on the keyword.
10.6. Customize Layout
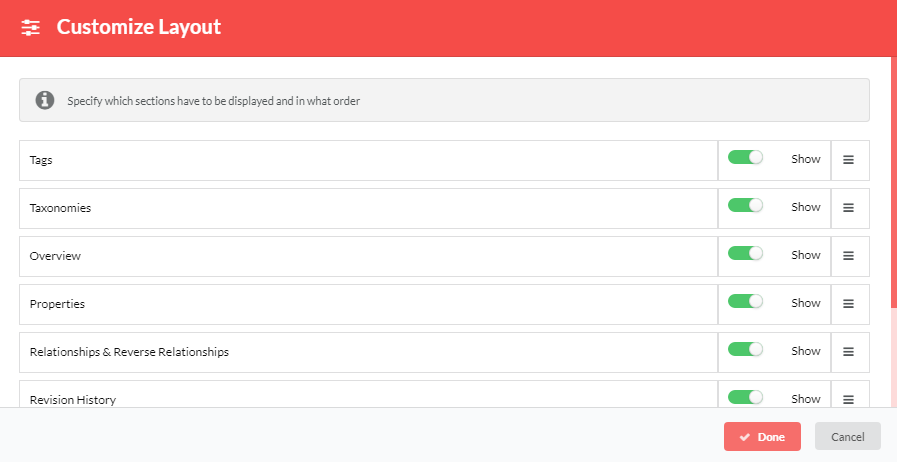
RepoPro allows the user to customize the layout of the View/Edit Asset Instance screen. You can choose the sections of the screen that you wish to display by switching the display on and off, and also decide the order in which you want them displayed.
To customize the View/Edit Asset Instance screen layout:
In the View/Edit Asset Instance screen, click Custom Layout to display the Customize Layout dialog.
The Customize Layout dialog displays listing out all the sections of View/Edit Asset Instance screen.
In the Customize Layout dialog, in the row that has the section that you wish to customize, click and drag the Show/Hide toggler to your right to turn it green, and enable display of that section. Inversely, click and drag the Show/Hide toggler to your left to turn it red, and hide that section.
In the Customize Layout dialog, in the row that has the section that you wish to customize, drag and release the three-lined icon (
 ) to rearrange the order in which the sections appear.
Click Done to save the changes and exit the dialog.
Note
If a parameter is visible and editable to the logged-in user and is also mandatory, the user must provide a value to the Parameter. RepoPro does not allow the user to save the asset instance if the Parameter is left empty in such cases.
