5. Browse
In this section:
The Browse module provides all the necessary options for the user to find information easily and quickly. RepoPro allows the user to browse Asset Instances by:
- Asset Type
- Taxonomies
5.1. Browse by Asset Type
To browse Asset Instances by Asset Type:
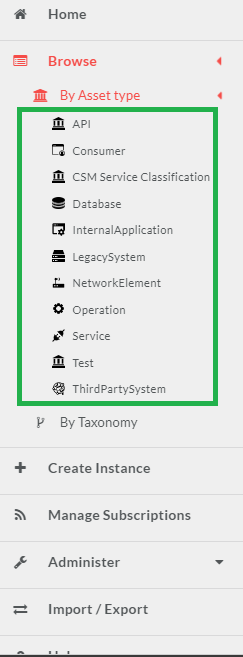
In the main Navigation menu, click Browse > By Asset Type. A list of Asset Types (and associated icons) displays below in an alphabetical order.
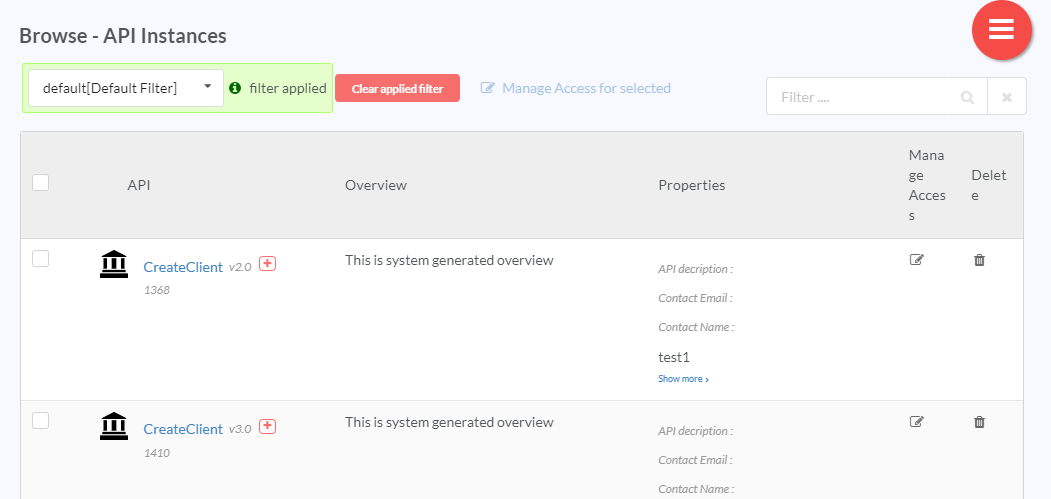
In the list of Asset Types, click an Asset Type to display the Browse <Asset> Instances grid view screen that contains all the Asset Instances of that Asset Type.
The Browse <Asset> Instances screen provides an infinite scroll view. While scrolling downwards, a scroll icon
 appears. Click the scroll icon to be re-directed to the top of the screen. Browse <Asset> Instances screen has a column for the parameter values (Property Values) for each Asset Instance.
Each asset instance in the Browse <Asset> Instances table is a hyperlink that takes the user to the View/Edit Asset Instance screen for that asset instance. Visit View Edit Asset Instance for more information about View/Edit Asset Instance screen. The Add icon (
 ) next to each asset instance allows users to add version details to that asset instance. Click the Add icon (
 ) to open the Add Version Details dialog box. Visit Versions for more information on Add Version Details.
Note
The Add icon (
 ) is available only if an Asset Type is versionable.
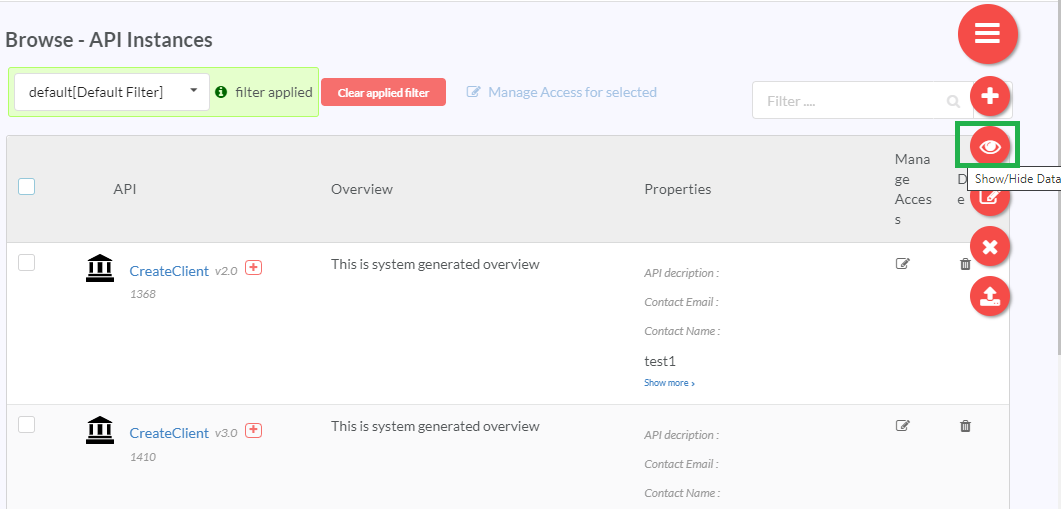
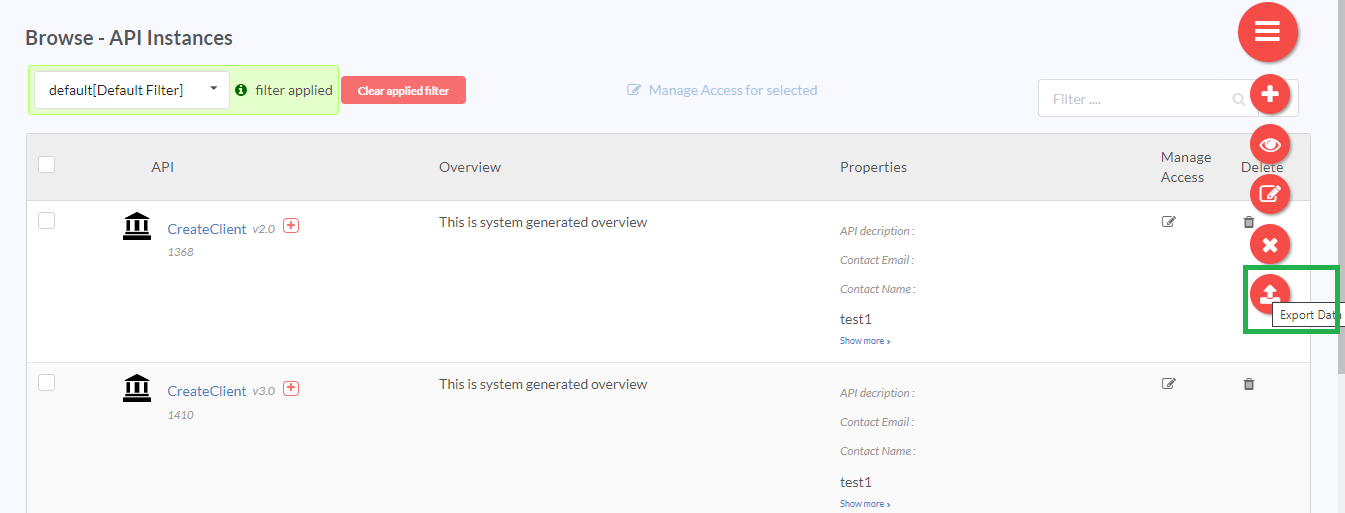
The screen contains a hamburger menu, which provides the following options:
- Add New Instance
- Show/Hide Data
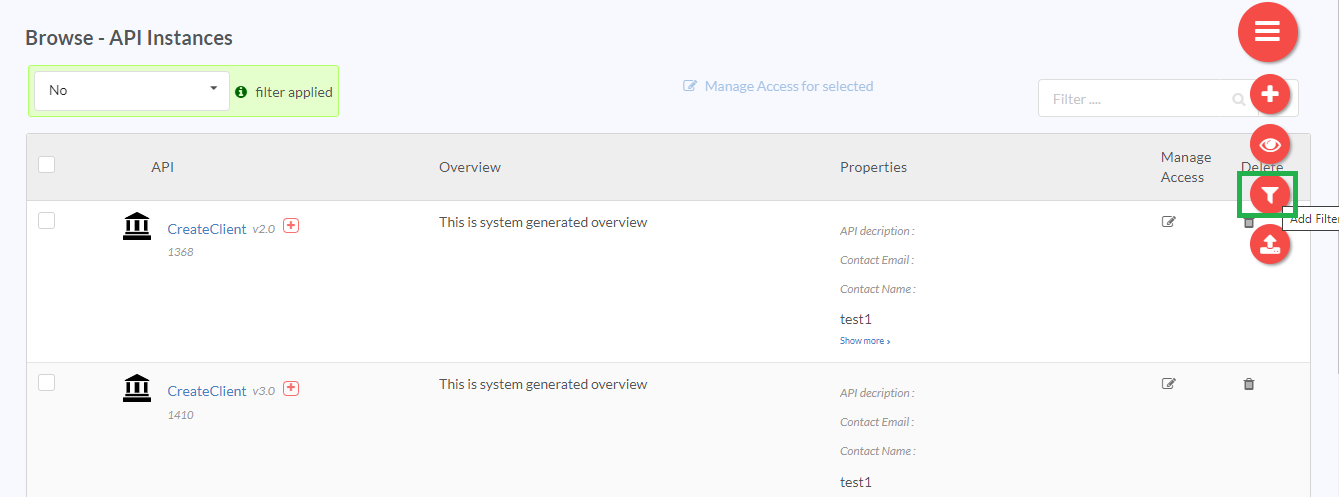
- Add Filter
- Export Data
Any logged in user is allowed to set the default filter. This feature is user specific.
The Browse <Asset> Instances screen will be loaded with default values if default filter is set, else normal Browse <Asset> Instances screen will be loaded.
Note
The order of Categories and Parameters as set in the Edit Asset Type screen is used for displaying them in the Browse <Asset> Instances grid, Show/Hide Data and Add Filter options in the hamburger menu.
The options available in the hamburger menu are:
Add New Instance
The Add New instance option allows the user to add a new Instance for the selected Asset Type.
For instructions on how to add Asset Instances, visit: Add Asset Instances.
Show/Hide Data
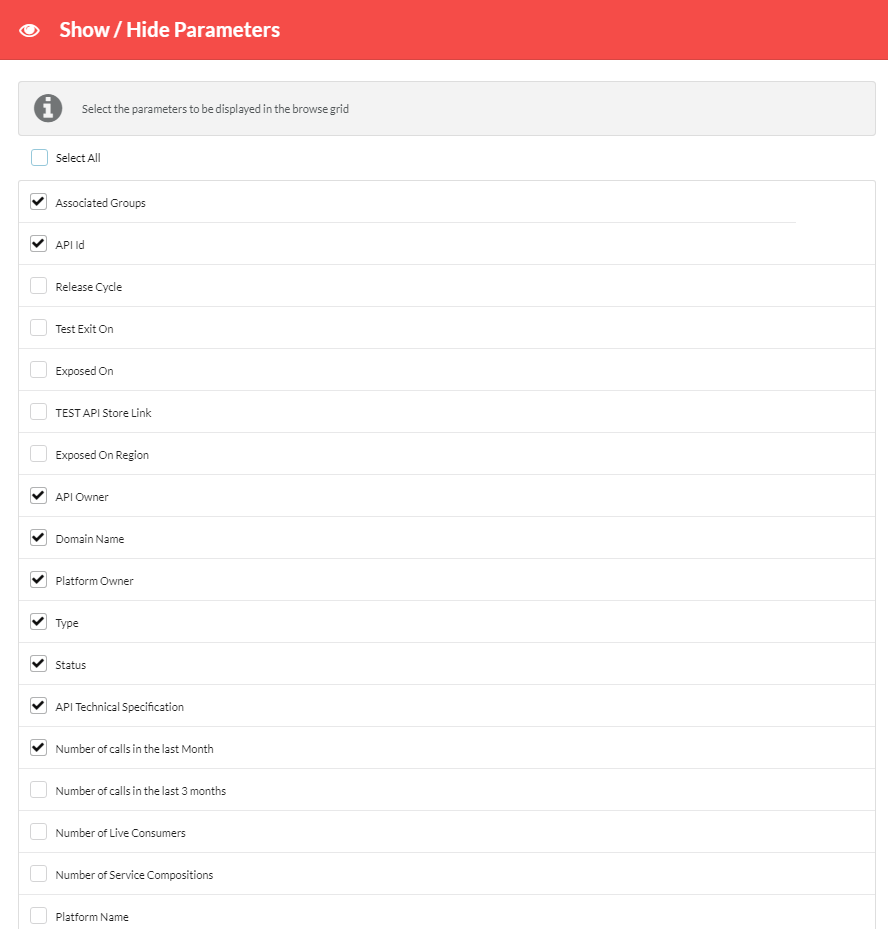
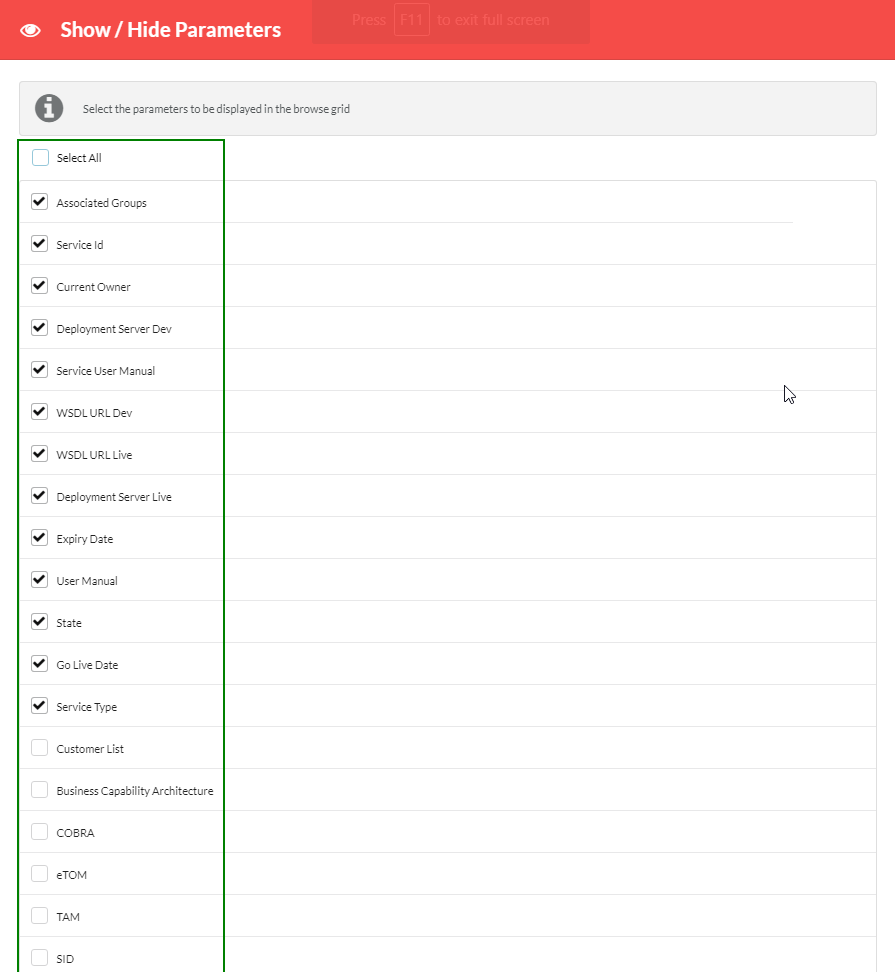
The Show/Hide Data option allows the user to select the parameters to show or hide in the Browse <Asset> Instances screen.
Bulk Access
To access instances in bulk:
Bulk access is the fastest way to manage multiple asset instance access. Users can perform actions like Edit, View and Delete on multiple instances of an asset simultaneously with the Bulk Access feature.
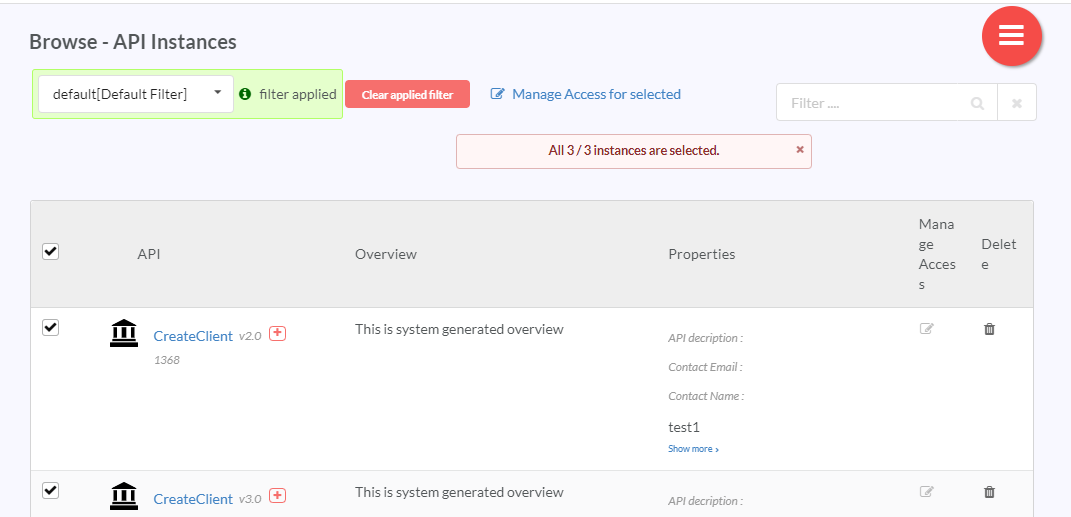
In the Browse <Asset> Instances screen, select the checkbox corresponding to the Asset Instance that you wish to manage. You can also deselect an instance by deselecting the checkbox corresponding to the instance.
To select all the instances of the asset, select the checkbox corresponding to the Asset Name in the header row.
Note
If you select the checkbox(es) before each instance, Manage Access option for all instances will be disabled. Selecting the checkbox(es) will also hide the Export Data option in the hamburger menu.
When you select all the instances of the asset, a dialog window displays asking you to confirm your selection. Click Yes to continue.
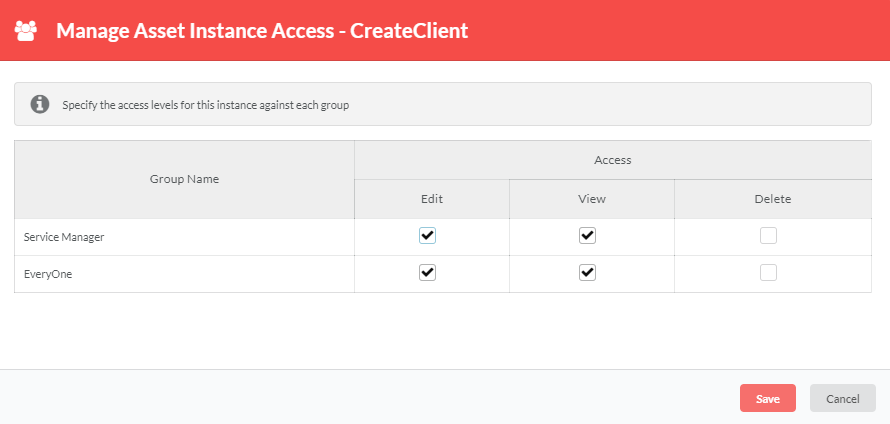
Click Manage Access for selected. The Manage Asset Instance Access dialog displays.
In the Manage Asset Instance Access dialog, click to select/deselect the checkboxes corresponding to the Groups for which you wish to allow/remove Edit/View/Delete access to the Asset Instance.
Click Save to save your selection. Upon saving, the changes will be reflected in all the selected Asset Instances.
Note
Manage Asset Instance Access and Manage Access for selected options will be visible only if Associated Groups check box is selected in Show/Hide Parameters dialog.
Note
In the Show/Hide Parameters dialog that can be accessed from the Browse <Asset> Instances screen, the Associated Groups check box must be selected for the Manage Access for selected option to be visible.
To select the parameters to display:
In the Browse <Asset> Instances screen, hover over the hamburger menu to view all its options.
Click the Show/Hide Data icon (
 ). A Show/Hide Parameters dialog displays.
In the dialog, Associated groups and asset instance version IDs display along with Parameters. By default, the dialog has Associated groups, Asset Instance version IDs and the mandatory Parameters selected for display.
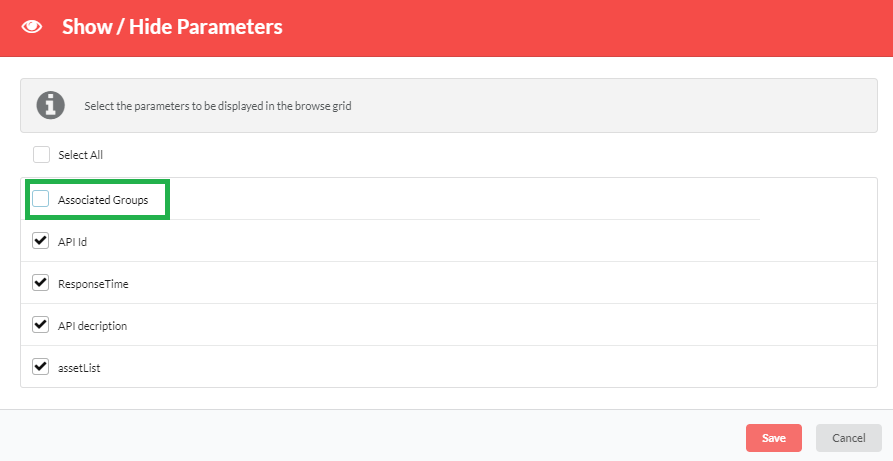
You can also hide the Manage Access column from the Browse <Asset> Instances screen. To do this:
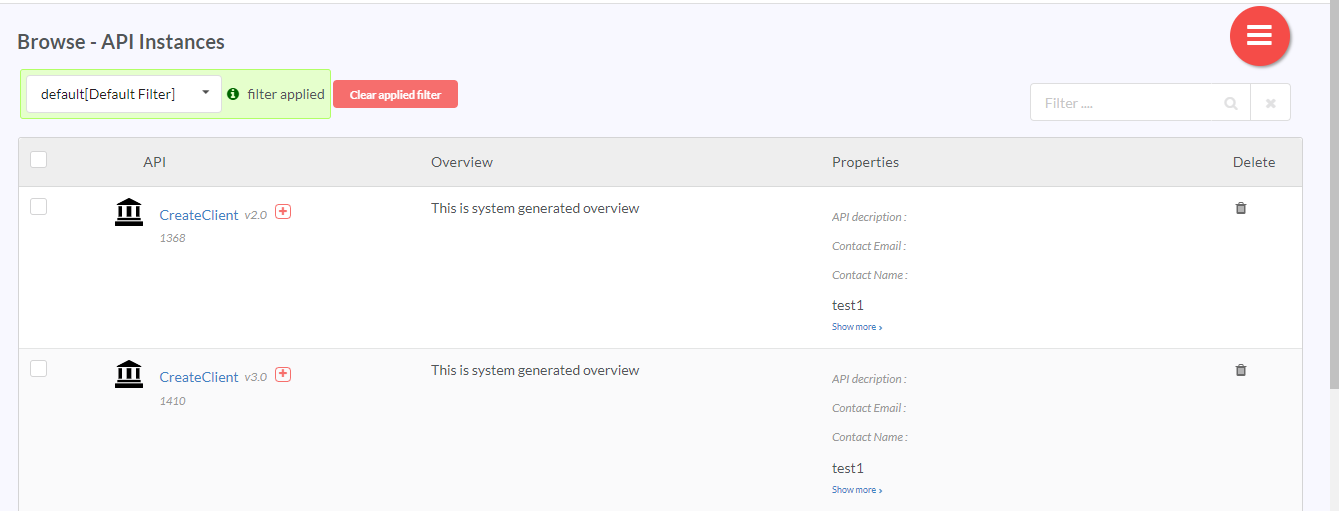
- In the Show/Hide parameters dialog, deselect the Associated Groups check box and click Save, to hide the Manage Access column on the Browse <Asset> Instances screen.
- Click Save to redirect to the Browse <Asset> Instances screen where the Manage Access column will no longer be visible.
Select the Associated Groups check box in the Show/Hide parameters dialog to make the Manage Access column visible on the Browse <Asset> Instances screen.
Note
In the Show/Hide Parameters dialog that can be accessed from the Browse <Asset> Instances screen, the Associated Groups check box must be selected for the Manage Access for selected option to be visible.
Click to select/deselect checkbox(es) corresponding to the Parameters you wish/do not wish to display.
Click Save to save the settings automatically for the current user; and subsequently the same settings can be used to display the browse grid when the logged-in user logs in again. Each user can have own configuration for displaying parameters.
Note
The Parameters available for viewing is controlled by the settings for category-wise access except for Associated Groups and Asset Instance version ID.
Note
Guest users do not have the Show/Hide Data option. Guest users can view only those Parameters as configured under Category-wise access and Default View settings by the admin.
Add Filter
The Filter option allows the user to filter data based on meta-data parameter values of Asset Types. It provides the user an interface to define and store criteria for filtering based on set criteria.
Here are a few points to note before you start using the Filter feature:
- Filter option is affected by the setting mentioned for Guest users in Manage Guest Access.
- All the parameters configured under the category-wise access across all Asset Types are available for defining criteria except Derived Attribute, Derived Computation parameter types and Derived attributes for Asset List, for which the values are derived from related Asset Instances.
- The user can use the ‘And’ and ‘Or’ operators.
- The order of definition of criteria is the order of evaluation.
- The specified query executes across all Asset Instances (across Asset Types) and the matching Asset Instances are included in the result set.
Note
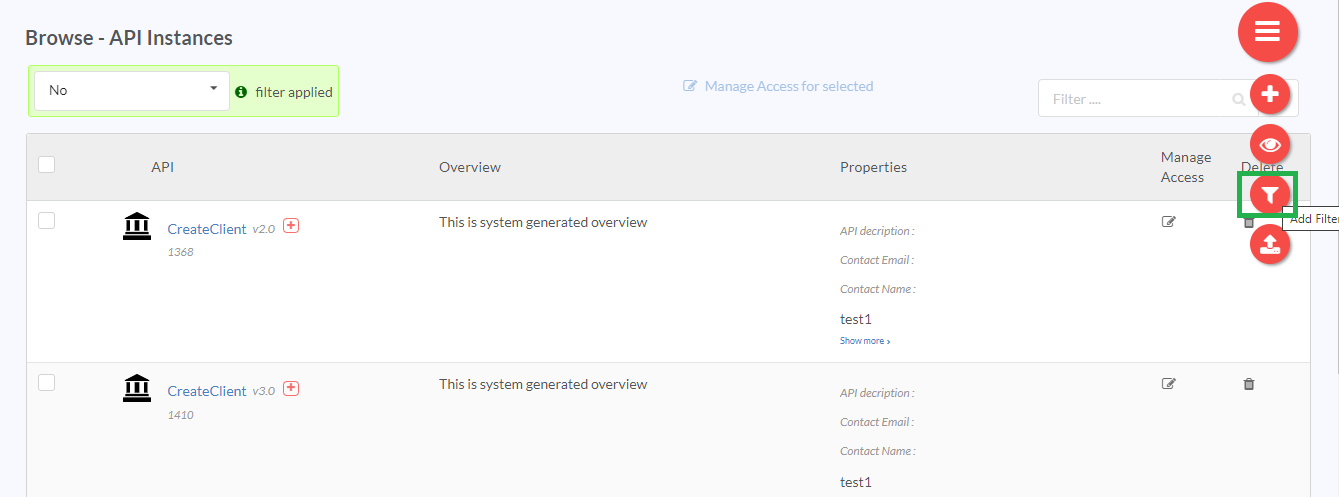
You can use the general filter option from the Browse - API Instances grid page for a quick narrowing down on the API instance(s) you are looking for. For more information, see: Using the Filter option.
To filter view:
In the Browse <Asset> Instances screen, hover over the hamburger menu icon to view all the menu options.
In the hamburger menu, click the Add Filter icon (
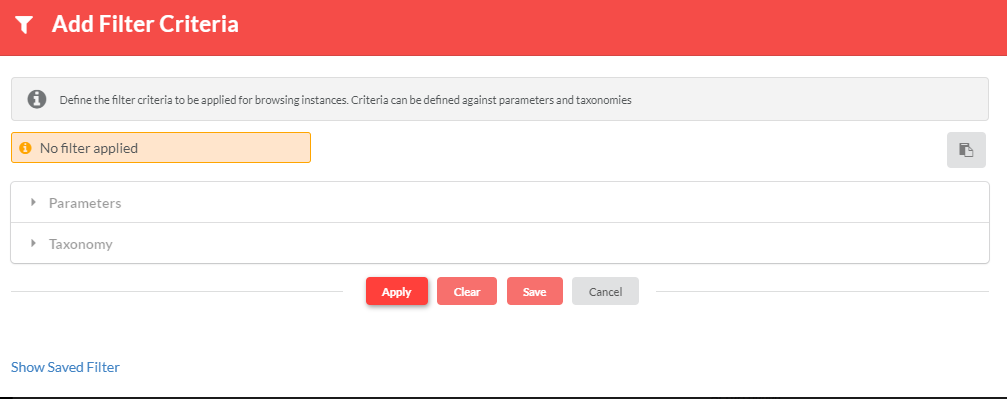
 ). The Add Filter Criteria dialog displays.
The Add Filter Criteria dialog contains collapsible tabs: Parameters and Taxonomy.
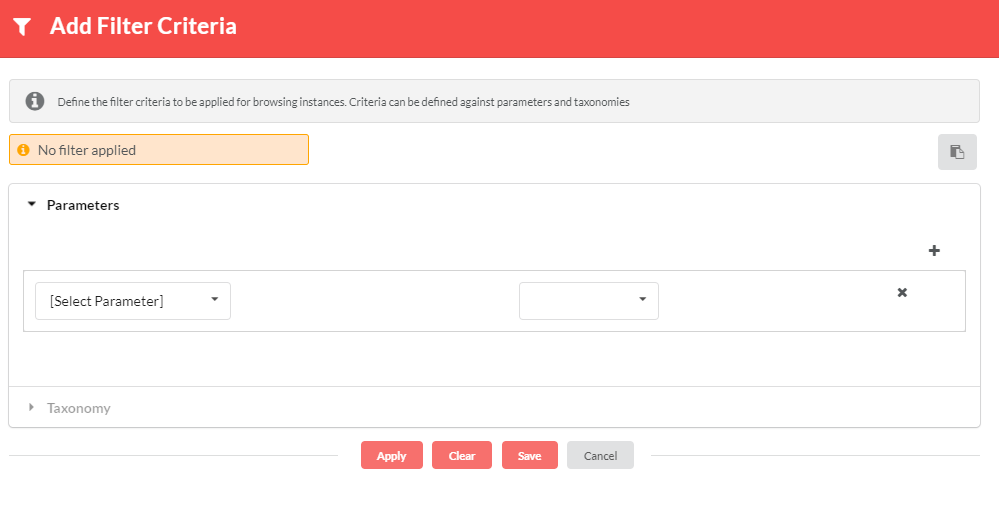
Click the Parameters tab to display the expanded view.
In the [Select Parameter] drop down box, click to display a drop down list, and then select a Parameter configured under Category access defined for the Asset Type.
Note
The [Select Parameter] drop down does not include the Parameter Types of Derived Attribute, Derived Computation and Derived Attributes for Asset List.
Note
Even though the parameter is deleted the filter name can still exist.
In the Operators drop down box, click to display the drop down list, and then select from operators: ‘equal to’ (=), ‘not equal to’ (!=), greater than (>), lesser than (<), greater than or equal to (>=), lesser than or equal to (<=) and Between.
In the third field, type or select the criterion for filtering the selected Parameter. Depending on the Parameter Type selected and its data type, a text box(for text), dropdown (for a list Parameter type; except in the case of Native User List and Ldap User list, a textbox displays for the user to type in a name to find an exact match), calendar box (for date type) displays. The available options differ based on the type of Parameter selected. If the Parameter selected is a list type or if the Parameter is a date type, it is a non-editable text box with a select date icon, or else it is a text box.
Click the Add icon (
 ) to add another set of filter to your Filter Criteria.
An And/Or drop down box displays. Click the Delete icon (
 ) to remove a criterion.
In the And/Or drop down box, click to display a drop down list, and then select logical operators ‘And’ or ‘Or’ for filtering. Select And for conjoining the criteria (needs both the criteria to be satisfied), or Or for satisfying either one of the criteria.
Click Apply to filter the grid rows based on the criteria defined. The result of the applied filter displays in the Browse grid along with the defined criteria. Once the filter is applied, the hamburger menu displays two additional menu options: Edit and Remove Filter.
(Optional) In the hamburger menu, click the edit icon to edit an applied filter.
(Optional) In the hamburger menu, click Remove Filter to go back to the original Browse <Asset Type> Instances grid.
To select Taxonomies for the filter condition, click the Taxonomy tab to display an expanded view of the taxonomies that were assigned to the Asset.
Note
Multiple Taxonomies are always considered as an “Or” condition.
To copy all the parameter and taxonomy values, click Copy filter request icon
 . The entire parameter and taxonomy values (including nested taxonomies) will be copied in JSON format.
Click Save to save the filter for future use.
In the Filter Name box, type a unique name for the saved filter.
To set the filter as the default filter, select the Mark as Default Filter check box. Deselect this box, if you do not want the filter to be the default filter.
Note
The filter will not be set as default filter unless this check box is selected.
Click Save. The Saved Criteria is now available for the user’s sole use, who can apply it anytime without having to add the same filter again.
To view the saved filter, click Show Saved Filter to display an expanded view.
To clear the filter criteria, click Clear. Clearing the filter criteria clears the criteria data from the filter criteria form. It will also disable the Actions button.
To load saved filter criteria:
In the Browse <Asset> Instances screen, hover over the hamburger menu to view all its options.
In the hamburger menu, click the Add Filter icon (
 ). The Add Filter Criteria dialog displays.
The Add Filter Criteria dialog contains the Show Saved Filter section that has the Saved Filters drop-down and the Actions button for the actions: Load, Update, Update & Set Default, Remove Default and Delete.
The Actions button will be disabled unless a saved filter is selected in the Saved Filters drop-down.
From the Saved Filters drop-down, select a saved filter. Click Actions and then click Load. The filter criteria loads into the Add Filter Criteria dialog.
(Optional) To update the saved criteria with any change that you would have made to the loaded filter, click Update.
(Optional) To update the saved filter criteria as well as set the saved filter as the default filter, click Update & Set Default.
(Optional) If the saved filter was also set as the default filter, click Remove Default to remove the default filter tag of the saved filter. This will clear the default filter from the Saved Filters drop-down and disable the Actions button.
Note
Remove Default option will only appear in the Actions list if the default filter is selected in the Saved Filters drop-down.
(Optional) To delete the saved filter criteria, select the saved filter criteria from the Saved Filters drop down, and then click Delete. The filter is deleted. It will no longer appear in the Saved Filters drop-down and the Actions button will also be disabled.
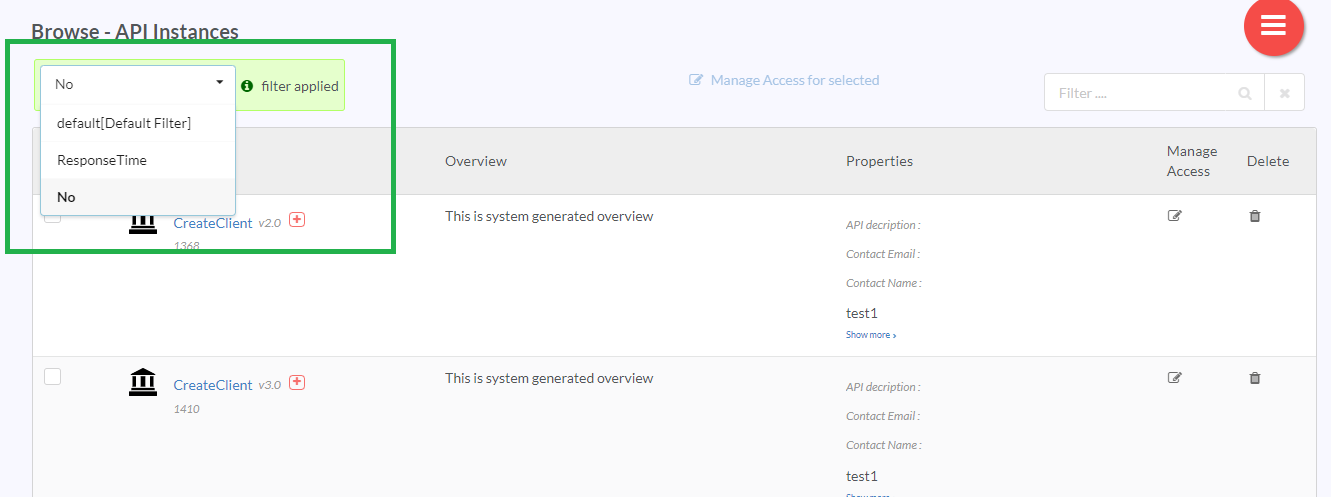
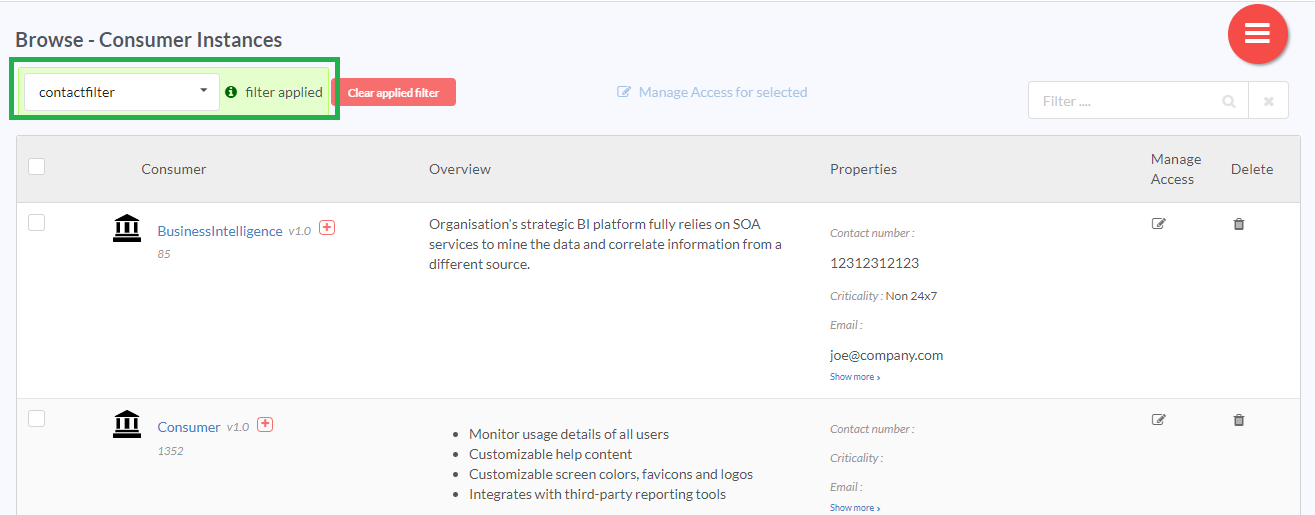
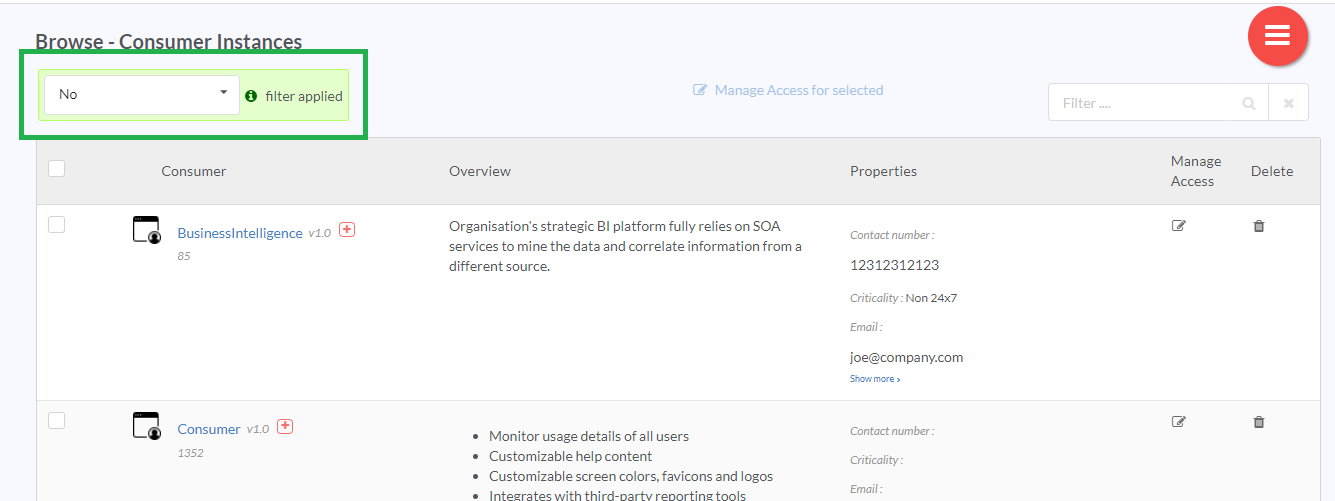
The Browse <Asset> Instances screen displays a drop-down list from which you can select a filter to set. This drop-down list will contain a list of saved filters, including the Default Filter and No filter. Click the drop-down to select the required filter.
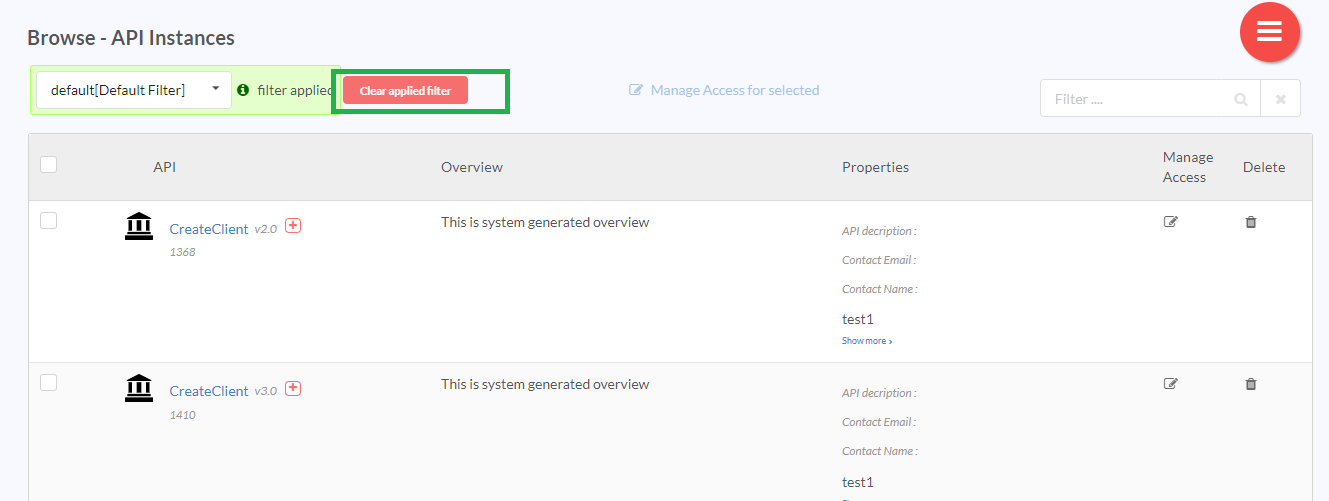
To clear the applied filter, click Clear applied filter.
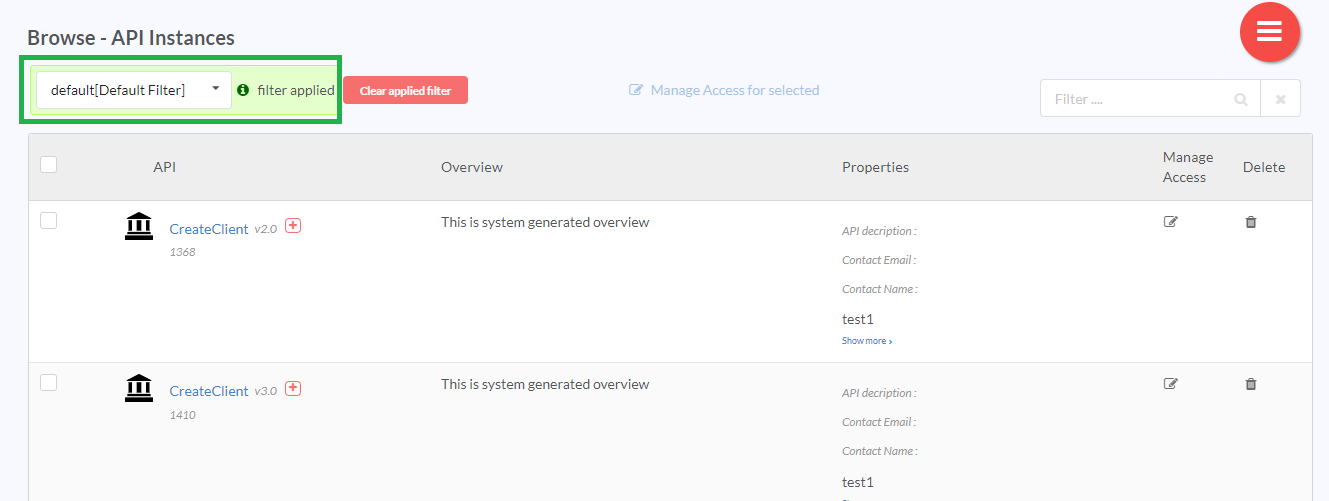
If you have already set a default filter, <Filter>[Default Filter] filter applied will be displayed on the Browse <Asset> Instances screen.
If you have already set a saved filter, <Filter> filter applied will be displayed on the Browse <Asset> Instances screen.
If you have not set a filter, <No> filter applied will be displayed on the Browse <Asset> Instances screen. This will be also displayed if you delete the default filter or selected filter. You can either select a filter to apply from the drop-down or set a new filter using the Add Filter option in the menu.
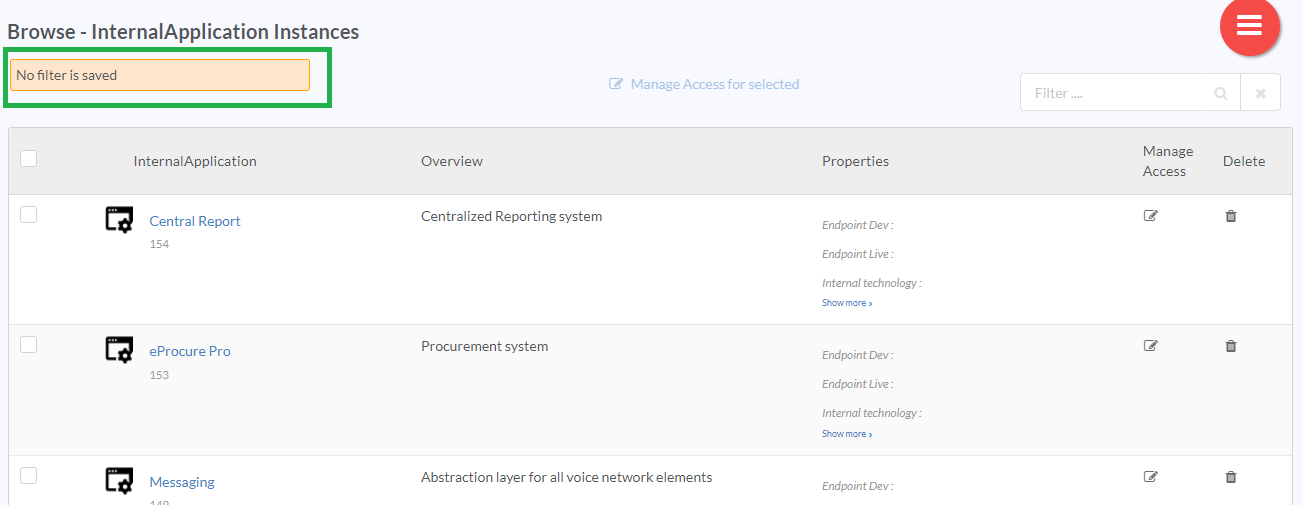
No filter is saved message will be displayed if you have not saved any filter or if you delete all the saved filters.
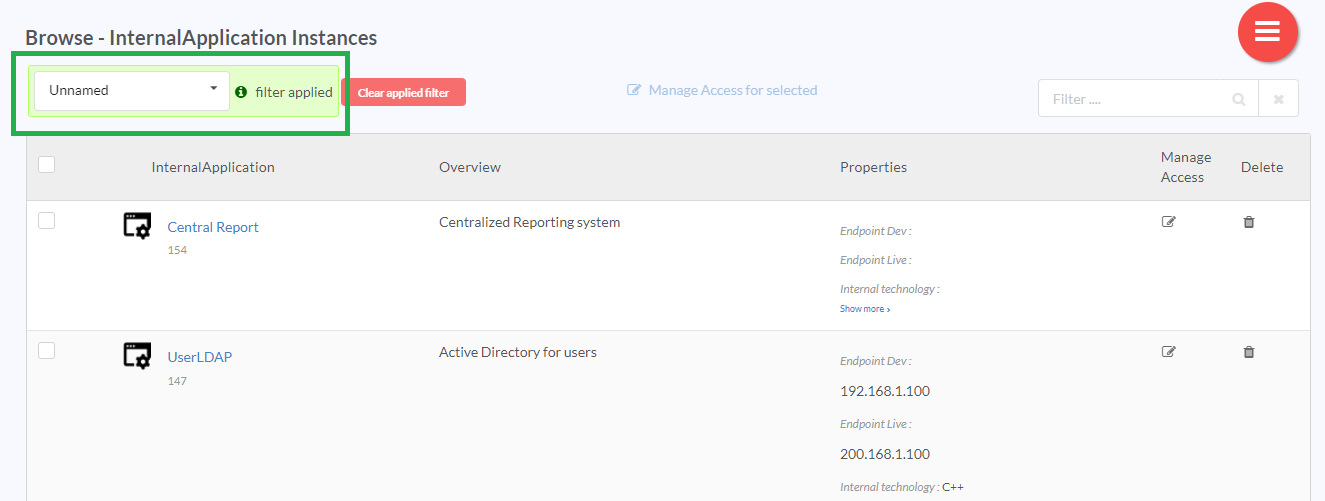
If you create a new filter in Add Filter Criteria dialog and click Apply without saving it then <Unnamed> filter applied will be displayed on the Browse <Asset> Instances screen. Unnamed will also temporarily display in the drop-down until the filter is cleared or a new filter is applied.
Export Data
Logged-in users have the option to export the Browse or Filter result derived from Show/Hide Data to an Excel file.
To export filtered data, in the hamburger menu, click the Export Data icon.
Only those records that are on view; after taking into account any filter and/or show/hide columns settings applied, are included for the export. The Export includes the Taxonomies and Tags for the Asset Instances, as well as the Relationships.
Note
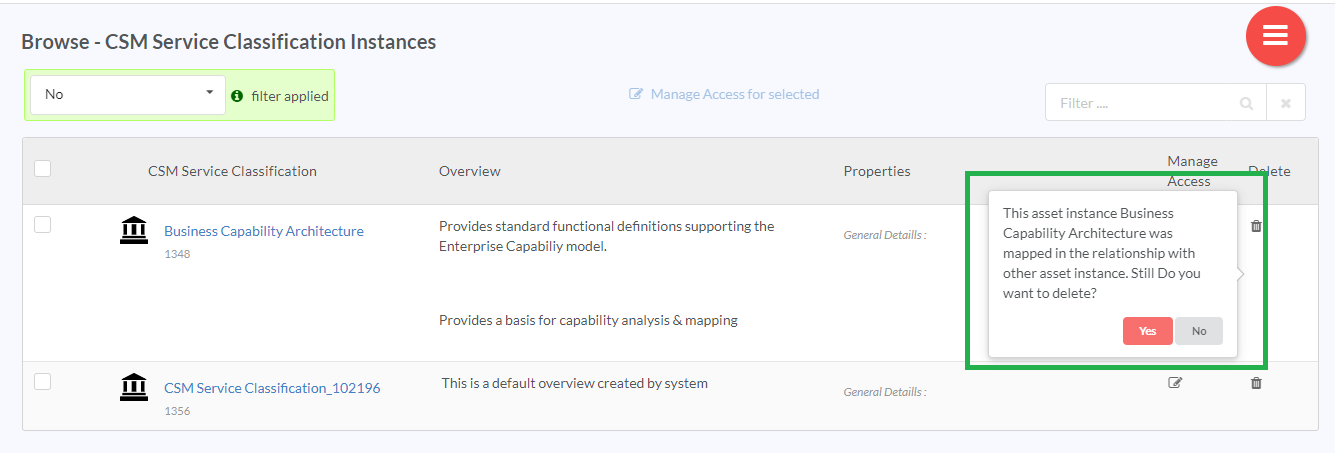
When an instance is mapped to another instance in relationship tree, and if user tries to delete destination instance, confirmation message about the instance being mapped will be shown in the UI.
5.2. Browse By Taxonomies
To browse Asset Instances by Taxonomies:
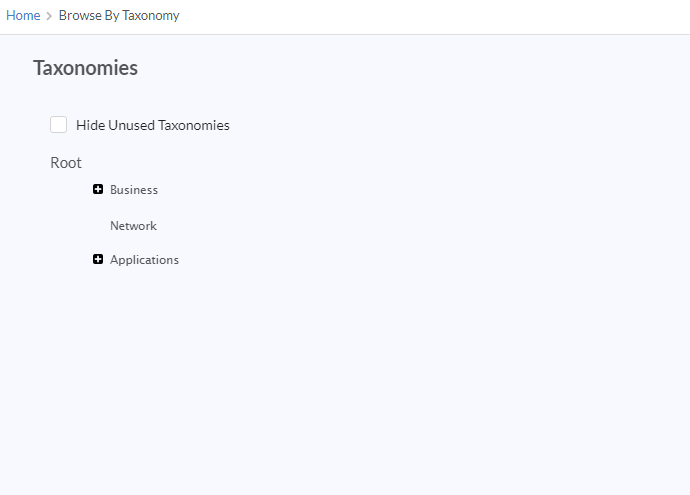
In the main Navigation menu, click Browse > By Taxonomy. The Taxonomies screen displays with a tree-view of all the Taxonomies defined in the Repository.
In the Taxonomies screen, navigate to the node in the Taxonomy Tree that you wish to browse, and then click the node to display a grid containing all Assets and their Asset Instances, which have been assigned the Taxonomy. Each Asset Instance in the grid under the column Asset instance Name is a hyperlink, which takes the user to the View/Edit Asset Instance screen for that Asset Instance. Each Asset in the grid under the column Asset Name is a hyperlink, which takes the user to the Browse <Asset> Instances screen.
(Optional) Click to select the Hide Unused Taxonomies check box to hide Taxonomy node(s) in the Tree that has not been assigned to any Asset Instance.
